

As a business owner, it is your wish to keep your data accurate despite all the other things you have to deal with. Do you also wish to keep your business accounting data accurate and error-free?
If this is what you want, you need to know how to add month-end accruals in QuickBooks. The month-end accruals are either expenses or revenues that you have earned in a month but haven’t paid or received back. If you add them to QuickBooks, you can ensure that your financial statements will reflect your financial conditions. They follow the generally accepted accounting principles (GAAP).
What are month-end accruals? Why are they important?
In Accounting, Accruals is a method that records revenues and expenses whenever they are earned or incurred. All this is tracked regardless of when the cash is exchanged. With the help of this method, you get a more accurate view of a company’s financial side. You get to learn if a company has strong financial health by matching the revenues and expenses to the period they relate to.
Expenses or income that you have accrued or earned during a month but have not yet paid for or received are known as month-end accruals. In the event that a customer owes you money for a service you rendered in January but will pay you in February, for instance, you will have accrued revenue. Similar to this, you have an accumulated expense for the amount you owe if you receive an invoice for a power bill in January and decide to pay it in February.
Because they enable you to record your financial transactions in the time period in which they happen rather than when the money is transferred, month-end accruals are crucial. You'll be able to see your company's performance and financial situation more clearly in this method. Additionally, accrual accounting aids in adherence to GAAP, the set of guidelines that control financial reporting.
How do you Add Month-end Accruals in QuickBooks?
We all know that QuickBooks is a popular accounting software. It allows you to easily add month-end accruals. The process usually involves creating a journal entry for each accrual and posting them to the appropriate accounts. Here are the steps to follow:
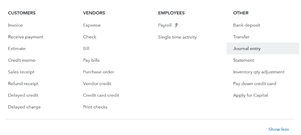
Start by clicking on the +New button which is at the top left corner of the screen. This will open a menu with different options for creating transactions.
Then click on the journal entry under Other. This will open a form where you can enter the details of your journal entry.
Now enter the date and entry number of the journal entry. It is important that the date should be the last day of the month for which you are recording the accruals. Please note that the entry number should be sequential and unique for each journal entry.
Select the expense account for accrual in the Account column for the first line. For example, select Utilities Expense, if you have an accrued utility bill.
On the same line of the Debit column, enter the amount of the accrual. For example, in case your utility bill is $100, enter $100.
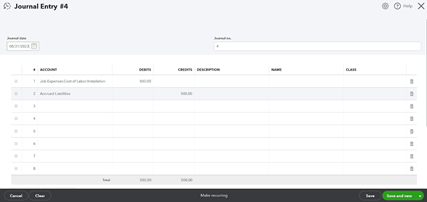
In the second line's Account column, choose the Accrued Liabilities account. This liability account is used to keep track of the money you owe but haven't paid. If not, you can open one by selecting Other Current Liabilities as the account type when you click on Add New.
On the same line, enter the same accrual amount in the Credit column. Enter 100, for instance.
In the Description or Memo areas, you have the option to optionally add a description or memo for the journal entry. Later on, this will assist you to clarify and define the journal entry's goal.
Click save and close.
In QuickBooks, you have successfully added a month-end accrual. These procedures can be repeated for each accrual that needs to be documented.
How to do Reverse Month-end Accruals in QuickBooks?
The next step you need to initiate when you receive or pay the amount is to reverse the accruals created earlier in QuickBooks. This implies that you create a new journal entry that cancels out the original journal entry. If you do this, you avoid double counting the revenue or expense in both periods. Here in detail, we explain instructions for reversal accruals in QuickBooks.
- In the upper left corner of the screen, click the + New button.
- Select Journal entry from the Other menu.
- Locate the journal entry you wrote for the accrual during the prior time frame. To find it, utilize the Journal no., Date, or Description fields.
- The first day of the current period should be used as the date. Change the date to February 1st, for instance, if you created the accrual journal item on January 31st.
- At the bottom of the Journal Entry box, select Reverse. The original journal entry's debits and credits will be immediately switched as a result.
- To close, click Save.
This is all. You have now successfully reversed an accrual in QuickBooks. You can repeat these steps for each accrual you need to reverse.