


In QuickBooks, managing inventory and item lists sometimes requires deleting multiple items. QuickBooks offers both easy and more complex methods for performing this process. This article explains the methods you can use to easily delete multiple items from your QuickBooks account.
Table of Contents
Why Would You Need to Delete Multiple Items in QuickBooks?
Managing your data is essential for keeping your financial records accurate. There are several reasons why you might need to delete multiple items in QuickBooks:
- Correcting errors: If you’ve accidentally created items or added duplicate items, you’ll need to delete them to keep your data accurate.
- Cleaning up your file: Over time, you may need to remove old or unused items to keep your QuickBooks file clean and running efficiently.
- Restructuring your data: When you reorganize your accounting categories or item lists, you may need to delete several old items.
- Improving software performance: Too many unused items can slow down QuickBooks. Deleting them can help your software run more smoothly.
- Complying with regulations: Certain regulations or laws may require you to delete specific types of data entries.
How to Delete Multiple Items in QuickBooks
- Open QuickBooks and log in to your company file.
- Go to the “Lists” menu. Select “Item List” (on Windows) or “Items” (on Mac).
- To select multiple items, hold down the Ctrl key (Windows) or the Command key (Mac).
- Right-click on the selected items.
- From the pop-up menu, click “Delete Item.”
- Confirm the deletion when prompted.
Important to Remember while Deleting the Items
- Keep in mind that you are not allowed to delete the entire list of items at once or delete several items together.
- Deletion should be reverted immediately in case you deleted an item. Before reverting, if some other action is performed by you, then reversing becomes impossible.
- If the item is deleted by mistake, then go to the Edit menu immediately and select Undo Delete.
Read more: How to Delete A Payment In QuickBooks
How to Batch Delete or Void Transactions in QuickBooks Desktop Accountant Edition
To Quickly delete or void multiple transactions at once, use the Batch Delete/Void Transactions utility (BDT).
Note:
- This feature can be found exclusively in QuickBooks Desktop Accountant 2024, Enterprise, Enterprise Accountant 24.0, and subsequent versions.
- To access this feature, you must log in as an Admin or External Accountant user.
- Unfortunately, the Batch Delete/Void Transactions tool does not have support for multi-currency transactions.
Batch Delete or Void Transactions
Note: It is not possible to batch delete or void the transactions below. You can still delete them individually.
- Invoices that include reimbursed expenses, timesheets, mileage, or items.
- Invoices that include billable time and costs.
- Paychecks issued to employees.
- Payroll Liability Checks are made to settle payroll-related obligations.
- Sales Tax Payments are made to fulfill tax obligations.
- Online Bill Payments are made for bills or invoices.
- Any transaction that occurred in a closed accounting period.
Choose Edit, Then Delete to Delete Each transaction Individually
- Access the File menu and choose Switch to Single-user mode. Do not select Switch to Multi-user mode if it appears.
- Navigate to the Accountant menu and select Batch Delete/Void Transactions.
- Choose the transactions you wish to delete or void from the list of Available Transactions.
- Select Review & Delete (or Review & Void).
- Opt for Back Up & Delete or Back Up & Void. Alternatively, you can skip the backup and choose Delete only or Void only from the dropdown menus.
- Select Yes to confirm you want to delete or void the transactions.
View Deleted/Voided Transaction Report allows you to print a copy of the deleted or voided transactions after deleting or voiding them.
Delete or Void Specific Transactions
Filter for Specific Transaction Types
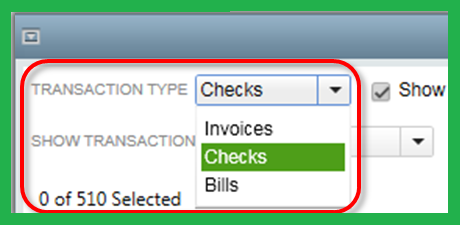
You have the option to delete or void specific types of transactions. To do this, open the Transaction Type dropdown menu and choose a transaction type. These transaction types will be listed, allowing you to delete or void them. The “Bills” option encompasses bill payment checks, bill refunds, bill credits, refund checks, and finance charges.
Show/Hide linked or voided transactions.

To display transactions linked to the selected transaction, check the box labeled “Show linked transactions.” This will reveal transactions that are connected to the selected transaction, such as a paid invoice accompanied by a payment. These linked transactions will be listed in the “Linked Trns” column of the Available Transactions list.

Filter Transactions
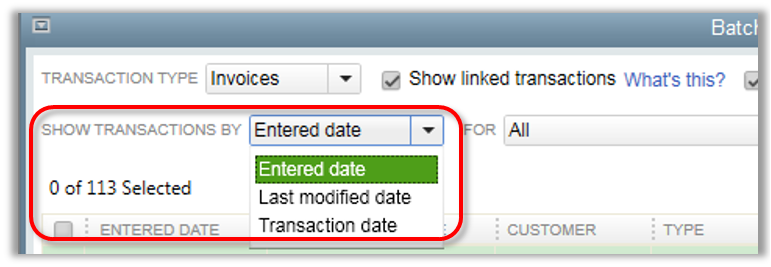
From the Show Transactions by dropdown menu, select Enter date, Last modified date, or Transaction date to filter transactions.
Frequently Asked Questions
How do I create an item in QuickBooks?
Follow these steps to create an item in QuickBooks:
- Initially, go to Item List from the Lists menu.
- Next, select Item and then click on the New button.
- Now, choose the type of item that you wish to create.
- After that, fill out the required fields.
- Click on “Custom Fields”, if you want to add your own customized fields.
- Finally, save the item.
How do you duplicate your items in QuickBooks?
You can easily duplicate your items with these easy and simple steps:
- Go to the Lists menu and then select “Item List” for windows
- Or select simply “Items” for Mac
- Next, highlight the items that you want to copy
- Now, select “Duplicate Item” a right-click on the item
- If you want, you can make needful changes to the item’s information
- The “DUP” will be appended to it and the name of the item will be the same
- You can also rename the item as desired
- At last, hit the “OK” button.
How do I make my items inactive in QuickBooks Online?
A batch action feature in QB Online allows you to make your items inactive in just a few simple steps:
- The very first, go to the Gear icon
- Next, choose the Products and Services
- After that, mark the items that you wish to remove
- Using the drop-down menu, select “Batch Actions”
- Now, select the “Make Inactive” option
- In the end, press the “Yes” button to complete the entire action.
How do I delete multiple Entries in QuickBooks?
Below are the mentioned to delete multiple entries in QuickBooks:
- Access your QuickBooks Online account and navigate to the Banking tab.
- In the “For review” section, select the checkboxes next to the transactions you wish to remove.
- Click on the “Exclude” option.
- Move to the “Excluded” section and select the checkboxes next to the transactions you want to delete.
- When you’re ready, click on the “Delete” button.
How do I delete items in QuickBooks?
Here are the mentioned steps to delete items in QuickBooks. Follow all the steps carefully:
- Open QuickBooks on your computer.
- In the menu bar, click on “Lists.”
- For Windows: Choose “Item List.” For Mac: Choose “Items.”
- Locate and select the item you wish to delete from the list.
- Click on the “Edit” option in the menu bar.
- From the drop-down menu, select “Delete Item.”
- QuickBooks will prompt you to confirm the deletion. Click “Yes” to proceed.
- The selected item will be permanently removed from your item list.
How Do I Edit Multiple Items in QuickBooks Desktop?
Steps to edit multiple items in QuickBooks Desktop, follow all the steps carefully:
- Open the window to Add/Edit Multiple List Entries.
- Click on the List drop-down arrow and choose the specific list you wish to manage.
- If there are existing records in your list, you can apply filters to view a specific record or a set of records.

