When switching to the multi-user mode in QuickBooks, you encounter error code H202. Don't worry, as we are here to help you. We will explain to you the effective ways to resolve this error. It is a common problem when you use QuickBooks Desktop in multi-user mode. To learn about all of the causes and troubleshooting solutions for this QuickBooks issue, we encourage you to read this blog to the conclusion.
Typically, this error occurs when users attempt to use QuickBooks in multi-user mode, or if QuickBooks cannot open a company file on another system. The error window that pops up may indicate that the multi-user connection to the server is denied.
The error message associated with the error code h202 denotes that the QuickBooks company file is located on a different computer and QuickBooks needs assistance connecting. Multi-user mode errors can prevent you from opening a company file stored on another computer. The easy fixes provided here are available, or you can contact our QuickBooks error support team.
What is QuickBooks Error H202 (Multi-User Switching Issue)?
Server computers store QuickBooks company files (QBW) on a multi-user network. Workstations are other computers connected to the network (but do not host QBW files). When a workstation fails to access a company file placed on another computer, it results in a QuickBooks error H202. This error message reads as follows:
| Problem | You are trying to work with a company file that is located on another computer, and this copy of QuickBooks cannot reach the server on that computer. (H202) |
| Problem with multi-user hosting setup | QuickBooks could not open the file in multi-user mode. (H202) |
On the computer where the company file is located, open the start menu, then open QuickBooks Database Server Manager. The Database Server Manager will scan your files and restore the connection.
What Causes QuickBooks Error H202?
The QuickBooks error code H202 occurs when QuickBooks Desktop attempts to connect to the company file, but can't communicate with the server because:
- Incorrect hosting configuration settings.
- The server computer firewall is blocking incoming and outgoing communication.
- Conflict with DNS server.
- The network data file (.ND) is corrupt or damaged.
- This snag may also show up when the exchange of company data between QuickBooks and the server is blocked by the system firewall.
- DNS settings may be inappropriately configured, leading to the error.
- The IP address of the Host or the server may not be available to QuickBooks Desktop.
- Essential QuickBooks services like the QBCFMonitor or QuickBooksDBXX are not running in the background.
- QuickBooks Database Server Manager might be having specific issues.
Signs and Symptoms of QuickBooks Error Code H202
The following are the common symptoms of QuickBooks' Multi-user switching Error H202:
- This error prevents you from switching to multiple-user mode in Quickbooks.
- Even after consistent attempts, you can’t open a company file located on another computer.
- The QuickBooks error code H202 message appears on your computer screen.
- During operation, QuickBooks freezes or stops working for a few seconds.
- The performance of your Windows is extremely slow.
Undo QuickBooks Multi-User Mode Error H202 using the following techniques
Here are the steps you need to take to fix QuickBooks error Code H202 in QuickBooks Desktop. If one doesn't work, try another -
Solution 1: Test Network Connectivity
You can check your network connection by pinging your server from the workstation that is receiving the error H202.
NOTE: If you don’t know your server name, you will need to turn on “Network Discovery” on your server computer and any workstation receiving the error.
Follow these steps to ping your server:
- Type run into the Windows search bar to open the Run window.
- In the Run window, type cmd into the search box, and click Enter.
- Enter ping [servername] to ping the server name from your workstation, and press the Enter key.
Solution 2: Verify QuickBooks Services
The following steps can be followed to start multi-user hosting mode on a server running a full version of QuickBooks:
- On the server, you should open QuickBooks desktop.
- After that, navigate to File and then Utilities.
- Then choose Host multi-user access.
To verify the running status of QuickbooksDBXX and QBCFMonitorService on the server, follow these given quick steps:
- You need to open the Run window.
- After that type in services.msc in the text field and hit a click on OK.
- The next step is to choose QuickBooksDBXX.
- Also check the Startup type, if it is Automatic or not.
- If in case the Startup type is not set as Automatic then do it now.
- Make sure the Service status shows Running after that.
- Now, head to the Recovery tab and choose it.
- Select Restart the service for first, second, and subsequent failures from the drop-down menus.
- Now, you need to hit Apply and then pick the OK button to confirm the changes.
- The above steps must be performed for the QBCFMonitorService.
Solution 3: Download and Run the QuickBooks File Doctor Tool
- In the very first step, close your QuickBooks Desktop
- Save the QuickBooks Tool Hub file to your system after downloading it
- When you're finished, double-click on the QuickBooksToolHub.exe file to open it
- Next, install it by following the on-screen directions and agreeing to the terms and conditions
- Open the QuickBooks tool hub by double-clicking the icon

- Go to the tab for company file issues
- After that, choose to Run the QuickBooks File Doctor tool
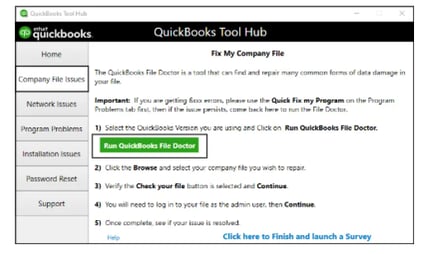
- In the file doctor tool, pick the company file from the drop-down option
- If you are unable to locate the company file, select Browse and Search from the drop-down menu
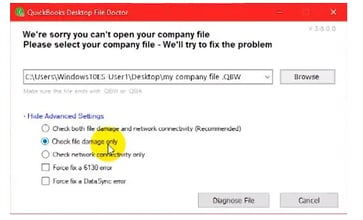
- Select the option to check your file, then click on the Continue tab
- After that, enter your QuickBooks admin password and choose the next option
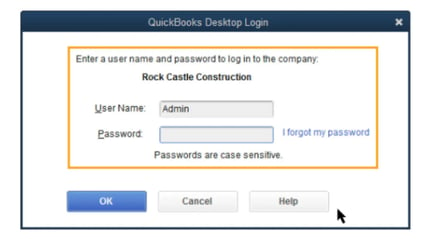
- The last step is to open the QuickBooks Desktop as well as the company file to verify whether the error is resolved or not.
Solution 4: Restoring the backup file of the QBW file
When you try to run the QuickBooks File Doctor and are unable to run it. Then to resolve it, follow the below guidelines:
- Firstly, you create a backup for the files that are co. The backup files help in supplanting the tainted files with the saved ones.
- Then, you need to open QuickBooks and click on the "File"
- Hit the next click on the "Open or Restore Company" option
- Click on the choice that states "Click Open or Restores a Backup Copy" and proceed by clicking on the "ok" button.
- Now you have to choose the "Local Backup" and click on the "Ok" button.
- A drop-down menu will show up on which you should peruse and choose the location for backup
- You should choose the file that has a ".QBB expansion" and afterward proceed by clicking on "Open" and lastly on "Next".
- A Save In drop-down menu will show up from which you need to choose the location for the restored files
- You should place the name of the file in the name field. A "Save as" field will naturally spring up with the section of the "*.QBW" file.
- You should press the "Save" catch to end this process.
Solution 5: Assemble the Computer Firewall Settings
- Press the beginning button and explore QuickBooks info Server Manager.
- Choose QuickBooks info Server Manager from the list and click on the Port Monitor choice.
- Note the Port range of your version of QuickBooks Desktop.
- Currently, click the beginning button once more and explore for Windows Firewall.
- Choose Windows Firewall and click on the Advanced Settings choice from the left.
- Currently, right-click the inward Rules choice and hit New Rule.
- Click Port, and so hit Next.
- The communications protocol choice should be enabled.
- Now, checkmark the particular native Ports and enter the port range within the text box.
- Click Next and opt to permit the association.
- Click Next and sort a reputation for this new rule.
- Currently, follow equivalent steps to line the departing rules for QuickBooks.
Solution 6: QuickBooks Services are Running
Make sure that QuickBooks DBXX (where XX represents the year of QuickBooks) and QBCF Monitor Service are running on the server PC. To use the multi-user mode of QuickBooks services, follow the below pointers.
- Initiate the primary step by writing ‘services .msc’ within the Windows search bar. Move ahead and press the Enter key.
- Look out for QuickBooks DBXX service to appear within the Services window. If this doesn't seem, then follow these given steps:
- make certain that the info server manager is put in on the server properly
- Look out for the corresponding, up-to-date info Server Manager. Once a year once the installation of QuickBooks Desktop on the user’s PC, the Manager conjointly gets an associate upgrade.
- In case, the complete program is running on the PC, one must make sure that hosting is enabled on the server.
- The consecutive step ought to involve double-clicking the QuickBooks DBXX service. Once the service commences, it ought to show either Running or Begin choice.
- Within the following step, choose ‘Restart the QuickBooksDBXX Service' for the primary, second, and later failures below the Recovery tab.
- Merely repeat points one,2,3, and four as mentioned higher than for the QBCF Monitor Service.
Having followed all the said steps, the user needs to open QuickBooks in multi-user mode on every of the work computers. This can be done to ascertain if the ‘QuickBooks multi-user mode, not working issue has been resolved or not.
If the matter persists and therefore the error message seems, the user must check the membership of QuickBooks DBXX service.
Solution 7: Add the server to the Windows host file
- Find the IP address and computer name of the server & workstation
- Press the “Windows + R” keys to open the Run window on the Server.
- Now type cmd and hit Enter to open a Command Prompt window.
- Type ipconfig /all and then hit Enter and take note of the Host Name and the IP Address.
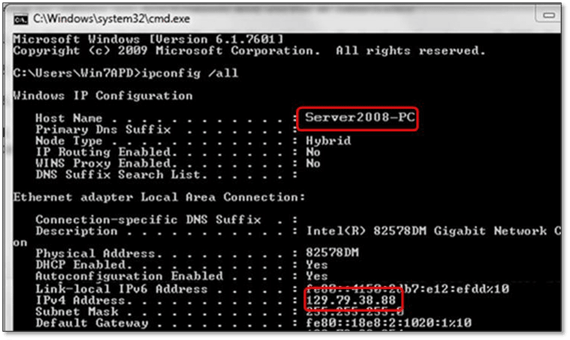
- Repeat steps 1-4 on any additional computer connected to the server.
- Edit Windows hosts file
After executing the above steps, try opening the company file in multi-user mode. If this doesn’t work, proceed to the next solution.
Solution 8: Check Host Mode on every of the User Computers
- Now, open the QuickBooks File menu on the user's PC, followed by Gap Utilities.
Note: If Host Multi-User Access seems on the list, the user must move to a consecutive PC. This merely denotes that the actual PC isn't the system hosting the corporate file.
- If Stop Hosting Multi-User Access seems on the list, one needs to disable hosting, followed by sanctionative QuickBooks single-user mode.
- Once you make sure that hosting mode is off on all the user computers, one ought to scan for the QuickBooks multi-user mode not operating error.
Solution 9: Set up and use the QuickBooks Tools Hub on your server
Intuit's QuickBooks File Doctor is a reliable, troubleshooting tool for diagnosing and troubleshooting various types of QuickBooks errors, including Error codes H101, H202, H303, and H505. To use this tool, you have to download it (if not already downloaded) from Intuit's official website and install it. This process involves the following steps:
- The first thing you need to do is download and install QuickBooks file doctor.
- Open the tool from the QuickBooks tools hub by selecting company file issues.
- Choose the Company file from the drop-down menu. If you are unable to find the file, hit Browse and search.
- After that, click on the checkbox for your file and then tap Continue.
- After entering the QuickBooks admin password, select Next.
- After the scan has been completed, you are recommended to open the QuickBooks software and the company file. The scanning time depends on the size of the file, and in the majority of cases, it may take up to 5 minutes.
Solution 10: Restart QuickBooks Database Server Manager Service
Here's how to resolve the H202 error in QuickBooks by restarting Database Server Manager:
- Open the Run window, type services.msc, and then click OK.
- Right-click QuickBooksDB19 (2009), QuickBooksDB18 (2008), or QuickBooksDB17 (2007) and select Stop.
- Right-click and select Start. Then close the window.
- Display extensions for known file types.
- Right-click the Windows Start button and select Explore > Tools > Folder Options.
- Click the View tab and clear Hide extensions for the ‘known file types’ box.
- Again click the View tab, select Show hidden files and folders, and then clear the ‘Hide protected operating system files’ box.
- In the Warning window, click Yes, and then hit OK.
- Close Windows Explorer.
Final Words
This is the end of our blog on QuickBooks Error H202. We hope that after reading the information mentioned above, you will be able to better understand and resolve this company file on another computer h202 error. It is recommended to consult an expert as soon as possible when nothing seems to be working.


