

The Invoice Payment History report displays payments linked to invoices. It comprises invoice dates, payment dates, paid amounts, and balances. An invoice payment history report is helpful.
- Monitoring payments and handling accounts receivable.
- Identifying overdue invoices and payment patterns.
- Evaluating data to improve cash flow.
- Regular tracking ensures precise records and customer insights.
This guide explains how to view, record, and customize the Invoice Payment History report.
Table of Contents
- 1 How to View Invoice Payment History Report in QuickBooks?
- 2 How to Record Invoice Payments in QuickBooks?
- 3 How to Record Partial Payment for an Invoice?
- 4 How to Record Payments for a Single Invoice?
- 5 How to Record Payments in QuickBooks Solopreneur?
- 6 How to View Remaining Customer Balances?
- 7 How to Record Multiple Group Payments Together Into a Single Deposit?
- 8 How to Customize Reports in QuickBooks?
- 9 How to Create a Report that shows Invoices Paid by Each Customer?
- 10 How to Run a Report Showing Advanced Customer Payments?
- 11 Final Words
- 12 Frequently Asked Questions
How to View Invoice Payment History Report in QuickBooks?
View your QuickBooks Online payment history directly in the product, using these steps:
- Click on Reports.
- Then select Customers and Receivables.
- After that choose the Transaction List by Customer.
- Then get the range of the desired date changed in the From and the To fields.
- Tap on Customize Report present on the right side of the upper corner.
- Click on the tab of Filters.
- Then in the left table of Choose Filter find as well as choose the Paid Status and then select Closed.
- Then get back to the table of Choose Filter and then find the Transaction Type.
- After that tap on the drop-down arrow and then select Invoice.
- Then tap on OK to get the report running.
Read this: How to Record a Refund From a Vendor in QuickBooks
How to Record Invoice Payments in QuickBooks?
Create and send an invoice when a customer intends to pay in the future. Record the payment once they pay to link it to the invoice and balance the accounts. QuickBooks Payments automates this procedure. It processes payments and classifies them automatically.
Notes:
- Record payments after processing them to mark invoices as paid.
- Leaving payments unrecorded keeps invoices open and unpaid on reports.
- Record full or partial payments.
- QuickBooks monitors any remaining balance.
How to Record Partial Payment for an Invoice?
Here are the steps to record partial payment for an invoice:
- Choose the “+ New” button.
- Choose the “Receive Payment” option.
- Choose the customer’s name from the Customer dropdown.
- Select the payment method from the Payment Method dropdown.
- Choose the account from the “Deposit to” dropdown.
- Add the payment amount in the “Amount Received” field.
- Choose the checkbox for the invoice in the “Outstanding Transactions” section.
- Add the “Reference No.” and “Memo” if required.
- Choose the “Save and Close” button.
How to Record Payments for a Single Invoice?
Here are the steps to record payment for a single invoice:
- Choose the “+ New” button.
- Choose the “Receive Payment” option.
- Choose the customer’s name from the Customer dropdown.
- Select the payment method from the “Payment Method” dropdown.
- Choose the account from the “Deposit to” dropdown.
- Choose the checkbox for the invoice in the “Outstanding Transactions” section.
- Add the “Reference No.” and “Memo” if required.
- Choose the “Save and Close” button.
Read this: How to Record Sales Tax in QuickBooks
How to Record Payments in QuickBooks Solopreneur?
Here are the steps to record payments in QuickBooks Solopreneur:
- Go to the option “Get Paid” and choose the “Invoices” option.
- Locate the unpaid invoice and choose the option “Receive Payment”.
- Choose the account from the “Deposit to” dropdown.
- Add the payment amount in the “Amount” field.
- Choose the payment date in the “Payment Date” field.
- Choose the “Save” button.
How to View Remaining Customer Balances?
To check remaining customer balances, follow these steps:
- Go to the “Reports” option.
- Open the “Customer Balance Summary” report.
- Choose the “Run Report” option.
- Review the customer’s open balance in the “Total” column.
Note: QuickBooks implements partial payments to invoice line items in order. Additional payments are implemented to the next line items until the payment is done.
How to Record Multiple Group Payments Together Into a Single Deposit?
Access the Undeposited Funds account to record payments while depositing several checks as a single deposit. This groups multiple payments into one deposit transaction in QuickBooks. Only use this method when the bank records several payments as a single deposit.
How to Customize Reports in QuickBooks?
QuickBooks Advanced enables you to create custom reports using the Custom Report Builder. Financial reports offer key business understandings. Customize reports to meet your requirements. Filter them by accounts or customers. Change the layout to show relevant data. Focus on the information that is crucial for the business.
Run a Report
- Go to the “Reports” option.
- Locate and open a report.
- Tip: QuickBooks Online Plus, Essentials, and Advanced provide “Detailed” versions of standard reports.
- Use the basic filters to change settings like report dates.
- Choose the “Customize” option.
- Tip: Use the Find report by name search bar to locate specific reports.
Customize a Report
Implement filters to change your report. A majority of the reports provide standard filter options, while some have special ones.
Customization Options:
- General: Modify accounting method, reporting period, and number format.
- Rows/Columns: Choose rows and columns for display.
- Filter: Choose customers, accounts, vendors, and products.
- Header/Footer: Set what is displayed in the header and footer.
Once customization is over, choose the “Run Report” option.
Note: Available features depend on your QuickBooks subscription.
Save Customization
Save custom reports to run them later using the same filters.
Here are the steps to save a Custom Report:
- After customizing a report, choose the option “Save Customization”.
- Name the report.
- Choose the “Save”.
- Select a user from the “Share With” drop-down to provide editing access.
- Note: Avoid sharing the same report several times with users to avoid duplicates.
- Use saved reports in the “Custom Reports” tab.
View examples of custom reports
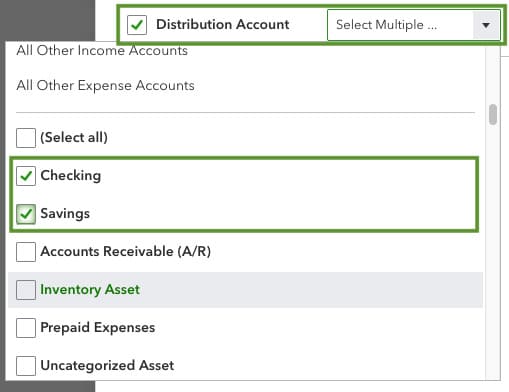
Show Specific Accounts
Here are the steps to show specific accounts:
- Open the “Customization” screen.
- Choose the “Filter” icon.
- Choose accounts from the “Distribution Account” drop-down.
- Choose the “Run Report” button.
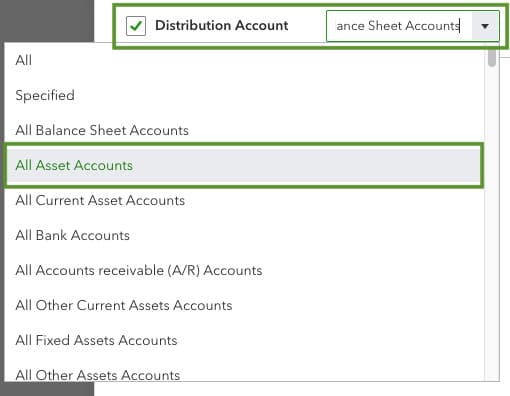
View All Accounts by Type:
Here are the steps to check all accounts by type:
- Open the “Customization” window.
- Choose the “Filter” button.
- From the “Distribution Account” option, choose an option like “All Asset Accounts”.
- Choose the “Run Report” button.
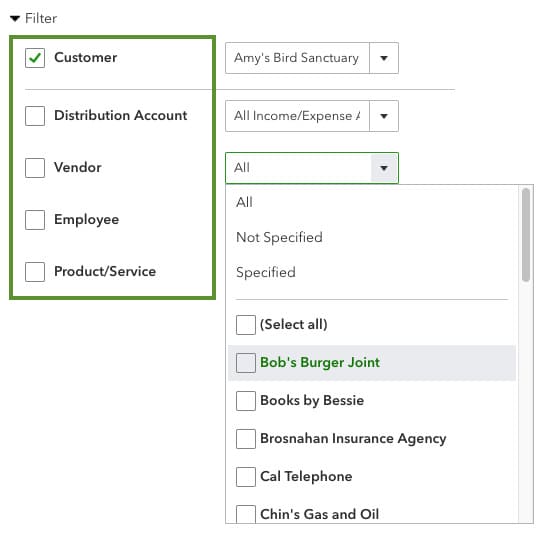
Show Specific Customers, Vendors, Products, or Services
Here are the steps to Show Specific Customers, Vendors, Products, or Services:
- Open the “Customization” window.
- Choose the “Filter” button.
- Select customers, vendors, or products and services from the available drop-downs.
- Choose the “Run Report” option.
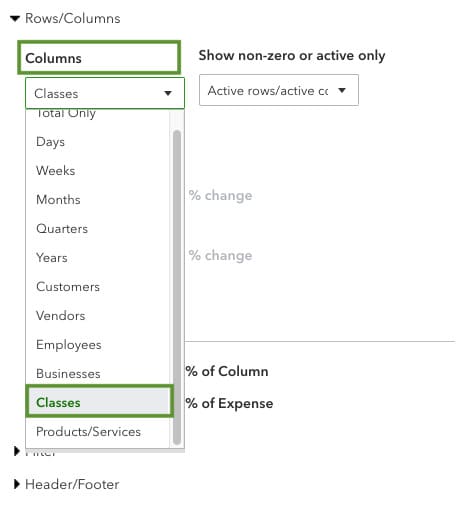
Filter by Class or Location?
Here are the steps to filter by location or class:
- Open the Customization window.
- Choose the “Rows/Columns” option.
- Select the “Classes” or “Locations” option from the drop-down.
- Choose the “Run Report” button.
Manage and Automate Custom Reports
See all of your custom reports
Here are the steps to manage Custom Reports:
- Go to the “Reports” section.
- Choose the “Custom Reports” tab.
- Locate and open a report.
Automate custom reports
Here are the steps to automate custom reports
- Go to the “Reports” section and choose the option, Custom Reports.
- Locate the report.
- Choose the Edit option from the “Action” column.
- Choose “Set Email Schedule” to enable it.
- Add the email addresses of recipients.
- Finish the form and set the schedule.
- Choose the “Save and Close” button.
Note: This feature is not present in QuickBooks Online Simple Start.
Show Custom Reports to Specific Groups
Here are the steps to show custom reports to specific groups:
- Create a custom report and choose the “Save Customization” option.
- Select a group from “Add this Report to a Group”.
- Choose the “Save” button.
- Go to “Reports” and choose the option “Custom Reports”.
- Locate the group on the list.
- Choose the “Edit” option from the “Action” column.
- Choose the option, “Set Email Schedule”.
- Add email addresses for recipients.
- Finish the form and set the schedule.
- Choose the “Save and Close” option.
Note: Group custom reports are not present in QuickBooks Online Simple Start.
Delete a Custom Report from a Group
Here are the steps to delete a custom report from a specific group:
- Go to the “Reports” section and choose the option “Custom Reports”.
- Locate the group on the list.
- Choose the “Edit” icon from the Action column for the report.
- Choose the “Delete” button and confirm with Yes.
Note: This feature is not present in QuickBooks Online Simple Start.
Export and Share Custom Reports
Here are the steps to export custom reports in Excel or PDF format:
- Open the report.
- Choose the “Export” icon.
- Select the “Export as PDF” or “Export as Excel” option.
Alternative Option:
- Go to the “Reports” section and choose the option “Custom Reports”.
- Locate the custom report on the list.
- Select the “Edit” icon from the Action column.
- Select “Export as PDF” or “Export as Excel”. The report will be exported in the chosen format.
Here are the steps to share custom reports in Excel or PDF format:
Share PDF Reports Over Email:
- Open the report.
- Choose the “Email” icon.
- Select the Email.
- Complete the form.
- Change the body message to inform recipients.
- Choose the “Send” button.
Share in Excel Format:
- Share Edit Access with Team Members
- Open the report and choose the option “Save Customization”.
- Choose a user from the Share with drop-down menu.
- Choose the “Save” button.
Note: Reports should be shared only once to prevent duplicates.
How to Create a Report that shows Invoices Paid by Each Customer?
Check the invoices and payments for each customer using filters to make the data small by class and date. Here are the steps to run and customize the report:
- Go to the “Reports” menu.
- Choose the “Customers and Receivables” option.
- Select the option “Customer Balance Detail”.
- Change the “Date” range.
- Choose the option “Customize Report”.
- Go to the “Filters” tab.
- Choose the option “Class”.
- Include additional filters as required.
- Choose the “OK” button to save the changes.
How to Run a Report Showing Advanced Customer Payments?
Tracking advanced customer payments in QuickBooks Desktop assists in managing prepayments and customer accounts. Use filters to check open payments and export reports for precise records.
Here are the steps to monitor advanced customer payments in QuickBooks Desktop:
- Launch the QuickBooks Desktop application.
- Choose the “Reports” option from the top menu.
- Select the option, “Customers & Receivables”.
- Choose the “Transaction List by Customer” option.
- Choose the “Customize Report” option from the toolbar.
- Go to the “Filters” tab.
- Apply the following filters:
- Transaction Type: Choose Payment.
- Paid Status: Choose “Open” to show advanced payments.
- Set the desired Date Range.
- Choose the “OK” button to implement the filters.
- Check the report for prepayments.
- Choose “Memorize’ to save the report.
- Choose “Excel” to export the report.
Final Words
In this guide, all the crucial information related to the Invoice Payment History Report in QuickBooks Online has been shared. Detailed steps for how to view, report, and customize the Invoice reports have been added in this article.
Frequently Asked Questions
Q 1: What information does the Invoice Payment History Report offer?
Ans: The report highlights payment dates, invoice dates, amounts paid, and outstanding balances.
Q 2: Why use this report?
Ans: The report helps monitor payments, handle receivables, and track customer payment trends.
Q 3: Can the report be customized?
Ans: Yes, change date ranges and include filters to meet your requirements.

