

Your business, whether large or small, will involve commercial transactions. Buying raw materials or delivering products—both qualify as invoices. An invoice is essentially a bill sent for payment. It also includes the deal’s terms. Keeping invoice records helps track cash flow, expenses, and business investments. In the digital era, updating how you handle invoices is crucial. Though tedious, it directly affects business operations. To simplify this, QuickBooks is a reliable accounting software.
With QuickBooks, record-keeping becomes effortless. Its cloud-based system lets you create and send invoices anytime. It manages records, expenses, transactions, and invoices in one place. You can track sales and handle invoices without accounting expertise. To keep this information handy, you can choose to export the invoices from QuickBooks.
Table of Contents
Reasons to Export Invoice From QuickBooks
There are several reasons why QuickBooks invoices are useful for small business owners:
- Invoices are easy to track. As QuickBooks generates invoices and integrates them into your records, you can track outstanding invoices and keep an updated accounts receivable balance. QuickBooks won’t delete your invoices without your permission.
- It’s efficient. By utilizing the instant email delivery feature and integrated credit card and debit card functionality, you can expect to receive payments faster than traditional invoicing methods that involve mailing invoices.
- Online invoicing is less expensive. The process of invoicing and payment can be completed primarily online, which eliminates paperwork, manual data entry, and error-prone situations.
How to Export Invoices From QuickBooks Desktop?
While QuickBooks allows you to store all of your invoices, you may find that it is better to export them to a program like Microsoft Excel for sorting and sharing. Many features are available in spreadsheet applications such as Microsoft Excel that are not currently embedded or accessible in QuickBooks.
QuickBooks invoices are exported to other programs, such as Microsoft Excel, for the following reasons:
- The invoices can be customized and redesigned to include specific company details.
- When multiple users require access to invoices but do not have access to the QuickBooks system, exporting the invoices to Excel provides a convenient solution.
- Exported invoices can be easily saved, printed, or emailed to clients and customers.
- Excel’s sorting and organizing functions aid in managing bookkeeping records, while keeping track of outstanding invoices ensures up-to-date accounts receivable information.
- Advanced Excel features like PivotTables and VLOOKUP enable efficient data organization for easy accessibility and meaningful analysis.
Read more: How to Export Quickbooks Customer List in Few Simple Steps
How to Export Invoices from QuickBooks Online?
The following information provides a step-by-step guide on how to export invoices from QuickBooks Online to Microsoft Excel. It’s important to note that exporting invoices does not remove them from QuickBooks Online; they will still be stored within the system
- Under the list of functions, click Reports.
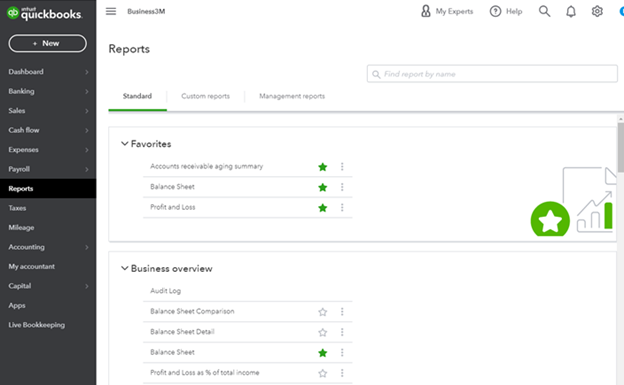
- In the text box, begin to key in “Invoice list” and hit Enter.
- The “Invoice list” will automatically populate as you type in QuickBooks Online.

You can view a list of all invoices reported through a specific date range here.
- Using Customize, you can change the dates range or filter the report.

- Select Export to Excel from the Export function dropdown once the report has been customized.

Excel will now allow you to access your invoices and data.
How to Export Invoices From QuickBooks Pro
Exporting invoices from QuickBooks Pro is as straightforward as it is with QuickBooks Online. To export stored invoices to Microsoft Excel, follow these steps:
- Open QuickBooks Desktop and click on the “Reports” tab.
- In the search text box, enter “Invoice list” and press Enter.
- Under the “Report period” section, apply date filters as needed, and then click on the “Run Report” button.
- Once the report is generated, locate the “Export” button and select “Export to Excel.”
How to Automate Exports of Invoices from QuickBooks Online
While it is possible to manually export invoices, the repetitive nature of generating weekly or monthly reports can become overwhelming over time. To streamline this process, a solution like smbaccountants can be of great assistance. This is a tool designed to automate the export of invoices from QuickBooks Online, making the task much more efficient. You can easily export invoices from QuickBooks Online to Excel, eliminating the need for manual intervention. Additionally, Coupler.io offers the capability to connect QuickBooks to BigQuery, further expanding its functionality and integration options. By leveraging Coupler.io, you can simplify and automate the export of invoices, saving time and effort in your reporting tasks.
To automate invoice exports, first create an account, then follow the steps below:
- To create a QuickBooks importer, click on Add Importer.

- Choose your preferred Source and Destination apps.

- For the Source app, choose QuickBooks. The destination app can be Microsoft Excel, Google Sheets, or BigQuery. Then, click Proceed.
- Connect your Source account.

- If you are already logged in to QuickBooks, a popup will appear prompting you to click the “Connect” button. Simply click on the “Connect” button to proceed. However, if you are not logged in, please log in to your QuickBooks account and then click the “Connect” button.
- Select the data category to export.

- As you are attempting to export invoices, select the “Invoice” option and click on the “Jump To Destination Settings” button.
- Set up an account at your destination.
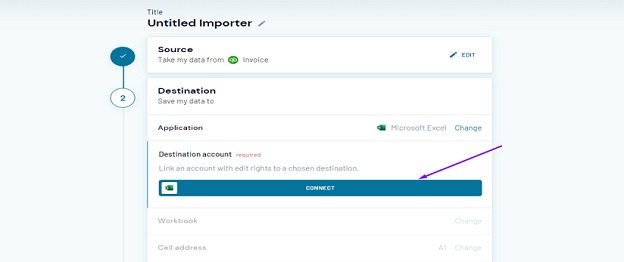
- In a popup, you will be prompted to log in to your destination account. Select a workbook and choose a sheet. Click Jump To Schedule Settings.
- Connect a schedule for data refresh.
- Turn off Automatic data refresh and run the importer. Or create a custom export schedule for Quickbooks invoices.
- Click Save and Run.
Need Professional Help?
If you get stuck anywhere in the process, feel free to get in touch with the SMB QuickBooks Technical Support Team, Which is available 24/7 on smbaccountants.com.
Frequently Asked Questions
Q 1: How can I export the invoice template from QB to excel?
Ans: From your QuickBooks window, open the file menu. Then, go to “Utilities” and all options will appear on your screen. Hit the click on the “Import” option and go to the Excel files. The next thing you have to do is select the NO option and then close the Add/Edit option from the list entries window. After this QB will offer a spreadsheet.
Q 2: How can I export invoices to a new company file?
Ans: You can easily export invoices in QuickBooks by hitting the click on the “Customers menu” option. After this, you have to choose the Customer Center. Now moving forward to the transaction tabs and choosing the “Invoice” option. Hit the next click on the “Run Reports” menu from the list of invoices.
Q 3: Is it possible to print the multiple invoices in QuickBooks?
Ans: The answer is YES, open the file menu and then choose the “Print Forms” option. From the drop menu options, you have to choose the “Invoice” section. Locate and choose the “Print” option. Then all invoices you want to print appear on your screen and later hit the Ok button to finish the program.

