QuickBooks Auto Data Recovery stands out as a remarkable feature within the QuickBooks application. It serves as an invaluable tool for recovering lost data, proving exceptionally helpful in scenarios where files become corrupted, go missing, or sustain damage. Let's delve into a comprehensive exploration of this tool to understand its functionality and learn how to harness its full capabilities.
QuickBooks has consistently strived to enhance the user experience by introducing valuable features, and one such offering is the QuickBooks Auto Data Recovery Services. This service was first introduced in 2010, initially available for QuickBooks Pro/Premier and later incorporated into QuickBooks Enterprise in 2012. These features have proven instrumental in recovering lost data through QuickBooks Auto Data Recovery.
This feature operates by automatically creating a local backup copy of your company file. It relies on two distinct Sybase technologies: "auto-replication," which generates a duplicate of your QuickBooks Company (.QBW) file, and the QuickBooks Transaction Log (.QBW.tlg) file,
What is QuickBooks Data Recovery?
QuickBooks Recovery, including the Auto Data Recovery feature, empowers users to retrieve nearly all their data in the event of corruption or data loss, regardless of the cause. While Intuit Data Services are typically available to assist users, relying solely on them might entail a significant downtime in using the QuickBooks application.
Auto Data Recovery Services offers a swifter solution for recovering lost or corrupted data. It is advisable to employ this tool only after exhausting all available troubleshooting methods to address the current issue.
Following are the steps to recover the lost file using QuickBooks recovery software:
- Lost transactions are recovered by utilizing the existing Transaction Log File and a duplicate of the company file.
- In this recovery process, all transactions, except those executed within the last few hours, are reinstated using both the company file copy and the Transaction Log file.
What is an ADR file in QuickBooks?
If you're curious about what an ADR file is in QuickBooks, continue reading to grasp the importance of this file. When users back up their company files, QuickBooks generates a duplicate of the crucial application data. This backup file serves as the cornerstone for restoring or recovering QuickBooks files and information when needed. Therefore, if you ever lose your data, it becomes crucial to initiate the recovery process.
You can locate this file within a folder called "QuickBooks Auto Data Recovery," which is designed to keep these files distinct from others. This particular file bears the .adr extension and is commonly referred to as the ADR file in QuickBooks. The suffix at the end of the file name is .QBW.adr, signifying both the file type and its importance. It's imperative to prevent this file from being deleted; otherwise, it can significantly complicate and make the recovery process challenging to manage.
What is a TLG file in QuickBooks?
Additionally, if you're wondering about the nature of a TLG file in QuickBooks, you'll find the explanation here. The TLG file, short for Transaction Log File in QuickBooks, plays a crucial role in the data restoration process. QuickBooks utilizes the TLG file between backup operations. When restoring the backup file, typically denoted as the .QBB file, you can place the TLG file in the designated directory and then proceed to open the data file in QuickBooks. If everything proceeds smoothly, you'll successfully load both the company file and the TLG file.
What is the Reason for QuickBooks Data Loss?
Your QuickBooks Account shows the error of data loss for several reasons. And, if you want to troubleshoot the problems permanently, you must understand the reasons behind the loss of data. So here, we have tried to point out the major reasons behind the same. Take a look:
- In the case of the non-wired connection, there are chances that due to slow internet speed, you are facing the issue
- The location in which the data or the documents are saved needs extra consent
- The Firewall is non-supportive and prevents access to the PC
- The power mode is on
Why does QuickBooks Data Go Missing or get deleted?
- If you upgrade the company file to its higher version.
- When you fail to upgrade the software properly.
- External interruptions while performing any task.
- Presence of multiple company files.
- Loss of company files from the hard drive.
- Unwanted power disruption.
- Crashing of the device while working on QB.
- Corrupt QuickBooks DataBase.
- Mistakenly deleting the files.
How to Recover Deleted Files in QuickBooks Desktop?
- At first, you need to open the search box, followed by typing *qbw, and then you need to hit the “Enter” button.
- In the next step, you are required to search for the copy as shown in the list of the company’s files
- Now, you need to note the file and right-click it. And then, you need to choose the option for “Properties.”
- As you move ahead with the steps, make sure that you go to the General tab. After that, you are supposed to check the file to see if is named a QuickBooks Company File or not
- In the next step, make sure that you have used the Date Modified feature, followed by discovering the most updated files
- As soon as you have found the most updated files, you are required to copy them to a CD
- And, just after the file is copied, you are supposed to remove all the residual files as soon as possible.
- In the end, all you need to do is paste the copied file into the same location where it was kept before
Method to Recover Lost QuickBooks Files Using QuickBooks ADR
Here are the methods you can use to recover QuickBooks data:
Method 1: Utilizing the Original .TLG file with QBW.adr File
To recover a QuickBooks file from your hard drive using the original Transaction Log File (TLG) and the Auto Data Recovery (ADR) version of the company file, follow these steps:
- Create a new folder named "QBTest" on your desktop.
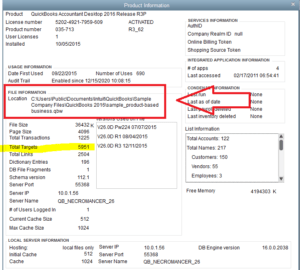
- Locate the folder where the company file is saved. You can find the location on the Product Information screen (F2 or Ctrl + 1) or the No Company Open Window.

- Copy the corresponding .tlg file from the company file's folder and paste it into your desktop's "QBTest" folder. Make sure you're able to view file extensions.
- If you can't identify the .tlg file, follow these steps:
- Open Windows Explorer.
- Click "Organize" and select "Folder and Search Options."
- For Windows 10, 8.1 & 8, Click "View" and choose "File Name Extensions."
- Uncheck the "Hide Extensions for known file types" option.
- Click "Apply" and refer to the "How to Show Hidden Windows Files" article for more detailed instructions.
- Find the QuickBooks Auto Data Recovery tool in the exact location of the company file
- Copy the .QBW.adr file and paste it into the "QBTest" folder. A.QBW.adr and .tlg files should be in the "QBTest" folder.
- Right-click the .QBW.adr file in your desktop's "QBTest" folder and select "Rename." Remove the .adr extension from the end of the file.
- Open QuickBooks and access the company file saved in the "QBTest" folder.
- Use your account register to verify that all transactions are present.
- Run the QuickBooks Verify Data Utility to ensure the integrity of this company file. You can find this option in the File menu under Utilities and select Verify Data.
- If the copy of the company file in the "QBTest" folder is fine, move the damaged company file to a different location.
- Transfer the copy from the "QBTest" folder to the original location as the last step in the QuickBooks recovery process.
Method 2: Make Use of .QBW.adr and .TLG.adr files.
Additionally, utilize the ADR version for the .QBW and .TLG files. This will allow you to recover all data except for transactions from the past 12 hours using QuickBooks' restore deleted transaction software.
- Following this method will effectively address how to recover a QuickBooks Company file, with the limitation that only transactions up to 12 hours prior can be retrieved.
- Begin by creating a new folder on your Desktop and naming it "QBTest."
- Open the "QuickBooksAutoDataRecovery" folder. To locate the company file, access the Product Information Screen by pressing F2 or Ctrl + 1 on your keyboard while on the No Company Open Window.
- Look for the .TLG.adr and .QBW.adr files share the same name as your company file.
Ensure that file extensions are visible. If not, follow these steps:
- Launch File Explorer by pressing your keyboard's Windows + E keys.
- Select the "Organize" option, then click "Folder and Search Options."
- Uncheck the "Hide Extensions for known file types" option.
- Click "Apply" and then "OK."
- Copy the .TLG.adr and .QBW.adr files and paste them into the "QBTest" folder you created on your Desktop.
Create .QBW and .TLG Files in the QBTest Folder
- Ensure that Windows is configured to display hidden files.
- Within the QBTest folder, remove the ".adr" extension from the file names to access the "qbw" and ".tlg" files located in the QBTest folder.
- Launch QuickBooks.
- Open the company file in your QBTest folder once QuickBooks is open.
- Confirm the presence of all transactions within the company file.
- Execute the "Verify Data" utility to ensure the integrity of the company file.
- If the copy of the company file is in good condition, you can relocate the damaged company file to a different location.
- Transfer the copy from the QBTest folder to the original location
How to Recover QuickBooks Data from a Hard Drive?
If you seek guidance on retrieving QuickBooks data from a hard drive, your quest concludes here. While QuickBooks is a highly regarded accounting software people use worldwide, occasional issues may arise that could result in the loss of crucial data. In such situations, it's imperative for users to first identify the root cause of the data loss before embarking on troubleshooting solutions.
Causes of Losing Data in QuickBooks
Users may encounter corruption or data loss in QuickBooks due to various factors:
- Transitioning to a higher version of QuickBooks company files may result in data loss.
- Updating the QuickBooks application can disrupt data integrity.
- QuickBooks errors can negatively impact the application's functionality and cause data damage.
- Valuable files are essential for running QuickBooks and the company file may become missing, damaged, or corrupted.
- Unexpected power outages or system crashes can lead to the loss of both unsaved and saved data.
- Data loss can also occur due to corrupt or broken database files within QuickBooks.
- Virus or malware infections represent another threat to data integrity.
- In unexpected file deletions, users may need to explore methods for recovering deleted transactions in QuickBooks Desktop.
Recovering the Lost QuickBooks Data
The next step is to initiate the data recovery process for lost data. When seeking a solution for QuickBooks data recovery, the auto data recovery tool emerges as the most straightforward and rapid method for restoration. Nevertheless, users should remember key considerations before employing this tool and reserve its use as a final option when all other procedures have been exhausted.
Where are QuickBooks Files Stored?
QuickBooks data files can be located in various directories on your system. These include:
- **C:\Users\Public\Public Documents\Intuit\QuickBooks\Company Files**
- **C:\ProgramData\Sage\Accounts\for Sage**
- **C:\Program Files\Intuit**
These paths also provide information about the application's version and year. You can identify QuickBooks files by their extensions, such as .IIF, .QBA, .ND, .QBM, .QBB, .QBX, .QBY, and .QBW, are stored on your host machine.
If you've accidentally deleted a transaction in QuickBooks Desktop, you can follow these steps to recover it:
- Type ".qbw" in the Start menu's search field and press Enter.
- Search for duplicate company files with the same name.
- Right-click on the file you suspect contains the deleted transaction and select "Properties."
- On the "General" tab, identify the file as a QuickBooks company file.
- Use the "Date Modified" feature to find the most recently updated file.
- Copy this file to a CD, USB drive, or other external storage.
- Delete all the remaining unnecessary files.
- Finally, paste the copied initial file back into its original location.
This method is proper when you have multiple files on your desktop and hard drive and need help determining which contains the required information. However, if you need to recover deleted QuickBooks files or lost transactions, QuickBooks offers an auto data recovery tool. For this, you can refer to the methods and other information provided in the blog above.
How Can You Avoid Losing Your Data Files in QuickBooks?
To safeguard your essential data files in QuickBooks, consider the following tips:
- Regularly back up your files; make it a consistent practice to avoid any lapses.
- Maintain the cleanliness and security of your PC by conducting periodic antivirus scans, including thorough inspections to prevent potential issues.
- Take preventive measures to avoid sudden system shutdowns for any reason.
- Keep a QuickBooks data recovery service contact number handy when corrupted or damaged. This is particularly crucial if you need help addressing such issues and feel overwhelmed.
Backup and Restoration Tips for QuickBooks Data Files
Please keep the following considerations in mind for backing up and restoring QuickBooks files as needed:
Backing up QuickBooks Desktop Data:
- Ensure regular backups of your company file data for security.
- QuickBooks offers an automatic data backup feature to prevent data loss by handling this task.
- You can set your preferred backup schedule - daily, weekly, or at your convenience.
- Here's how to set up automatic backups:
- Open QuickBooks Desktop and go to the File menu.
- Select the "Create Local Backup" option from the drop-down menu.
- Click "Next" and choose a folder or location for the backup.
- Configure your preferences, including the backup date and time, backup limits, and reminders.
- Confirm the correctness of the company data, then click "Yes" after double-checking.
- Follow the remaining prompts to set your automatic backup schedule.
Restoring QuickBooks Data Desktop:
To restore QuickBooks data, follow these steps:
- Open QuickBooks and navigate to the File menu.
- Choose the "Open or Restore an Existing Company" option.
- Select "Restore Backup Copy" and click "Next."
- Choose "Local Backup" and then "Next."
- Locate the backup company file on your PC, usually named "companyfilename.qbb."
- Choose a folder for the restored company file in QuickBooks and click "Open."
- Click "Save" to complete the restoration.
- If a warning message about overwriting your file appears, select the option that aligns with your preferences.
This comprehensive guide addresses your questions about data restoration and recovery in QuickBooks. Consider contacting QuickBooks' auto data recovery chat if you require further assistance. Ensure you have sufficient knowledge before using the tool to avoid potential risks.
The QuickBooks data recovery team offers the following services:
- Fixing corrupted files.
- Migrating your books from an older QuickBooks version to the latest one.
- Transitioning from QuickBooks Desktop to QuickBooks Online.
- Moving data from non-Intuit financial software to QuickBooks.
- Recovering and restoring files.
How to Use QuickBooks Files Recovery Tool?
You should not be worried about losing any data with QuickBooks. It even comes packed with an option of recovering data via a tool. Yes, you also can avail of this service by downloading and installing the auto recovery tool. You can easily get back your lost data by following the steps enlisted here:
- Scan the hard drive where you have mistakenly deleted the file
- Run Quick and Deep Scan
- Select the name of the file that you want to recover
- Click on the “Recover” option
How to Get QuickBooks Data Recovery Support?
In case, you have lost any important file or mistakenly deleted any data; you should not worry as there are many options through which you can recover it.
However, even after trying the hacks that are given above, if you are not able to recover it, you need to ensure that you have taken the quick assistance of the experts.
All you are supposed to do is to call QuickBooks customer service phone number ?smbaccountants.com. As soon as you call the given number on smbaccountants.com, you will be able to contact the professionals who are available for you round the clock to fix and troubleshoot the issues.
Frequently Asked Questions
How do I recover lost data in QuickBooks?
- Open QuickBooks and navigate to the "File" menu.
- Choose "Open or Restore Company."
- Opt for "Restore a backup copy" and click "Next."
- Select "Local Backup" and then click "Next."
- Browse your computer to locate your backup company file.
- Choose a destination folder to save your restored company file.
How do I rebuild data in QuickBooks?
- Navigate to the "File" menu, then select "Utilities," and choose "Rebuild Data."
- QuickBooks will prompt you to create a backup before it begins rebuilding your company file.
- Select the location where you wish to save the backup, then click "OK."
- After the rebuild process, click "OK" when you see the message confirming that the rebuild has been completed.
What to do if I am not able to identify the .QBW.adr and .TLG.adr files for QuickBooks Auto Data Recovery Tool?
- To open File Explorer on your Windows system, press the Windows + E keys.
- Within File Explorer, select the "Organize" option.
- Then, choose "Folder and search options."
- Then, choose "Folder and search options."
- Then, choose "Folder and search options."
- Choose "File name extension."
- Click on the option "Hide extensions for known file types."
- Click the Apply button.
- Click OK, and you're done.
What is the QBW TLG file in QuickBooks?
The QuickBooks transaction log file serves as a record of all impending changes set to be made to the company file (.qbw) before they are officially implemented. This file is located in the same folder as the company file and is automatically generated by QuickBooks.
How do I recover data from QuickBooks desktop?
Restore a backup company file
- Navigate to the File menu in QuickBooks and choose "Open or Restore Company."
- Opt for "Restore a backup copy" and click Next.
- Select "Local Backup" and proceed by clicking Next.
- Browse your computer to locate your backup company file.
- Choose a folder to designate where you want to save your restored company file.


