QuickBooks Printer Not Activated Error Code 20 and 30 is a common issue that users encounter when trying to print invoices, checks, PDFs, or other forms directly from QuickBooks. This frustrating error usually occurs due to faulty printer settings, outdated drivers, or incorrect system permissions.
In this article by SMBAccountants, we’ll help you understand the causes, symptoms, and expert-recommended solutions to permanently fix this error and restore seamless printing in QuickBooks.
Table of Contents
- 1 What are the Printer Not Activated Error Codes 20 and 30?
- 2 Solutions to Fix QuickBooks Printer Not Activated Errors 20 and 30
- 2.1 Solution 1: Edit or Update the Registry key Manually
- 2.2 Solution 1: Run QuickBooks Tool Hub
- 2.3 Solution 2: Reinstall QuickBooks PDF Converter
- 2.4 Solution 3: Set Your Printer as the Default
- 2.5 Solution 4: Uninstall USB Composite Device from Device Manager
- 2.6 Solution 5: Backup Registry and Restore System
- 2.7 Solution 6: Update Windows and Reinstall QuickBooks
- 2.8 Solution 7: Repair QuickBooks Installation Files
- 2.9 Solution 8: Check and Configure Print Spooler Service
- 3 Causes of the QuickBooks Printer Not Activated Error Codes 20 and 30
- 4 Common Symptoms of Error Codes 20 and 30 in QuickBooks
- 5 Final Thoughts
- 6 Frequently Asked Questions
- 6.1 Q 1: Why did I receive QuickBooks Printer Not Activated Error Code 30 while trying to print in the QuickBooks Pro version?
- 6.2 Q 2: How would I get my print wirelessly if I am unable to resolve the QuickBooks Printer Not Activated Error Code 30?
- 6.3 Q 3: How would I get my PC to recognize my printer after fixing the QuickBooks Printer Not Activated error code 30?
- 7 Adams Williams
What are the Printer Not Activated Error Codes 20 and 30?
Error Code -30: Printer Not Activated typically pops up with a message like:
“Printer not Activated, Error code -20.”
“Printer not activated – Error code -30”
This error prevents you from printing or saving documents as PDFs from within QuickBooks Desktop or QuickBooks Online.
Struggling With Accounting or Bookkeeping?
Talk to our experts in minutes — No wait time!
- Free Consultation
- Fast Response
- Trusted Experts

Solutions to Fix QuickBooks Printer Not Activated Errors 20 and 30
QuickBooks Error Code -30, “Printer not activated,” commonly appears when trying to print invoices, PDFs, or other documents. This error is often related to misconfigured printer settings, outdated PDF drivers, or a damaged QuickBooks installation.
Let’s walk through verified, expert-approved solutions to resolve the issue effectively:
Solution 1: Edit or Update the Registry key Manually
There are two Steps to manually update the registry key:
Step 1: Allow using the Registry Editor
- First, open your Registry Editor.
- Then, press Windows + R on your keyboard to open the Run dialog box.
- Now, type the command regedit.
- Next, right-click on regedit and select the “Run as administrator” option.
- To access the Registry Editor, you will need to navigate to HKEY_CURRENT_CONFIG.
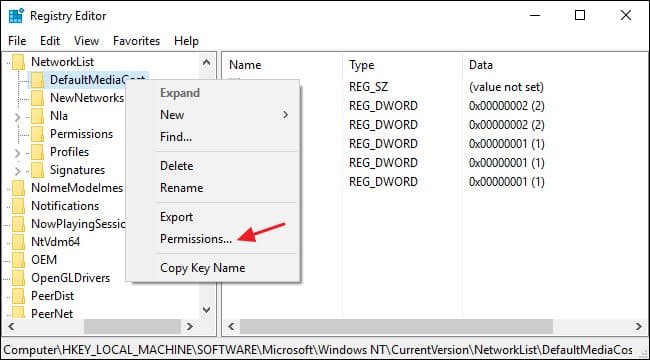
- Then, right-click on the Software folder and select Permissions.
- Next, you need to verify that the user has full control access to the table.
- In the final step, click the OK button and close the window and the Registry Editor.

After completing the steps above, QuickBooks will have access to all the necessary keys and printer settings, allowing it to function properly.
Step 2: Grant permission using a PowerShell script
This option is only for Windows 10 users. You can manually update your registry editor by granting permission using a PowerShell script.
Note: The user account requiring permissions must be logged in. The user account can also be accessed using the command prompt.
- Click the Start button and type: cmd.
- Right-click on cmd and select “Run as administrator”.
- In the command prompt, type: PowerShell and press Enter.
- Finally, copy the following code exactly as shown and paste it into the command prompt:
- PowerShell.exe -NoProfile -NoLogo -NonInteractive -Command “$key = [Microsoft.Win32.Registry]::CurrentConfig.OpenSubKey(‘Software’,[Microsoft.Win32.RegistryKeyPermissionCheck]::ReadWriteSubTree,[System.Security.AccessControl.RegistryRights]::ChangePermissions); $acl =$key.GetAccessControl(); $rule = New-Object System.Security.AccessControl.RegistryAccessRule (‘Users’,’FullControl’,’ObjectInherit,ContainerInherit’,’None’,’Allow’); $acl.SetAccessRule($rule); $key.SetAccessControl($acl);”
- This will ensure that this mistake won’t happen again.

Solution 1: Run QuickBooks Tool Hub
The QuickBooks Tool Hub is a free utility provided by Intuit that can resolve many common issues, including this printer-related error.
Steps to Use the Tool Hub:
- Close QuickBooks Desktop and all other running programs.
- Download the latest version of the Tool Hub from Intuit’s official website.
- Save the downloaded file (QuickBooksToolHub.exe) to your desktop.
- Double-click the file and follow the installation instructions.
- After installation, open the Tool Hub.
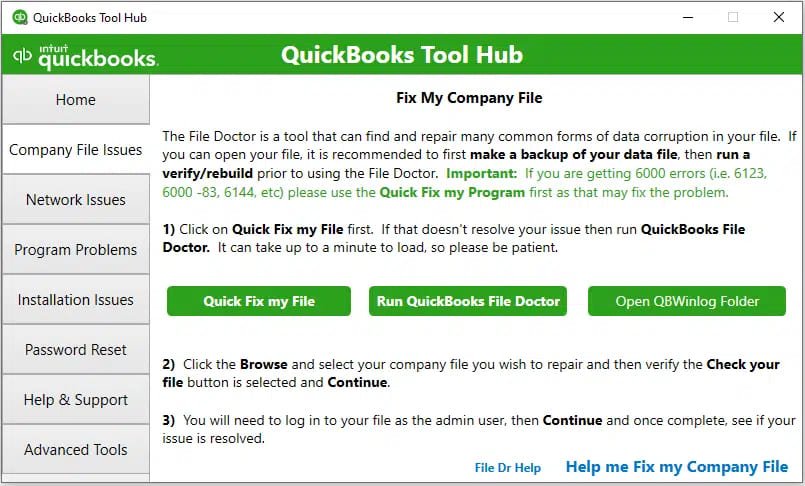
- Navigate to the Company File Issues tab.
- Click on Quick Fix My File.
- Restart your system and check if the printing error is resolved.

Tip: Always use the latest version of the Tool Hub for the most accurate diagnostics.
Read this: Printer Won’t Print Multiple Copies of Windows 10
Solution 2: Reinstall QuickBooks PDF Converter
QuickBooks uses a built-in PDF Converter to print and save documents. If it’s damaged, you may encounter printing issues like Error Code -30.
How to Reinstall PDF Converter:
- Open the Control Panel from the Start menu.
- Click on Programs and Features > Uninstall a Program.
- Locate QuickBooks PDF Converter, then click Uninstall/Change.
- Choose the Remove option instead of Repair.
- Follow the prompts to complete the process.
- Restart your system.
- Reinstall QuickBooks or run a repair to restore the PDF Converter.
Note: Always keep your QuickBooks Desktop updated to ensure compatibility with PDF printing features.
Solution 3: Set Your Printer as the Default
QuickBooks may not recognize the correct printer if it’s not set as the default.
How to Set the Default Printer:
- Press Windows + R to open the Run dialog.
- Type
control paneland press Enter. - Go to Hardware and Sound > Devices and Printers.
- Right-click your primary printer and choose Set as Default Printer.
- Restart your computer and test printing from QuickBooks.
Solution 4: Uninstall USB Composite Device from Device Manager
Misconfigured USB drivers can block communication between QuickBooks and the printer.
Steps to Fix:
- Press Windows + R, type
devmgmt.msc, and press Enter. - Expand Universal Serial Bus controllers.
- Right-click USB Composite Device, then select Uninstall.
- Disconnect the printer from your PC and reconnect it.
- Follow the on-screen prompts to reinstall the printer driver.
Solution 5: Backup Registry and Restore System
Making registry changes without backup can be risky. Always back up your registry first.
How to Backup and Restore the Registry:
- Open Registry Editor via Run (type
regedit). - Click File > Export to back up the current registry.
- To restore, choose Import from the File menu and select the backup file.
- Restart the system and test QuickBooks printing functionality.
Note: Modifying the registry is advanced. Proceed only if you’re comfortable or consult a technician.
Solution 6: Update Windows and Reinstall QuickBooks
Outdated Windows or corrupted QuickBooks installations may trigger printing errors.
Reinstalling QuickBooks:
- Go to Control Panel > Programs and Features.
- Locate and uninstall QuickBooks. Before doing so, note your license and product number.
- Restart your PC.
- Install the latest Windows updates.
- Reinstall QuickBooks using your setup CD or installer file.
- Follow the installation wizard and enter your product details.
Solution 7: Repair QuickBooks Installation Files
You may need the original QuickBooks installation disk for this.
Repair Steps:
- Press Windows + R, type
appwiz.cpl, and press Enter. - Find your QuickBooks version (e.g., QuickBooks 2020).
- Select it and choose Repair.
- Follow on-screen instructions.
- Restart the computer once complete.

Solution 8: Check and Configure Print Spooler Service
The Print Spooler manages print jobs. Restarting it can clear corrupted print jobs and fix errors.
How to Restart Spooler:
- Press Windows + R, type
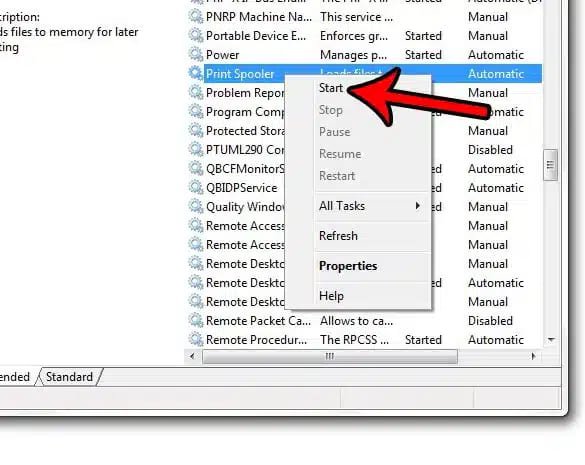
services.msc, and press Enter. - Scroll down and find Print Spooler.
- Right-click it, select Stop, then right-click again and select Start.
- Try printing again from QuickBooks.

Causes of the QuickBooks Printer Not Activated Error Codes 20 and 30
- When Error 30 appears it crashes all the active window program.
- You will notice that your system crashes with Error 30 whenever the same program is run.
- “QuickBooks Pro Printer Not Activated Error Code 30” will be displayed.
- Windows will run slowly and won’t respond to the keyboard input or mouse.
- The computer will freeze periodically sometimes for a few seconds.
- Incomplete installation of the QuickBooks Pro software or a corrupt download is one of the major causes.
- The Windows registry is getting corrupted due to the recent changes in QuickBooks Pro-related software, be it an uninstall or install.
- Malware or virus infections with the Windows system files that are corrupted or the program files related to the QuickBooks Pro-related.
- QuickBooks Pro-related files mistakenly or maliciously got deleted by the other program.
Error 30, which is a runtime error, could be caused due to various factors. Ensure that you troubleshoot every possible factor or cause of the problem, so that it may not occur again.
You can resolve the issue by:
- Conducting a full malware scan of the computer.
- Getting the junk cleaned from your system with the Dusk Cleanup.
- By performing the clean installation of the windows.
Common Symptoms of Error Codes 20 and 30 in QuickBooks
- You see the “Printer not activated Error Code -30” message while printing.
- The document fails to save as a PDF.
- QuickBooks freezes or crashes when printing or emailing forms.
- The printer responds but fails to complete the print job.
Final Thoughts
QuickBooks Error Code -30 is usually triggered by PDF printer driver issues, system misconfigurations, or damaged QuickBooks components. By following the verified solutions above, users can confidently troubleshoot and resolve the error. If the issue persists, consider reaching out to a certified QuickBooks ProAdvisor for expert help.
Frequently Asked Questions
Q 1: Why did I receive QuickBooks Printer Not Activated Error Code 30 while trying to print in the QuickBooks Pro version?
Ans: While facing this issue, the first thing you have to do is restart your PC and then turn on the printer. Ensure the printer paper is loaded accurately. After that, choose the “Windows Start button”, browse the Control Panel option, and double-click on “Printers and Faxes”. If the printer still shows offline, then hit your double right-click on the printer and then click on the “Use Printer Online”
Q 2: How would I get my print wirelessly if I am unable to resolve the QuickBooks Printer Not Activated Error Code 30?
Ans: The first thing is to make sure your Android gadget is associated with a similar wireless network that you need to make connections with your printer too. Then go to the system website and form a program on your mobile. After that, turn on “Printer” and set up the new settings for a wireless network connection.
Q 3: How would I get my PC to recognize my printer after fixing the QuickBooks Printer Not Activated error code 30?
Ans: Your printer may be bundled with a USB cable link whether or not it is a remote or wired printer. The process begins to plug the cables into the printer and your PC’s USB port. The direct connection should trigger your PC to recognize the printer and start up the product expected to finish the installation process.

Adams Williams
Adams Williams is a seasoned accounting professional with over 4 years of experience in bookkeeping, financial reporting, and business accounting solutions. Specializing in QuickBooks software, Adams combines technical expertise with clear, accessible content writing to help businesses streamline their financial processes. His insightful guides and how-to articles are crafted to assist both beginners and seasoned users in navigating accounting software with confidence.


