

Among 2 million users, QuickBooks is the most popular accounting software in every aspect, from big jobs to small accounting tasks. It is pretty understandable why QB and its related products are so popular. This program makes it simple to keep accurate records, which are required for some of your most critical tasks being a business owner, such as obtaining financing and filing taxes.
You can automate accounting processes instead of manually inputting data, just by integrating QuickBooks with BigCommerce. That means you’ll have more time and energy to focus on the other aspects of running a successful business. Continue reading this article to learn everything about BigCommerce QuickBooks Integration setup.
Table of Contents
- 1 What is Bigcommerce?
- 2 What is QuickBooks?
- 3 How to Set Up BigCommerce QuickBooks Integration
- 4 The Core Features of BigCommerce
- 5 Pros and Cons of BigCommerce
- 6 Importing BigCommerce Order to QuickBooks
- 7 Updating BigCommerce Stock Levels with QuickBooks
- 8 Setting Up Your Sync Settings
- 9 How to Set Up QuickBooks Payments
- 10 Frequently Asked Questions
What is Bigcommerce?
BigCommerce is a leading e-commerce platform that empowers users to build and manage their own online stores, sell products online, and securely process payments through multiple channels including credit cards and PayPal. Are. Since its inception in 2009, the company has experienced significant growth, now with a workforce of over 600 employees.
BigCommerce supports over 90,000 online stores in 120 countries. The BigCommerce platform includes several features such as fraud monitoring, abandoned cart recovery, and product ratings. B2B and B2C to over 60,000 SMBs, 2,000+ mid-market businesses, and well-known brands, cementing its position as a top performer in the e-commerce industry.
What is QuickBooks?
QuickBooks is the most popular software for accounting and managing expenses, or keeping track of daily health. In this, you can prepare invoices for customers, and pay bills, reports, and taxes. Multiple solutions are available to support a variety of business requirements, including in QuickBooks Product List: QuickBooks Online, QuickBooks Desktop, QuickBooks Payroll, QuickBooks Time, or QuickBooks Checking.
Struggling With Accounting or Bookkeeping?
Talk to our experts in minutes — No wait time!
- Free Consultation
- Fast Response
- Trusted Experts

How to Set Up BigCommerce QuickBooks Integration
- Make sure you have the following options configured in your BigCommerce account before connecting it to QuickBooks:
- Configure your payment options (you will need to resync the app whenever you add new payment methods in the future).
- Configure your tax settings (QuickBooks Online by OneSaas supports both manual and automatic taxes).
- SKUs will be required for all products and variants. When you set up the app, you may match existing SKUs in your BigCommerce catalog to the SKU field in QuickBooks by OneSaas, and there’s also an option to automatically produce SKUs in QuickBooks by OneSaas.
- In your QuickBooks account, you should also set up the following options:
- Configure your tax options
- Create a chart of accounts
- Turn on “Shipping” and “Discounts”
- “Track Quantity by Hand” should be enabled
- Select “Store Setup” from your BigCommerce dashboard.”
- After that, select the “Accounting” option
- Click “Install” which you find next to the “QuickBooks”
- Next, select the “Confirm” tab
- Once done with that then select “Connect to QuickBooks” (If you don’t already have a QuickBooks Online account, you can get a free trial by visiting this website)
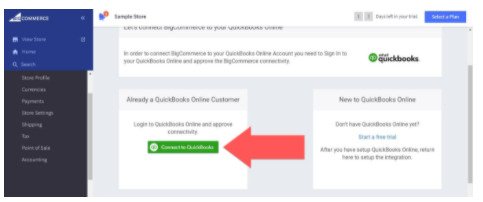
- Finally, click “Connect” to finish this setup process.

When you first log in to QuickBooks from BigCommerce, you’ll have two options for your first workflow: “When an Order is created in BigCommerce, produce an Invoice in QB” and “When stock levels are changed in QuickBooks, update stock levels in BigCommerce.”
The Core Features of BigCommerce
Here are the mentioned four different BigCommerce plans in a moment, but no matter which one you choose, you’ll enjoy all of these core features:
- Page Builder is a user-friendly drag-and-drop page-design tool.
- Unlimited user accounts
- Product Reviews potentiality
- Professional Reporting
- From Akamai Image Manager you can Optimize automatically Images.
- Allowing you to change HTML and CSS whenever you want
- Full-featured Content Management System (CMS)
- A mass of Search Engine Optimization (SEO) Features
- Integration with several Email Marketing Services, Including Well-Known Companies Like Mailchimp, Constant Contact, iContact, and Interspire
- Integration with PayPal (and a broad range of payment gateways)
- Capable to use any shipping rates to sell an unlimited quantity of digital or physical goods from any category.
- Get 12 free templates
- Gift Vouchers and Discount Coupons
Pros and Cons of BigCommerce
Here are the mentioned pros and cons of BigCommerce:
Pros of BigCommerce:
- Highly scalable: BigCommerce will support your store’s hosting abilities and framework upgrades. No matter, how much you wanna increase your business. The website will run smoothly in real time.
- Highly customizable: BigCommerce provides sufficient scope for personalizing your storefront. You can select 12 free templates or 183 paid templates of BigCommerce, and customize all themes using its Page Builder, this is very easy to use for building your websites.
- Multichannel selling: By using BigCommerce you can increase your sales in multiple channels including social media and common e-marketplaces like Amazon, Flipkart, Facebook Meta, and Instagram. From this platform, you can use other app integration for Walmart, Google, eBay, and more.
- Top-level search engine optimization (SEO): All essential HTML tags are embedded for your webpage in the BigCommerce back end; because that alone helps improve your search engine result page ranking. Also, your product page is designed to collect microdata from your customers and you can use this information to make your webpage even better.
- Impressive security features: BigCommerce hosts your online store and takes care of the security. It is ISO/IEC 27001 certified and deploys hardware firewalls for detecting hacker activities. BigCommerce Platform is Payment Card Industry Data Security Standard (PCI DSS) acquiescent and always up to date with the latest security scale.
Cons of BigCommerce:
- Annual sales limit: BigCommerce gets expensive over time because your revenue increases and your business grows, and you have no control over it.
- Limited, difficult-to-edit free themes: BigCommer provides you with only 12 free templates and some do not look fine, also they are not easy to edit or customize, either.
- No multilingual support: BigCommerce is only available in English language and it does not support any other languages. while your client is not comfortable in English then you can sell to them.
- Lack of native POS feature: BigCommerce allows you to integrate with a host of the leading payment service providers. It lacks an internal point of sale (POS), which slows down the checkout process and may make it less secure than a native POS.
- No ability to block IP addresses: You cannot modify the source code to ban IP addresses for harmful activities, unlike open-source platforms.
Importing BigCommerce Order to QuickBooks
The following choices are available in the process “When an Order is created in BigCommerce, Create an Invoice in QuickBooks Online”:
- Orders with Statuses can be retrieved: Choose whether the order statuses will be synchronized to QuickBooks as a Sales Invoice or a Sales Receipt.
- Order Number prefix: This prefix will be applied to all orders imported into QuickBooks from your BigCommerce account.
- Use Shipping Item: For your shipping line item, you can provide a “product” that assists you in tracking your shipping expenditures/charges.
- Discount Product: To keep track of discounts, specify a “product” for discount line items.
- Default Gift Card Product: To keep track of gift cards, specify a “product” for gift card line items.
- Assign them to the following: In QuickBooks, specify the type of customer record that will be created. The Sale Invoice will be assigned to the person who placed the order, the Customer’s Organization will be assigned to the person who placed the order’s company, and the “Generic Online Sale Customer” will be assigned to all Sale Invoices.
- Automate Invoice Numbers: Instead of using invoice numbers from BigCommerce, enabling this option will generate sequential invoice numbers in QB.
- Refunded Orders /Retrieve Canceled from BigCommerce: When orders are cancelled, refunded, or partially reimbursed in BigCommerce, determine whether QuickBooks will produce refunds. You’ll need to go into QuickBooks and manually alter the partial returns to the correct amount because they’ll be registered as full refunds by default.
- Refund Order Number Prefix: You can use the same prefix for refund order numbers as you do for ordinary order numbers.
- Match QuickBooks Items By: You can check whether existing QB items are matched to BigCommerce products by name or SKU, if you have them.
- Create New Items As: You must pick whether new items in BigCommerce are created as “Non-Inventoried Items” or “Inventoried Items”, if you want them to be created automatically in QB. Non-Inventoried Items will not allocate information to Income, COGS, or Asset Accounts, but Inventoried Items will.
- Use Income Account: The account you select here will be the default income account for all items sold.
- Use Expense Account: The account you select here will be used as the default expense account for all purchases.
- Use Income Account for Inventoried Items: This account will be used as the default income account for all inventory items.
- Use COGS Account for Inventoried Items: This account will be used as the default COGS account for all inventory items.
- For Inventoried Items, Use Inventory Asset Account: The account selected here will be the default Inventory Asset account for all items.
- Inventory Starting Date: The day you begin tracking the quantity of Inventoried Items on hand in QuickBooks. Set this at least one day before the current date to ensure that sales are produced from items created by the integration.
- Map Tax Codes: Select appropriate QB tax codes for your BigCommerce tax codes. If the appropriate tax code isn’t available in the dropdown menu, you’ll need to create it in QuickBooks and then reload the app. If you have QuickBooks’ “Automated Sales Tax” setting enabled, you won’t need to map anything.
- Deposit Payments into Account: By default, all payment methods that have not been individually mapped will be delivered to the account selected here.
- Map Payment Methods: Match BigCommerce payment methods to specific QuickBooks accounts using the dropdown menu.
You may also read this: WooCommerce QuickBooks Integration
Updating BigCommerce Stock Levels with QuickBooks
If your products were manually generated in QuickBooks with stock levels that match your BigCommerce stock levels, the “When stock levels are updated in QuickBooks, update stock levels in BigCommerce” workflow should be activated.
Even in that situation, you should only utilize the “When an Order is created in BigCommerce, create an Invoice in QB” workflow for the first or second synchronization. You won’t have to manually create products or change their stock this way.
If you decide to adopt this approach, the next step is to decide whether to match current QuickBooks products by name or by SKU. Then click “Save.”

Setting Up Your Sync Settings
Set your time zone, choose an integration start date, and tick the box to agree to the OneSaas user agreement terms and conditions after you’ve finished setting up your processes.
The only thing left to do is press the “Turn Integration On” button.
Supported Triggers and Actions
Triggers
| New Order Triggers when a new order is placed (with line item support). | New Customer Triggers when a new customer is added. |
| New Account Triggered when you add a new account. | New Bill Triggers when a new bill is added. |
| New Customer Triggered when you add a new customer. | New Estimate Triggered when you add a new estimate. |
| New Expense Triggers when a new expense is added. | New Invoice Triggered when you add a new invoice. |
| New Invoice Triggered when you add a new invoice (with line item support). | New Sales Receipt Triggered when a new sales receipt is added (with line item support). |
| New Payment Triggered when a payment is received (with line item support). | New Purchase Order Triggers when a new purchase order is added. |
| New Sales Receipt Triggered when a new sales receipt is added. | Updated Customer Triggered when an existing customer is updated. |
| New Vendor Triggered when a new vendor is added. |
Actions
| Create Customer Address Adds a new address to an existing customer. | Create Coupon (Category) Creates a new coupon attached to a category. |
| Create Customer Creates a new customer. | |
| Create Bill (Item Based) Create a new bill, optionally tied to a customer. | Create Bill (Account Based) Create a new bill, optionally tied to a customer (with line item support). |
| Create Bill (Item Based) Create a new bill, optionally tied to a customer (with line item support). | Create Credit Memo Creates a new credit memo. |
| Create Customer Adds a new customer. | Create Estimate Create a new estimate (with line item support). |
| Create Expense Creates a new expense using check, cash, or credit card. | Create Product/Service Creates a new product or service. |
| Create Journal Entry Creates a new journal entry. | Create Invoice Adds a new invoice (with line item support). |
| Create Sales Receipt Adds a new sales receipt (with line item support). | Create Payment Creates a new payment, optionally linked to an invoice. |
| Create Purchase Order Creates a new purchase order. | Create Refund Receipt Creates a new refund receipt. |
| Send Invoice Send an existing invoice. | Send Sales Receipt Send an existing sales receipt. |
| Create Time Activity Creates a new single time activity. | Update Customer Updates an existing customer. |
| Update Invoice Updates an existing invoice (with line item support). | Create Vendor Adds a new vendor. |
| Find Account Find an account by name. | Find Customer Find a customer by name or email address. |
| Find Invoice Find an invoice by number. | Find Product(s) Find a product by name (with line item support) |
| Find Vendor Find a vendor by name. | Find or Create Customer Finds or creates a specific customer v2. |
| Find or Create Vendor Finds or creates a specific vendor. |
How to Set Up QuickBooks Payments
You might want to use QB Payments as a payment gateway in addition to using QB for BigCommerce bookkeeping. However, BigCommerce’s default payment gateway is PayPal, but QuickBooks Payments is a good choice. It accepts Visa, Mastercard, American Express, Apple Pay, and Discover. Moreover, it offers premium features like invoicing and fraud prevention.
Follow these steps to set up QuickBooks Payments as a payment method for your BigCommerce store:
- Go to the “Store Setup” and then select “Payments” from your BigCommerce dashboard
- Move to the section “Online Payment Methods” and then click “Set up” which is next to the “QuickBooks Payments” option
- Now, click the button “Connect to QuickBooks”
- After that, a pop up window appears on your screen asking you to sign in with your QB account
- Finally, end the integration set up by entering the credentials and choose “Sign-in”.
Conclusion!
So, Bigcommerce QuickBooks Integration is not only an add-on, but also enables you to save your quality time with the automation process. Take advantage of additional applications to save time so that you can focus on other productive tasks to run a successful business.
Frequently Asked Questions
Q 1: Can BigCommerce connect directly with QuickBooks?
Ans: Yes, BigCommerce can integrate seamlessly with QuickBooks Online to automate sales, payments, and customer data syncing. This helps reduce manual data entry and ensures accurate, real-time accounting across both platforms.
Q 2: What data gets synced between BigCommerce and QuickBooks?
Ans: The integration syncs orders, customers, taxes, shipping, and payment details automatically. It ensures every transaction in BigCommerce is recorded properly in QuickBooks for accurate reporting.
Q 3: How often does the sync update information?
Ans: Most integrations run automatic daily or hourly syncs, with the option for manual syncs if needed. You can schedule updates based on your workflow to keep your QuickBooks data always current.
Q 4: Is the setup process complicated?
Ans: No, setup is straightforward — you simply connect your BigCommerce store and QuickBooks account, then map accounts and taxes. The process typically takes just a few minutes and requires no technical expertise.
Q 5: What if an order or payment fails to sync?
Ans: If data doesn’t sync correctly, you can check the sync logs or integration settings for errors. Once corrected, you can re-run the sync manually to ensure all records are properly updated in QuickBooks.

