


Intuit has introduced cloud computing-based software to deal with accounting issues and delays. This software is based on the integration framework that helps in facilitating all internet-based payments and the privacy of your account.
Manual operations are preferred to import PayPal transactions. There is only one type of payment gateway that supports online cash transactions all over the world and it is named PayPal. PayPal is a web-based payment gateway. It is the electronic option that is opposed to the paper payments like cash or check.
As we all know QuickBooks plays a very important role in storing and retrieving data of all types of companies — small, medium, and entrepreneur. As QuickBooks is also used for accounting purposes in all types of businesses that’s why it is very important to import PayPal transactions in QuickBooks. So, for importing the PayPal transaction in QuickBooks, we have to add it manually. Here, in this article, we will discuss how we can import PayPal transactions in QuickBooks Desktop, and Online.
Table of Contents
Features of PayPal
There are many features and benefits of integrating the QuickBooks Desktop with the PayPal account. Some of them are listed below.
- It is a time saver for the company as in this you have to add all the PayPal exchanges directly in the accounting setup. So it will save your money and time.
- With the help of QuickBooks desktop and the PayPal integration, the customer can easily pay online from anywhere anytime all over the world with the help of MasterCard, etc.
- Helps in easy and Quick payments of credit cards.
- One of the best features of PayPal is security. PayPal provides security to global customers including QuickBooks. It provides a safe and secure monitor flow. It had an inbuilt application to detect and deter fraud etc and it gives the user an instant warning.
You can set up QuickBooks with PayPal in just a few clicks. The integration of QuickBooks with PayPal can be done in a few steps.
How to Import PayPal Transaction in QuickBooks Desktop
The PayPal transaction allows you to keep track, of the orders tally, bank support, and the transaction on your Desktop. To execute the advance and the PayPal transaction you have to follow the following steps:
- It had the inbuilt feature that it can choose the app and search for the PayPal connection.
- Check for the file from QuickBooks that you want to integrate.
- Select the install button and wait for a while before the installation will be completed.
- Decide to whom you want to give the authority of performing the task.
- Navigate to the email option and then enter the registered email id and password.
- Sign in to your PayPal account and agree to all the data synchronization.
- Hit the return to intuit and select PayPal bank.
- Click on the next button to save the data and for the conversation on the business rate.
- Now click on the next button and you can choose the date for the transaction.
- Once you are done with the above steps now click an OK button to save all the changes.
Read this: How to Import General Ledger into QuickBooks
How to Import PayPal Transactions in QuickBooks Online?
There are three types of methods to import the data in payroll transactions manually.
Method 1: Importing the Data From the App Center.
Follow the following steps to import data from the app center:
- First, open the software and hit the apps button.
- Now we have to locate the sync with PayPal.
- Now you have to navigate to the settings in the sync PayPal app.
- As your above steps are completed, the new window will open in front of you.
- Now navigate to the manual import section and hit on the Run button to save the data and run the file.
Method 2: QuickBooks Online
Use the following steps to import data via QuickBooks online:
- First, you have to log in to your QuickBooks Account with the help of a user ID and Password.
- Navigate to the app tab and click on the, my app option to open it.
- Now search for the Sync with PayPal card.
- Click on the settings button which is very important in sync with the PayPal app card,
- The new tab will open in front of you.
- Now, press the run button to start manual imports.
- After clicking on the system you have to select the date range and please set it to the range for the manual importing.
- Now if the report is Ok then you have to click on the run command to run the files.
Read this: How to Import Excel Journal Entries into QuickBooks
Method 3: Import Through PayPal App
Follow the following steps to import data with the help of pay pal app:
- Navigate to the left menu and click on the Apps tab.
- Now search for the option connect to PayPal.
- Choose the option to get the app now.
- Now, look for the case if the file is to ship.
- Click on the install button to run the command.
- Select Allow button to command.
- Now you have to enter the id and the password of your account which is linked with the payroll.
- Hit the next button to move forward.
- Sign into your payroll account by using the id and password of the account.
- Now hit the personal pay bank account option.
- Track your transaction and click on the next button.
- Set the date from which you want to start the recording of the importing data.
- Hit the done button and come out of the screen.
Read this: How to Import CSV files into QuickBooks
How to Set Up QuickBooks to Import from PayPal
Following are the steps to import the data from QuickBooks to PayPal:
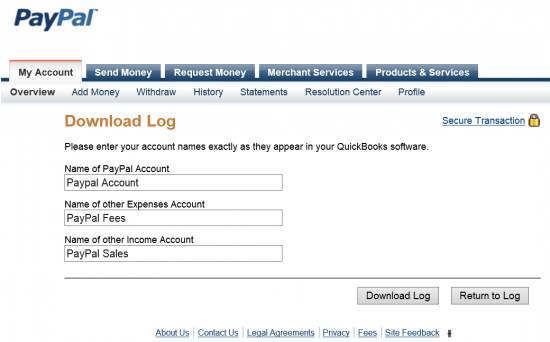
- First, you have to create a new bank account.
- Give the name of the PayPal account to the new account that you create earlier.
- Now create the expense account which is named PayPal fees.
- Create the income account which is named PayPal sales.
Steps to Use the .IIF file
PayPal transactions contribute to and deduct funds from your PayPal account balance. When customers make payments, their balance increases, while PayPal fees result in a decrease. When you import the activity using the .iif file, the increments in your balance are logged into a designated income account, while the decrements are recorded in a designated expense account.
During the import process, QuickBooks will attempt to match the customer names being imported with existing customer names in its database. If a match is not found, the customer name will be added to the Other Names List.
Important: Always backup your QuickBooks file before importing the .iif file!
Download Your .iif from PayPal
The activities which are done are to add PayPal account balance as well as subtract funds from the accounts. Following are the steps to use the .IIF file.
- First, you have to log in to your payroll account with the help of a login ID and Password.
- Navigate to the account tab and then click history.
- Click on the download history and then set the range of the data.
- Navigate to the file type option and click on the QuickBooks .iif file.
- Hit the history to download the file.
- Enter the name of the account.
- Enter the name of the PayPal account.
- Name the other expenses account.
- Be ensure that the expense account is not the sub-account of all the expense accounts.
- Add the name of the balances related to pay accounts must be entered in PayPal but if you enter the name of the vendor is enter then it must be entered in QuickBooks.
- Other types of the income account name
- Be ensure that the income account is not the subaccount of any other income account because if it is deposited in QuickBooks then it is converted to the bank account.
- In the case of a PayPal transaction, you can enter the name of the account here but the name of the customer in PayPal is entre in the QuickBooks.
- After completing the above procedure you have to save your file as a .iif file on your desktop.
- Navigate to the QuickBooks file menu and then select the utilities from the list of menus.
- In utilities hit the import button and then select the IIf files.
- Now locate the IIF file on your system where you store it.
- Hit the open button to mail it
Importing PayPal transactions with one of the following statuses is not possible:
- Canceled
- Paid
- Partially Refunded
- Pending
- Refunded
- Removed
In addition, any Transaction of the following types will not be imported:
- Add Funds from a Bank Account
- Withdraw Funds to a Bank Account
- Cancelled Transfer
- Cancelled Fee
- Refund
Frequently Asked Questions
Q 1: Can you link PayPal transactions to QuickBooks?
Ans: Connect to PayPal provides a smooth, intelligent, and uncomplicated method to integrate your PayPal transactions with QuickBooks. By establishing a direct connection with PayPal, we will fetch any transactions that impact your balance in PayPal and exhibit them within the banking section of your QuickBooks account.
Q 5: How much does PayPal Charge for QuickBooks?
Ans: You can take advantage of accepting online payments without any initial expenses or subscription fees. PayPal charges for QuickBooks invoices begin at only 1.7% + $0.20 per transaction for credit and debit card payments.
Q 6: Can I manually import transactions after completing the Sync with PayPal setup?
Ans: Yes, you can manually import your PayPal transactions into QuickBooks Online after the initial setup.
Q 7: Can you sync PayPal with QuickBooks desktop?
Ans: Effortlessly synchronize your PayPal payments with QuickBooks Desktop! All the necessary transaction information, including amounts, products, customers, fees, and more, will be automatically recorded and accounted for.
Q 8: How much is invoice fee on PayPal?
Ans: Using PayPal for invoicing will cost you 3.49% + $0.49 per transaction, which will be taken from your account after payment has been received. There are no monthly, annual, or subscription fees at PayPal.

