


Whether it’s QuickBooks or any other software, a stable internet connection is essential for downloading updates. If your internet connection becomes unstable, you may encounter errors during QuickBooks Desktop or payroll updates. One such issue is QuickBooks Error 12031, which belongs to the 12XXX series of update errors.
Continue reading this guide to learn expert-recommended methods to fix QuickBooks Error 12031 efficiently.
Struggling With Accounting or Bookkeeping?
Talk to our experts in minutes — No wait time!
- Free Consultation
- Fast Response
- Trusted Experts

Table of Contents
- 1 Root Causes of QuickBooks Error 12031
- 2 How to Fix QuickBooks Payroll Error Code 12031?
- 2.1 Solution 1: Install QuickBooks Updates in Safe Mode
- 2.2 Solution 2: Reset Network Settings
- 2.3 Solution 3: Verify Your Internet Connection
- 2.4 Solution 4: Verify the Internet Explorer Settings
- 2.5 Solution 5: Install the digital signature certificate
- 2.6 Solution 6: Repair QuickBooks desktop
- 2.7 Solution 7: Do a Clean Installation of QuickBooks Desktop
- 2.8 Step 3: Re-installation of the software
- 2.9 Solution 8: Temporarily Disable Firewall or Antivirus Software
- 2.10 Solution 9: Adjust QuickBooks Internet Settings
- 2.11 Solution 10: Update QuickBooks to the Latest Version
- 2.12 Solution 11: Disable Proxy Server (If Applicable)
- 2.13 Solution 12: Reinstall QuickBooks
- 3 Conclusion
- 4 Frequently Asked Questions
- 5 Adams Williams
Root Causes of QuickBooks Error 12031
QuickBooks Error 12031 can be triggered by several factors. Below, we’ll break down the most common causes:
- Slow or troubled internet connection: These issues are the primary reason for Error 12031 in QuickBooks. The software needs an accurate internet connection to maintain contact with Intuit servers, both for software updates and online services.
- A strict firewall and antivirus software setup: It can prevent QuickBooks from accessing the internet-based functions. The security system possibly perceives QuickBooks as a harmful program, which leads to blocked internet connectivity for the program.
- Incorrect date and time setting: QuickBooks fails to create secure connections because your computer maintains incorrect date and time settings. Secure connections require proper time stamps to perform their verification processes.
- Inappropriate QuickBooks Installation: Incomplete installation of QuickBooks together with corrupted files leads to error number 12031. The connections can fail because of installation cut-offs, software incompatibilities or damaged disk systems.
- Old QuickBooks Version: QuickBooks connections to Intuit servers can break when users operate with an old QuickBooks program.
- Internet Explorer Issues: The program necessitates Internet Explorer regardless of user-selected default browser application for its online capabilities. The connectivity of QuickBooks may be impaired when users experience Internet Explorer settings problems including defective proxy settings and outdated security standards.
- Restrictive UAC Settings: Narrow UAC settings under Windows User Account Control (UAC) might stop QuickBooks from obtaining vital system resources which results in connection errors.
- Corrupted Digital Certificate: QuickBooks achieves server authentication through digital certificates that may get corrupted. A damaged or old certificate from authentication will result in connection issues.
- Network Issues: The local network problems including router difficulties and DNS issues with network congestion make QuickBooks unable to access the internet.
- Conflicting Third-Party Software: The operation of third-party software installed on your computer might occasionally compete with QuickBooks which results in connection errors.
How to Fix QuickBooks Payroll Error Code 12031?
Now that we know the potential causes, let’s explore the most effective troubleshooting steps to resolve QuickBooks Error 12031.
Solution 1: Install QuickBooks Updates in Safe Mode
Updating QuickBooks software is one of the best ways to rectify many error codes in the accounting software. However, one of the main obstacles in the form of error 15225 completely disrupts the overall update process.
One of the best ways to rectify this error is by running the system in Safe Mode and then beginning to update the QuickBooks software.
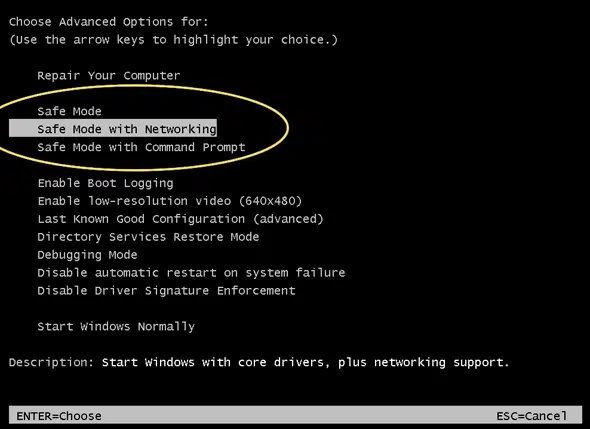
- First, you need to restart the system and then keep hitting the F2 key again and again till the Advanced Boot Option Screen appears. Now access the down arrow key present on the keyboard to get the Safe Mode with Networking option.
- Now press the Enter key.
- Now you need to run the QuickBooks Desktop software by clicking twice on the Desktop icon present in QuickBooks.
- Next, go to the Help option and then select the Update QuickBooks Desktop option.
- Then you need to press the Update Now option.
- Now click the option, Get Updates.
- After all the Updates get downloaded, you need to start the system again to begin the automatic installation of such updates.
- Lastly, press the Close option.
Solution 2: Reset Network Settings
Sometimes QuickBooks can experience issues due to incorrect network settings. To reset these settings to their default configuration:
- Open QuickBooks and click on the Help menu.
- Select Internet Connection Setup.
- Click Advanced Connection Settings and choose Restore Default Settings.
- Restart QuickBooks and attempt to update again.
Solution 3: Verify Your Internet Connection
The first step to resolve this error is to check if your internet connection is functioning properly. A poor or unstable connection can cause QuickBooks to fail when trying to reach its servers.
- Test your connection: Visit other websites using your browser or perform a speed test to check if your connection is working correctly.
- Switch to a wired connection: If you’re on Wi-Fi, try switching to a wired Ethernet connection for a more stable connection.
- Restart your modem/router: Unplug your router or modem for 30 seconds and plug it back in to reset your connection.
Once you confirm your internet connection is stable, try updating QuickBooks again.
Solution 4: Verify the Internet Explorer Settings
You must first ensure that Internet Explorer is configured as the default browser before proceeding with the next steps:
- Verify that the system’s date and time are correct
- Next, perform a double-click on the “Time display”
- Then correct the date and time, if necessary
- The next step is to pick a time zone and then make sure it’s the right one

- The strength of the Cipher is then verified
- When you’re done with that, go to the official Intuit website
- Then, to see the menu bar, hit the Alt key
- After that, you must right-click the file and select the properties option
- Check the connection number, then type in bit encryption
- Now you must update your settings using the tools before moving on to Internet options
- After that, select all temporary files and delete them using the delete key
- Go to the Connections tab and select LAN settings from the drop-down menu
- Going forward, select the checkbox next to “Automatically detect settings”

- If you don’t plan on using any of the proxy servers, make sure they’re all blank
- Then, on the advanced tab, scroll down and check the SSL 2.0 and SSL3.0 boxes

- After that, you must verify the publisher’s certificate and then uncheck the box next to it
- Again, go to the advanced tab, scroll down to the bottom of the list
- The final step is to confirm that TLS 2.0 is unchecked, and that you’re ready to go.
Solution 5: Install the digital signature certificate
- First of all, close the QuickBooks
- Now, track the C:\Program Files(x86)\Intuit\QuickBooks path
- Then, locate the QBW32.exe
- Once you locate the QBW32.exe then hit the right-click on it
- Choose the “Properties” menu
- Hit the click on the “Digital Signature”
- But make sure that Intuit Inc. is chosen in the list
- Click on the “Details” option to view the image
- From the details window, click on the “View Certificates”
- Click on the “Install Certificate” option
- Hit the Next button until the program is not finished
- Click on the Finish button
- After this, restart the system
- Open your QuickBooks again
- At last, try to download the update once again
Solution 6: Repair QuickBooks desktop
You can repair QuickBooks via doing the means referenced beneath:

- Most importantly, you need to reboot the system after shutting every one of the projects impeding the QuickBooks programming.
- After that reinforcement the company file.
- And afterward hit the Start choice moving to the control panel, by moving to the Start menu and opening the inquiry bar, trailed by entering the control panel in the pursuit box.
- After opening the control panel, hit a click on the projects and highlights alternative.
- And afterward, click on uninstall program. If you can’t detect the choices, then, at that point, all things considered, select projects and transition to program highlights.
- The subsequent stage is to click on program rundown and afterward click on uninstall, proceed, and next alternatives separately.
- When finished with that you are needed to click on repair alternative and afterward hit straightaway. Additionally, stand by till the opportunity repair measure concludes.
- After that, you need to hit the Finish tab and afterward reboot the system whenever provoked.
- The last advance in this cycle is to download the most recent QuickBooks discharge.
Solution 7: Do a Clean Installation of QuickBooks Desktop
You can perform a clean installation process of the QB. The process includes:
- Uninstalling of the QuickBooks Desktop
- Using QB Clean Install Tool for Windows
- Re-installation of the software
Step 1: Uninstalling of the QuickBooks Desktop
- To begin with, use the Windows + R keys on your computer to start the RUN command
- Then type Control panel into the search field followed by clicking the Ok button
- Now go to Programs and Features tab and select Uninstall a Program from the drop-down menu
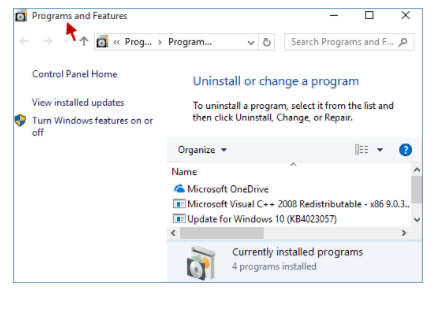
- In the end, from the list of all the Software, select QuickBooks Desktop and Select Uninstall, then follow the on-screen instructions to finish this step.

Step 2: Use the QuickBooks Clean Install Tool for Windows
You’ll need to rename the installation folders in this step which you can do quickly with the QuickBooks clean install tool. The following are the steps to be performed:
- To begin, go to Intuit’s official website and download QuickBooks Tools Hub

- After that, go to the file folder where the download was saved and follow the on-screen installation instructions to install the application
- Once done then click “I Accept” to finish the installation and then access the QuickBooks Tool Hub from the Desktop
- After selecting Installation Issues, go ahead and then click Clean Install Tool

- After that, select the QuickBooks Desktop Version that was previously installed and click Continue

- After some time, the message “Please install your copy of QuickBooks to the default location” will show on your screen; click OK to complete this stage
If you are unable to access QuickBooks while renaming the folders, the following actions should be followed:
- To go to the Task Manager, go to the Windows taskbar >>> Task Manager

- Select the Processes tab and then click the image name column heading
- Then click END after selecting exe, QBDBMgern.exe, qbw32.exe, and QBCFmonitorservice.exe.

- Finally, click “Yes” after receiving a confirmation message.
Step 3: Re-installation of the software
- Follow the onscreen instructions after inserting the QuickBooks Desktop CD
- After the software has been installed, it will prompt you for the product and licensing number

- Next step is enter the information exactly as it was given to you
- To finish the process, enter the above information and then follow the on-screen instructions
- Then press the Next button
- Select Next >>> install after selecting the installation type
- Finally, you are all set to run QuickBooks software.
Solution 8: Temporarily Disable Firewall or Antivirus Software
Many security programs, such as antivirus software and firewalls, can block QuickBooks’ access to the Internet. To check if this is the cause of the issue, temporarily disable these programs.
Disable Windows Firewall:
Go to the Control Panel > System and Security > Windows Firewall > Turn Windows Firewall on or off. Temporarily turn off the firewall and see if the issue is resolved.
Disable Antivirus Programs:
Open your antivirus software and turn it off temporarily. If QuickBooks Error 12031 goes away after disabling these programs, you may need to adjust the settings in the firewall or antivirus software to allow QuickBooks access.
Important Note: Make sure to turn your firewall and antivirus back on once troubleshooting is complete.
Solution 9: Adjust QuickBooks Internet Settings
Incorrect settings in QuickBooks can prevent the software from connecting to the Internet. To fix this, you need to verify that QuickBooks is properly configured to use your system’s network settings.
- Go to QuickBooks and select the Help menu.
- Choose Internet Connection Setup.
- Select “Use my computer’s Internet connection settings”.
- Click Next and then click Test Connection to verify that QuickBooks can successfully connect to the Internet.
If the test passes, close the setup and try updating QuickBooks again.
Solution 10: Update QuickBooks to the Latest Version
An outdated version of QuickBooks may be the root cause of Error 12031. Keeping QuickBooks up to date ensures that you benefit from bug fixes, security improvements, and better connectivity with servers.
- Open QuickBooks and navigate to the Help menu.
- Click “Update QuickBooks”.
- In the Update QuickBooks window, select Update Now.
- Once the update is complete, restart your computer and check if the error has been fixed.
Also, see this: How to Upgrade QuickBooks Desktop?
Solution 11: Disable Proxy Server (If Applicable)
If you’re using a proxy server to access the Internet, it could be causing conflicts with QuickBooks. Disable the proxy server temporarily to see if it resolves the issue.
- Go to Control Panel > Internet Options.
- Click on the Connections tab and then select LAN Settings.
- Uncheck the box to Use a proxy server for your LAN.
- Click OK and restart QuickBooks.
Solution 12: Reinstall QuickBooks
If none of the above solutions work, a damaged QuickBooks installation may be the cause of the issue. Reinstalling QuickBooks can resolve any corrupted files.
- Uninstall QuickBooks: Go to Control Panel > Programs > Uninstall a Program, then select QuickBooks and uninstall it.
- Reinstall QuickBooks: Download the latest version from the official QuickBooks website and follow the installation steps.
- Once installed, try updating QuickBooks to verify the issue is resolved.
Conclusion
QuickBooks Error 12031 can be a frustrating issue, but with the right troubleshooting steps, it can be easily resolved. By following the solutions outlined in this guide, you can fix the error and ensure your QuickBooks software continues to work smoothly. Regular maintenance, such as updating QuickBooks and verifying Internet settings, will help prevent similar issues in the future.
Frequently Asked Questions
Q 1: What causes QuickBooks Error 12031?
Ans: It occurs due to internet connection issues, firewall blocks, outdated QuickBooks, or incorrect settings.
Q 2: How can I fix QuickBooks Error 12031?
Ans: Check the internet connection, disable firewalls, update QuickBooks, run File Doctor, or reinstall QuickBooks to resolve it.
Q 3: Can antivirus software cause QuickBooks Error 12031?
Ans: Yes, antivirus or firewall software may block QuickBooks, preventing it from connecting to the internet.
Q 4: How do I update QuickBooks to avoid Error 12031?
Ans: Go to Help > Update QuickBooks > Update Now, then restart QuickBooks to install updates.
Ans: Yes, a slow or unstable internet connection can cause QuickBooks Error 12031 during updates or online transactions.

Adams Williams
Adams Williams is a seasoned accounting professional with over 4 years of experience in bookkeeping, financial reporting, and business accounting solutions. Specializing in QuickBooks software, Adams combines technical expertise with clear, accessible content writing to help businesses streamline their financial processes. His insightful guides and how-to articles are crafted to assist both beginners and seasoned users in navigating accounting software with confidence.

