

Creating an invoice in QuickBooks is essential for managing sales transactions efficiently. QuickBooks allows users to generate and customize invoices with company details, track payments, and send them directly to customers. The software enables businesses to apply taxes, set due dates, and manage recurring invoices for better financial control. With features like automated payment reminders and seamless record-keeping, QuickBooks simplifies the invoicing process. Whether using QuickBooks Online or Desktop, learning how to create an invoice in QuickBooks helps businesses streamline cash flow and maintain accurate financial records effortlessly.
Continue reading for detailed instructions on:
- How to generate an invoice using QuickBooks Desktop and Online.
- Using sales orders and estimates to create an invoice in QuickBooks.
- Advice on customizing and automating invoices.
Table of Contents
How to Create an Invoice in QuickBooks Desktop
Create an invoice from scratch:
- Choose Create Invoices from the Customers menu or the Home page.
- If a customer or customer job is not yet in your system, click Add New or choose from the Customer: Job drop-down list.
- Please provide the necessary information. Include the invoice number, recipient’s details, date sent and due, and any terms.
- In the detail section, check every item on the invoice. Note: When you add items, your configurations will automatically fill in the description and amount. With every new invoice, you can adjust or remove them as necessary.
- Then you have to select Save and then close.
Create an Invoice From a Sales Order
In QuickBooks Desktop, there are two methods for creating an invoice from a sales order.
From the Sales Orders window
- Go to Sales Orders and choose Create Invoice.
- To include every item from your sales order in the invoice, you have to select Create Invoice for all of the sales order(s). Click Create invoice for selected items if you only want a portion of the items on your invoice.
- Make any required adjustments to the invoice.
- Then click Save and Close.
From the Invoice window
- Choose “Create Invoices” from the “Customer” menu or the “Home” page in QuickBooks.
- You have to choose a customer or customer job from the “Customer: Job” drop-down menu.
- Select one or more sales orders that include the items you wish to have included in the bill.
- Make any required changes to the invoice.
- Press “Save & Close.”
Read more: How to Create an IIF File for QuickBooks
Create an Invoice From an Estimate
You can turn your estimate into an invoice once a customer accepts it.
You may still submit an invoice even if the task isn’t finished as long as you are billing a set fee. When the work is finished, you can turn the estimate into an invoice if time and expenses affect your pricing.
To do this, there are two processes.
From the Estimate window
- Open the estimate of your choice.
- On the form, you have to select Create Invoice at the top.
- You should probably get a prompt for the items and quantities on the invoice that you need to fill out appropriately if progress invoicing is enabled.
- Modify the data on your invoice as necessary.
- Lastly, you have to click on “Save & Close.”
From the Invoice window
- Click “Create Invoices” from the QuickBooks “Home” page or the “Customer” menu.
- Choose a customer or customer job from the drop-down list labeled “Customer: Job.” The “Estimates” window becomes available.
- Select the estimate that you like to have on the bill. You can only choose one estimate at a time in QuickBooks.
- You can change the information in your invoice as required.
- At last, you have to click Save and Close.
Read more: Create A New Company File From An Existing One in QuickBooks
How to Create an Invoice in QuickBooks Online
Learn about the many features and customization choices that QuickBooks Online provides to streamline your accounts receivable process and create invoices that accurately represent your brand.
Convert an Estimate to an invoice
From an existing estimate create an invoice in QuickBooks Online”
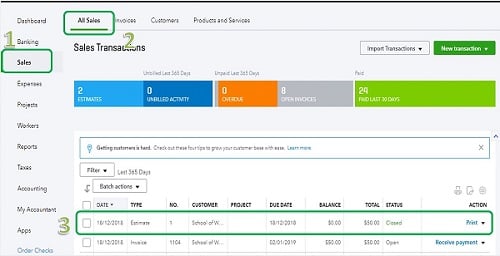
- In Sales, you have to select All Sales.
- Locate the estimate that has to be converted. You need to change the status in the corresponding drop-down option to “Pending” or “Accepted” if the status column indicates “Declined.”
- Click “Convert to invoice” in the “Action” column of your estimate if the status is “Accepted.”
- If it displays “Pending,” then you can select “Convert to invoice” from the drop-down menu.
- Check your invoice one more time, make any last adjustments, and then click “Save.”
Convert a Sales Order to an Invoice
Sales orders are not yet supported by QuickBooks Online, although they are by integrated third-party software like Method.
The method won’t sync with QuickBooks when you create sales orders since QuickBooks Online doesn’t have them. However, Method allows you to instantly transform a sales order into an invoice that will sync with your accounting program.
Conclusion
Mastering the process of creating invoices in QuickBooks Desktop empowers businesses to streamline their billing process, enhance financial accuracy, and maintain a professional image with clients. By using the various features within QuickBooks Desktop, such as customizable templates, automatic calculations, and seamless integration with other financial functions, users can efficiently generate invoices tailored to their specific needs. If you still face any kind of issue then you can call the help desk team.
Frequently Asked Questions
Q 1: Is QuickBooks Online invoicing feature free?
Ans: Although QuickBooks Online isn’t free, it does include many different pricing plans that include invoicing. Depending on the particular plan you select, there are several steps involved in creating an invoice in QuickBooks Online.
Q 2: How to schedule recurring invoices in QuickBooks?
Ans: Using QuickBooks Online, create recurring invoices as follows:
- Select Recurrent Transactions from the Settings gear icon, then select New.
- Click OK after choosing Invoice as the Transaction Type.
- Then you have to change the Type to Scheduled, then choose Send emails automatically.
- Now you have to click Save template.
Within QuickBooks Desktop:
- Choose Quick Create and then Invoice from the main screen.
- Select an already-existing client or add a fresh one.
- Complete the required fields and turn On the online payment option.
- You have to click Memorize Invoice in the Edit option.
- Select Save and Send.
- You may now set up a recurring transaction using this invoice in your Settings (gear icon).
- Ensure that the Type is set to Scheduled and that the Automatically Send Emails box is checked.
Q 3: Is it possible to accept payments in QuickBooks Online?
Ans: Yes, you can accept payments in QuickBooks Online, for an additional fee you have to sign up for QuickBooks Payments.
- In settings, you have to click the gear icon, then you have to click Recurrent Transactions, and then you have to click on New.
- Then you have to select Payments, then in the QuickBooks Payments section, you have to click Learn more.
- Now you have to click Set up Payments.

