

All you need to do is take a few easy steps on your account to erase an audit trail in QuickBooks. Don’t worry.
The QuickBooks Audit trail feature enables you to get a detailed track of the information like by whom and when the modification was made. When you have more than one person using the QuickBooks file at a specific time then, for this situation, you should enable the Audit Trail option by simply choosing the Audit Trail check box.
Table of Contents
- 1 What is an Audit Trail in QuickBooks?
- 2 How to Find and Erase an Audit Trail in QuickBooks?
- 3 Find Audit Trail in QuickBooks Pro, Premier, Enterprise, Desktop & Online
- 4 How Do I Disable the Audit Trail in QuickBooks?
- 5 How to Use Audit Trails for Multiple User Access?
- 6 How to View The Transaction Modifications in The Audit Trail in QuickBooks?
- 7 How to Use The Audit Log in QuickBooks?
- 8 Where Can You Discover Audit Reports in QuickBooks?
- 9 How to Customize QuickBooks Audit Trail Reports?
- 10 Final Word!
- 11 Infographic Of Solutions For Clear or Erase an Audit Trail in QuickBooks
- 12 Frequently Asked Questions
- 12.1 Q 1: Does Audit Trail Elimination affect QuickBooks?
- 12.2 Q 2: How do Business Owners use the audit trail report regularly?
- 12.3 Q 3: How do I clear an audit trail in QuickBooks?
- 12.4 Q 4: Can you see an audit trail on the QuickBooks desktop?
- 12.5 Q 5: What is the difference between the audit trail and the transaction log in QuickBooks?
- 12.6 Q 6: Can you turn off the audit Trail in QuickBooks online?
What is an Audit Trail in QuickBooks?
The Audit Trail in QuickBooks is used to manage and track all the reports that are deleted, modified, or newly added transactions in your account. You can also track the lost transaction using the Audit trail feature in your QuickBooks desktop account. It becomes the life savior feature if you enable it in your account as it provides you with the previous transactions that are no more in your account.
How to Find and Erase an Audit Trail in QuickBooks?
Steps to Find An Audit Trail In QuickBooks
- Launch your QuickBooks Desktop software.
- Then go to the edit menu and select the preferences command.
- As soon as you select the preferences command preferences dialog box appears.
- Now you have to indicate that you wish to alter the preferences for the accounting of the company’s data file. For this, you will have to go to the icon bar that is located in the preferences dialog box at the left corner and then choose the set of preferences for the accounting.
- Next, you have to tap on the Company Preferences option.
- Further, indicate that you are willing to utilize the audit trail. You can do this in QuickBooks by simply marking the Use Audit Trail checkbox selected and then clicking on the OK button.
- Now your QuickBooks will start keeping a record of all the changes and modifications that the users make.
- You can always customize your reports according to your needs you can change the display, fonts, resize, etc.
Read this: How to Enter Inventory Purchases in QuickBooks Desktop
Steps to Erase An Audit Trail In QuickBooks
Step 1: Launch QuickBooks Desktop Software
First of all, you have to launch your QuickBooks Desktop software and then choose the File menu that is located on the left side of the QuickBooks window.
Step 2: Search for Utility Option
Then in the drop-down list search for the utility option and select it.
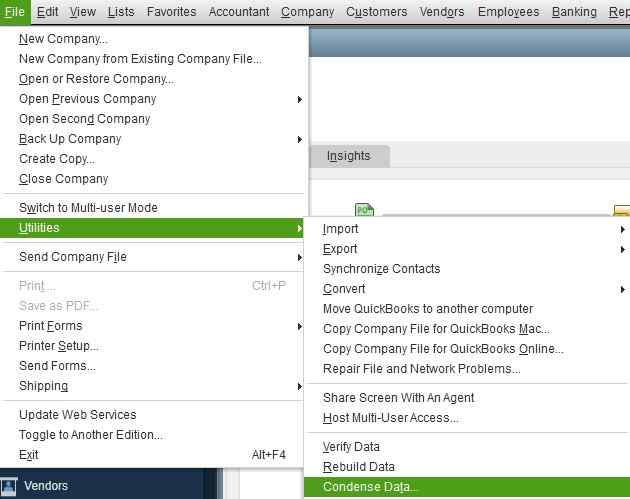
Step 3: Choose the Options Accordingly
Next, you have to either select the clean-up company data option or the condense data option. You have to select these options according to the versions of QuickBooks you are using because in some versions clean-up data is written as condensed data.
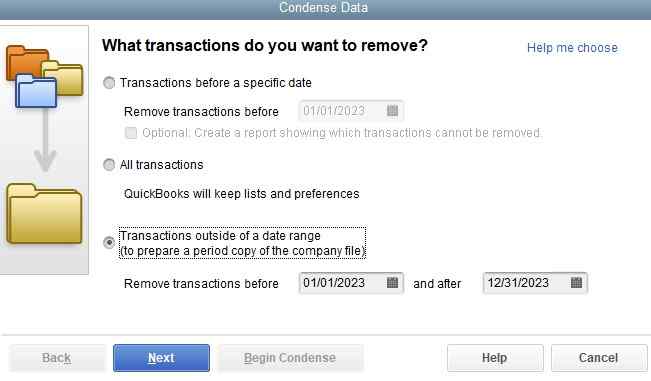
Step 4: Choose The Range of Date
Now choose the range of date from when your audit trail is to be cleared or you can also choose the delete all transactions option.
Step 5: Tick All The Check Box
After that, with the help of your mouse, you need to tick all the check-boxes that will appear on the instruction screens and this is how the audit trails for all the accounts and transactions will be erased.
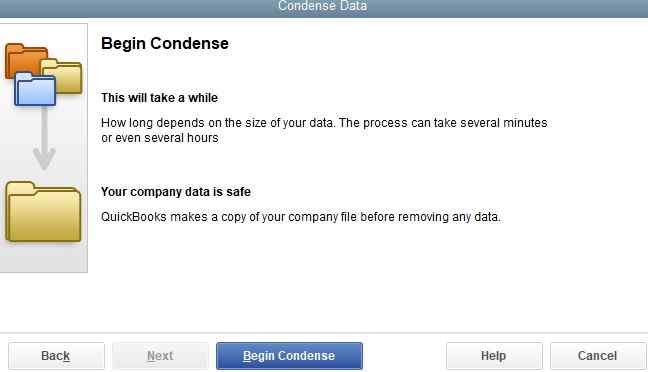
Step 6: Begin the clean-up
At last, select the begin cleanup button to finish up the process.
You must respond to this information. If you need any further assistance, don’t hesitate to ask.
Issues Faced While Using Audit Trails
- At times the users are not able to access and work with the functionality of audit logs.
- Users are unable to locate the history of some specific transactions.
You can see the changes in the log by clicking on the Gear icon and selecting the Audit Log option in the Tools section.
Also Read this: How to Enter Cash Back Rewards in QuickBooks
Find Audit Trail in QuickBooks Pro, Premier, Enterprise, Desktop & Online
In QuickBooks Desktop, Pro, Premier, and Enterprise:-
- In the QuickBooks Desktop
- Click on the Reports menu option
- Then select the option Accountant and Taxes
- Further, click on the Audit Trail.
In QuickBooks Online:-
- Open the QuickBooks Online.
- Click on the Gear-like icon that is on the top right side of the QuickBooks Online window.
- From the drop-down menu, click on the Audit Log option.
How Do I Disable the Audit Trail in QuickBooks?
Once it is enabled, you are not able to disable the audit trail in QuickBooks. For this, you have to connect with the QuickBooks help desk team to do it.
How to Use Audit Trails for Multiple User Access?
Enable QuickBooks Audit Trail options to data file multi-user access. The audit trail allows you to keep a record of all the ongoing or past modifications to the QuickBooks data file. This feature is beneficial for the multiple users operating the company file. Here are the steps to enable the Audit Trails in QuickBooks:
- First of all, select the Edit menu preference command.
- It will display the preferences Window.
- Specify that you need to modify an accounting preference regarding the company data file. To do this, here are the instructions:
- Firstly use the icon bar that appears at the left edge of the dialog box which says preferences.
- It will allow you to choose the accounting set of preferences.
- Once done, hit on the Company Preferences option.
- Determine that you need to access an Audit trail. For this, choose the checkbox that says Audit Trail.
- Hit on OK button; it will help to keep records of all the alterations on the accounting.
You may read this: How to Delete Unbilled Expenses in QuickBooks
How to View The Transaction Modifications in The Audit Trail in QuickBooks?
Understanding the Audit History feature in QuickBooks can greatly assist you in accessing and utilizing the audit trail effectively. By utilizing this feature, you can promptly view the audit trail and make use of it as needed. Begin by selecting Recurring Transactions to access the audit history. Then, choose a transaction and click on “more.” This action will reveal the Audit History, granting you access to the trail feature.
Below is the list of pointers you need to follow to view the change in the Audit Trail:
- Firstly you need to locate the Recurring Transactions menu that appears in the QuickBooks.
- Now this option will allow users to add, edit, and perform modifications in the recurring transaction if needed.
- In case a person needs to view the records based upon a particular date then discover the Audit History. Below listed is the information you can monitor in the Audit History:
- Name of the person who had made the changes.
- When and what changes are made?
- Make sure you have all the rights to see the Audit History.
- Now open the desired transaction you need to discover.
- Hit on the More button.
- After this choose Audit History.
- It will open the Audit Trail.
- To view more details, you have to choose Show All and click on the Compare button.
How to Use The Audit Log in QuickBooks?
To open the audit log in QuickBooks Online, click the “Settings” button in the QuickBooks Online toolbar. Then click the “Audit log” link under the “Tools” heading in the menu that appears. Alternatively, click the “Reports” link in the Navigation Bar. If needed, then click the “Standard” tab to the right to show the standard reports. In the “Business Overview” report section on that tab, click the “Audit Log” title.
To open the audit log in QuickBooks Online, you have three options:
- Click the “Settings” button in the QuickBooks Online toolbar, then click the “Audit log” link under the “Tools” heading in the menu that appears.
- Click the “Reports” link in the Navigation Bar. If needed, then click the “Standard” tab to the right to show the standard reports. In the “Business Overview” report section on that tab, click the “Audit Log” title.
- Use the shortcut key by pressing Ctrl+Alt+A on your keyboard.
To filter and customize the view of the “Audit Log” page in QuickBooks Online, follow these steps:
- Select filtering choices from the “User,” “Date changed,” or “Events” drop-downs in the upper-left corner of the page to filter the entries.
- Click the “Settings” button in the upper-right corner of the list of events to show a drop-down menu.
- Check or uncheck the checkboxes under the “Columns” heading in the drop-down menu to show or hide those columns.
- Set the number of entries to show per page in the audit log by selecting an option in the “Page Size” section of the drop-down menu.
To print the audit log in QuickBooks Online, follow these steps:
- Click the “Print list” button in the upper-right corner of the list of events.
- This opens a new page or tab with a printer-friendly view of the audit log.
- Your web browser’s “Print” dialog box also opens, letting you easily print the audit log.
- Once you have printed the audit log, you can close this new web page or tab.
- To view the changes to an event in the audit log, find the event you’re interested in and click the “View” link in the “History” column.
- For transactions, clicking “View” will usually open an “Audit History” page with a “Transaction History” pane on the right side of the window.
- You can use your browser’s “Back” button to return to the main “Audit Log” page after you’ve viewed an event’s details, if desired.
Things you need to know:
- The Audit log will display 150 records in a single time; if you need to know the past events then you have to choose the View that appears in the History column to display the audit History.
- There will appear all the modifications you have done.
Where Can You Discover Audit Reports in QuickBooks?
The audit report is not the same as the Transaction history report. The audit report contains a detailed log. In case you are a QuickBooks Desktop user, then follow the steps to access the audit log report:
- Discover Reports Option
- Choose the Accountant and Taxes button
- Hit on Audit Trail
- QuickBooks online user
Follow The Steps:
- Discover the Gear icon
- Click Audit Log
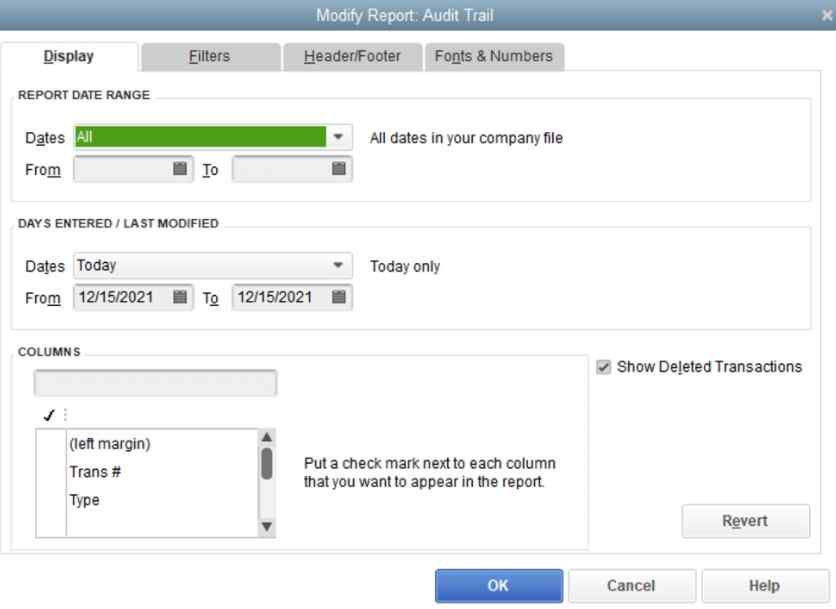
How to Customize QuickBooks Audit Trail Reports?
Clicking on the report at the top of left corner will allow us to customize the QuickBooks Audit Trail report according to our preferences. In the Audit Trail window, you will find the Modify Report. The screen opens up with multiple tabs, including Display, Filters, Header/Footer, and Fonts & Numbers. Each tab offers a different feature.
There are four tabs found in the Audit Trail Window.
Here are:
- Filters
- Header/Footer
- Display
- Fonts & Numbers
Display:
When you click on the Display button then you can get the date range, days, and the date when the transactions changed, and entered. Moreover, you can set the columns that are displayed on the report.
Filters:
The filter option is useful to search the transaction according to the amount, name, customer job, account, etc. to set a filter you have to choose the required option and then write the desired information in the middle. Once you have chosen the options filters to get applied and appear in the right corner of the filter option. To delete a filter, you have to left-click on it and then choose to remove the selected filter.
Header/Footer:
This option is used to edit the content that appears on the header and footer of the report.
Fonts and Number option:
It was designed to perform the modification on the report’s appearance. You can change the default report settings.
Here are the steps:
- Go to the Edit option.
- Click on Preferences.
- After that choose Reports and Graphs.
- Now hit on the Company Preferences.
- Click on the Format.
Final Word!
In conclusion, managing and erasing the audit trail in QuickBooks can help optimize file performance while maintaining control over transaction history. However, users must follow the correct procedures to find, modify, or delete the audit trail, ensuring compliance with data retention needs and maintaining system integrity for accurate financial reporting.
Infographic Of Solutions For Clear or Erase an Audit Trail in QuickBooks

Frequently Asked Questions
Q 1: Does Audit Trail Elimination affect QuickBooks?
Ans: Removing the audit trail would not affect QuickBooks. It also helps you manage your data files, which lets your QuickBooks program run smoothly.
Q 2: How do Business Owners use the audit trail report regularly?
Ans: Audit Trail report is mainly used by the business owner regularly for two reasons:
- As a control tool: The owner will search the list of users and transactions processed quickly to ensure that they access only the transactions to which they have been approved.
- As a training tool: It helps to find where many transactions removed or changed appear within the study.
Q 3: How do I clear an audit trail in QuickBooks?
Ans: Below are the mentioned steps to clear an audit trail in QuickBooks:
Removing Audit Trail
- Go to Window, then Close All.
- Click on the File menu and select Utilities.
- Choose Rebuild Data from the options.
- Follow the instructions provided on the screen to create a backup of your data.
- Once the tool finishes, select OK.
- Go to the File menu and click on Utilities.
Q 4: Can you see an audit trail on the QuickBooks desktop?
Ans: Here are the steps to see an audit trail on the QuickBooks Desktop:
- Choose the “More” option.
- Select “Audit history” to open the Audit trail.
- To view an expanded version, click on “Show all”.
- For a side-by-side comparison, select “Compare”.
Q 5: What is the difference between the audit trail and the transaction log in QuickBooks?
Ans: The transaction log records all transactions in QuickBooks, while the audit trail specifically logs transaction changes.
Q 6: Can you turn off the audit Trail in QuickBooks online?
Ans: QuickBooks logs indirect modifications when a user alters a transaction that was previously recorded in your financial records, such as modifying a finalized reconciliation. It’s important to note that, for audit and security purposes, the audit log cannot be disabled.

