

QuickBooks error H202 appears when something is preventing multi-user connections to your server computer. These errors typically indicate that your workstations are unable to communicate with the company files on the host server.
Follow the steps below to fix connection issues and restore multi-user access:
Table of Contents
- 1 What Causes QuickBooks Error H202?
- 2 How to Fix QuickBooks Error H202 in Multi-User Mode?
- 3 Advanced Fixes of QuickBooks Error H202
- 3.1 Solution 1: Ping the Host Computer from a Workstation
- 3.2 Solution 2: Go to Windows Host File and Add Server
- 3.3 Solution 3: Change the Company File Location
- 3.4 Solution 4: Add Services QuickBooksDBXX and QBCFMonitorService to the Admin Group
- 3.5 Solution 5: Create a New Folder for the QuickBooks Company File
- 3.6 Solution 6: Run QuickBooks Install Diagnostic Tool
- 3.7 Solution 7: Fix QuickBooks with Windows Control Panel
- 3.8 Solution 8: QuickBooks Firewall Ports Information
- 3.9 Solution 9: Change QBGlobalAppConfig.ini on Fedora Linux Server
- 4 Signs and Symptoms of QuickBooks Error Code H202
- 5 Frequently Asked Questions
- 6 Conclusion
What Causes QuickBooks Error H202?
The QuickBooks error code H202 occurs when QuickBooks Desktop attempts to connect to the company file, but can’t communicate with the server because:
- Incorrect hosting configuration settings.
- The server computer firewall is blocking incoming and outgoing communication.
- Conflict with DNS server.
- The network data file (.ND) is corrupt or damaged.
- This snag may also show up when the exchange of company data between QuickBooks and the server is being blocked by the system firewall.
- DNS settings may be inappropriately configured, leading to the error.
- The IP address of the Host or the server may not be available to QuickBooks Desktop.
- Essential QuickBooks services like the QBCFMonitor or QuickBooksDBXX are not running in the background.
- QuickBooks Database Server Manager might be having specific issues.
Struggling With Accounting or Bookkeeping?
Talk to our experts in minutes — No wait time!
- Free Consultation
- Fast Response
- Trusted Experts

How to Fix QuickBooks Error H202 in Multi-User Mode?
Here are the steps you need to take to fix QuickBooks error Code H202 in QuickBooks Desktop. If one doesn’t work, try another –
Solution 1: Fix Error H202 with the QuickBooks Tool Hub
This solution resolves firewall, network, and database service errors. These errors trigger QuickBooks error H202 in multi-user mode.
Here are the steps to use the QuickBooks Tool Hub:
Step 1: Download and install the QuickBooks Tools Hub on your server
QuickBooks Tool Hub offers built-in features to identify and fix multi-user access issues. Here are the steps to install the tool hub:
- Exit the QuickBooks Desktop application.
- Download the current version of QuickBooks tool hub.
- Access the QuickBooksToolHub.exe and complete the on-screen guidelines.
- Acknowledge the terms.
- From the desktop, start QuickBooks Tool Hub.

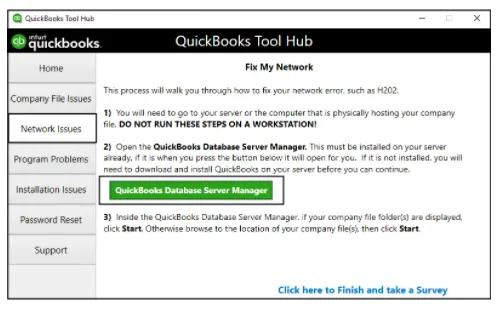
Step 2: Run the QuickBooks Database Server Manager
The QuickBooks Server Manager guarantees correct firewall hosting authorizations for the company file. Here are the steps to run the QuickBooks Database Server Manager:
- Access the QuickBooks Tool Hub.
- Choose the “Network Issues” option.
- Click the option “QuickBooks Database Server Manager”.
- In case the company file folder is displayed, click the “Start Scan” option.
- To add folders, use the “Browse” option if needed.
- Allow the scan to finish and choose the “Close” button.
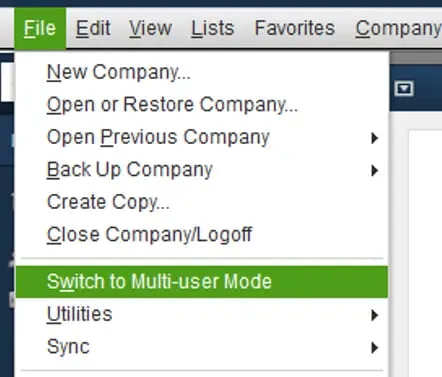
- Access QuickBooks for every workstation.
- Head to the “File” option.
- Now, click the “Switch to Multi-user Mode” option.
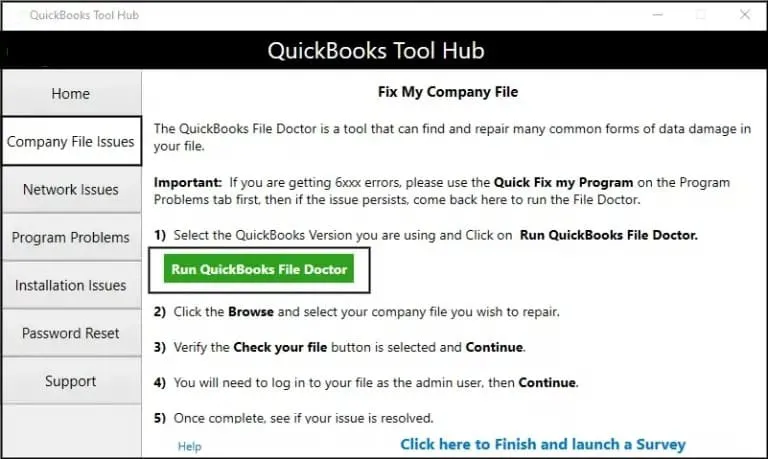
Step 3: Run the QuickBooks File Doctor
QuickBooks File Doctor reviews network connectivity and company file access problems. Here are the steps to run the QuickBooks File Doctor:
- Access the QuickBooks Tool Hub.
- Choose the “Company File Issues” option.
- Click the “Run QuickBooks File Doctor” option.
- Choose the company file.
- Select the option “Check your Network”.
- Add the QuickBooks admin password.
- Click the “Next” option and enable the scan to finish.
Solution 2: Verify QuickBooks Services
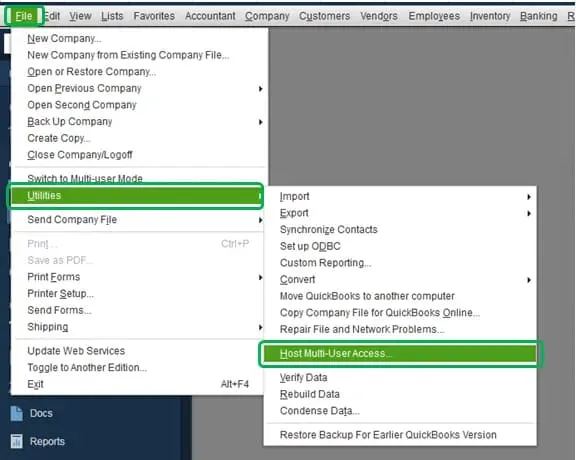
The following steps can be followed to start multi-user hosting mode on a server running a full version of QuickBooks:
- On the server, you should open QuickBooks desktop.
- After that, navigate to File and then Utilities.
- Then choose Host multi-user access.
To verify the running status of QuickbooksDBXX and QBCFMonitorService on the server, follow these given quick steps:
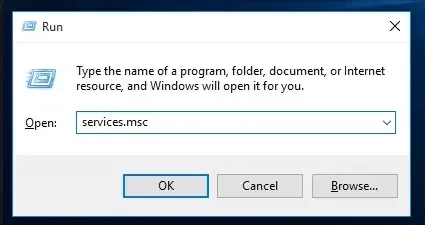
- You need to open the Run window.
- After that type in services.msc in the text field and hit a click on OK.
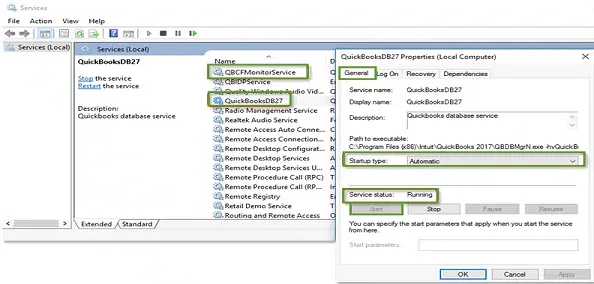
- The next step is to choose QuickBooksDBXX.
- Also check the Startup type, if it is Automatic or not.
- If in case the Startup type is not set as Automatic then do it now.
- Make sure the Service status shows Running after that.
- Now, head to the Recovery tab and choose it.
- Select Restart the service for first, second, and subsequent failures from the drop-down menus.
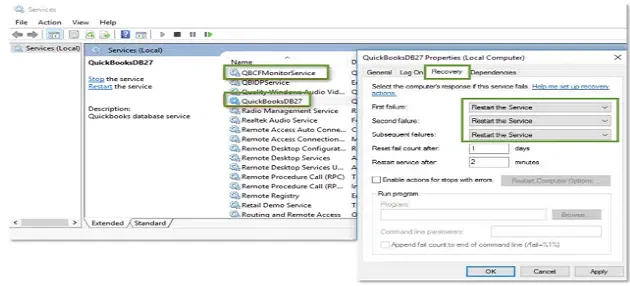
- Now, you need to hit on Apply and then pick the OK button to confirm the changes.
- The above steps must be performed for the QBCFMonitorService.
Solution 3: Set Hosting to Local Files
It is advised not to host the QuickBooks program on multiple workstations. Check the hosting settings as discussed below:
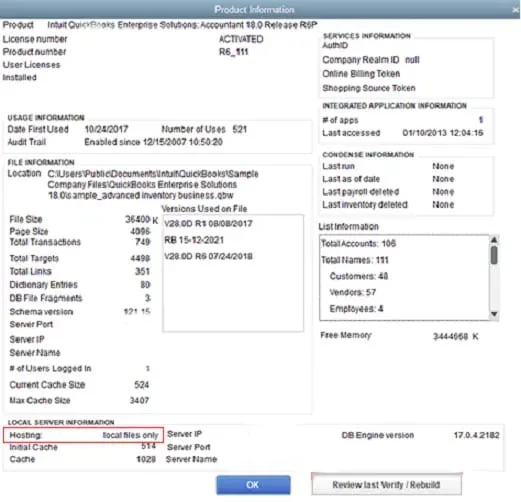
- Run the QuickBooks Desktop.
- Click the “F2” key to start the “Product Information” screen.
- In the screen for Local Server Information, verify that Hosting is enabled for local files only. This stops systems from operating as unauthorized hosts.
Solution 4: Configure the System Firewall Settings
Configure the system firewall to resolve the error H202 Multi-user Mode on QuickBooks. Here are the steps to make sure the firewall does not restrict QuickBooks:
- Launch the system firewall settings on the systems and server.
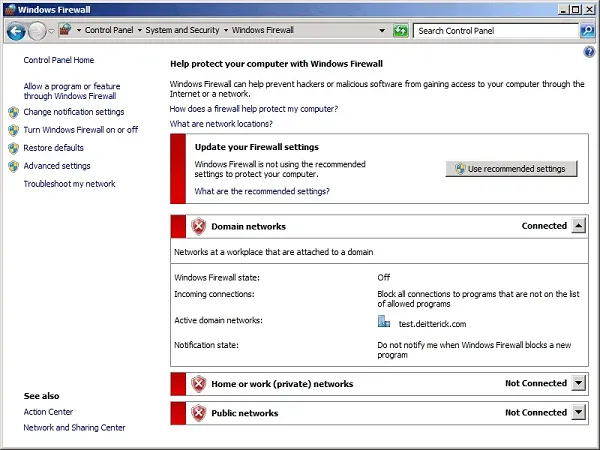
- In the firewall, prepare exceptions for QuickBooks.
- Change the firewall permissions to enable outbound and inbound access.
- Reboot the connected systems.
- Run QuickBooks Desktop.
- Head to the File menu and choose the option “Switch to Multi-user Mode”. In case of a firewall block, this step re-establishes access.
Solution 5: Change the name of the .ND and .TLG Files
Corrupted network configuration files or log files restrict multi-user connectivity. This leads to error H202.
Here are the steps to modify the .ND and .TLG file names:
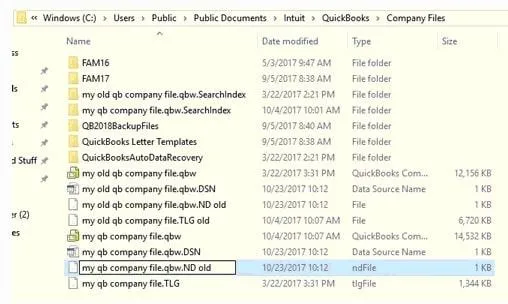
- Shut down the QuickBooks application on all the workstations.
- Open the company file folder.
- Search the files with the same company file name ending in .TLG and .ND extensions.
- Right-click every file and choose the “Rename” button.
- At the end of every file name, include “.OLD”.
- Exit the folder.
- Open the QuickBooks application and press the “Alt” key.
- The company file appears.
- QuickBooks rebuilds the network and logs files automatically.
Advanced Fixes of QuickBooks Error H202
Solution 1: Ping the Host Computer from a Workstation
Often, due to firewall problems or network issues, QuickBooks error code H202 occurs. To check connectivity, ping the server from each affected workstation using these steps:
Step 1: Activate Network Discovery on all workstations
- On every workstation and the server, run the Start Menu.
- Type Network, and run the “Network and Sharing Center” option.
- Press the option, “Change Advanced Sharing Settings”.
- In the Printer Sharing section, choose the option, “Turn on Network Discovery”.
Step 2: Locate the Server Name
- Run the Start menu on the server.
- Enter Run and start the Run dialog box.
- In the box, enter “CMD” and click the “Enter” button.
- In the command screen, enter, ipconfig /all.
- Now click the “Enter” button.
- In the Windows IP Configuration section, find the “Host Name”.
- Write down the server name and keep it for future use.
Step 3: From the workstation, check the Server
- On the impacted system, click the “Windows + R” keys. This will open the Run screen.
- Enter CMD and click the “OK” button.
- In the command prompt, enter ping [ServerName].
- Now click the “Enter” button. Change the original name of the server. Perform this step on every system that displays the error H202.

Solution 2: Go to Windows Host File and Add Server
To assist QuickBooks to the server, include the server IP, and add a name to the particular hosts file:
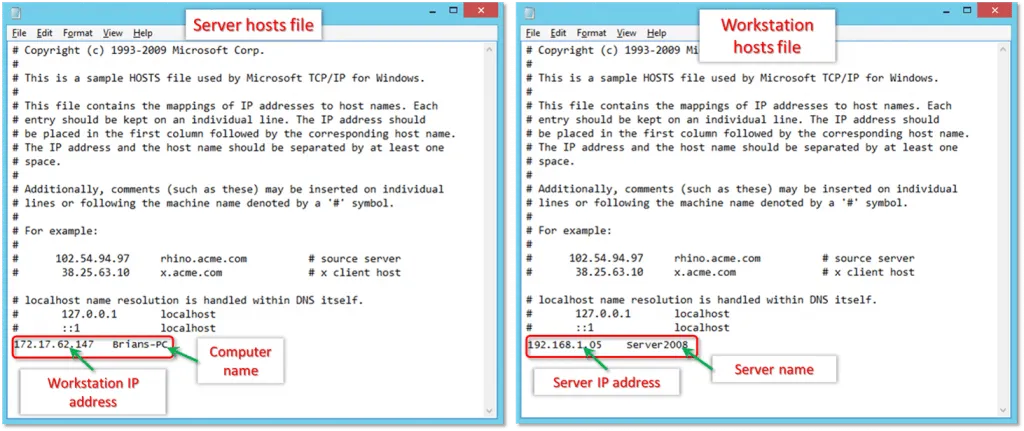
- On the impacted system, head to one of the paths shared below:
- C:\Windows\System32\Drivers\Etc
- C:\Windows\SysWOW64\Drivers\Etc
- Find and click the hosts file twice.
- When notified, run the file with the Notepad.
- Head to the end and include a new line. Enter the server’s IP address, click the “TAB” key.
- Now add the server name.
- Head to the File menu.
- Now press the “Save” option.
- Shut down the Notepad screen.
- Once the file is saved, run QuickBooks and try changing to Multi-user Mode once more.
Solution 3: Change the Company File Location
A corrupted file path or extended directory structure interrupts the QuickBooks multi-user access. Here are the steps to change the company file location:
- Find the .QBW company file.
- Now, select the file and right-click.
- Choose the “Copy” option.
- Add the file to the Desktop.
- Click the “Ctrl” key and keep holding it.
- Now, open QuickBooks.
- Next, from the “No Company Open” option, choose the “Open or Restore an Existing Company” option.
- From the desktop, access the copied file.
Solution 4: Add Services QuickBooksDBXX and QBCFMonitorService to the Admin Group
Inadequate authorizations for QuickBooks services block server connectivity. This leads to error H202. Here are the steps to add QuickBooks to the Windows admin group:
- On the server system, access Windows Services.
- Classify QBCFMonitorService and QuickBooksDBXX.
- Allocate complete Windows Admin authorizations to both services.
- Save the changes and reboot the services.
- Access QuickBooks Desktop and check the “Multi-user Mode” access.
Solution 5: Create a New Folder for the QuickBooks Company File
Using a new folder for the company file helps test the source of error H202. Here are the steps to create a new folder for the company file:
- Prepare a new folder on the particular server.
- Provide complete permission to make the folder accessible over the network.
- Shift the QBW (company File) to a new folder.
- In multi-user mode, shift the QBW.
- Use the file from the fresh location.
- In case the file runs, the actual folder is corrupted. In case the file does not run properly, it is quite likely that the company file is corrupted.
Solution 6: Run QuickBooks Install Diagnostic Tool
The diagnostic tool fixes installation and connection issues. This helps in fixing the QuickBooks error code H202 with ease:
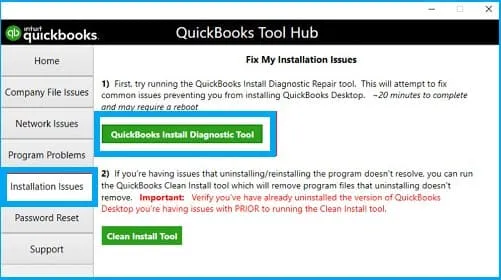
- Download the QuickBooks Install Diagnostic Tool.
- Run the tool and scan the system where the company file is saved.
- Make a note of the total network interfaces and IP addresses.
- In the “Firewall Status” segment, open the QuickBooks ports needed if notified.
- Head to “Data File Connectivity” and enable the tool to finish the check.
- Once the scan is over, run QuickBooks and check access to the company file. When the file opens properly, the issue is fixed.
Solution 7: Fix QuickBooks with Windows Control Panel
Corrupted QuickBooks Desktop program files disrupt network services. This leads to error H202. Here are the steps to resolve QuickBooks corrupted program files using Control Panel:
- Shut down QuickBooks on all workstations.
- Click “Control Panel” and choose the option “Programs and Features”.
- From the program list, select the “QuickBooks Desktop” option.
- Click the “Uninstall/Change” option and choose the “Repair” button.
- Complete the on-screen guidelines to finish the repair.
- Once completed, reboot the system.
- Update QuickBooks to its current release.
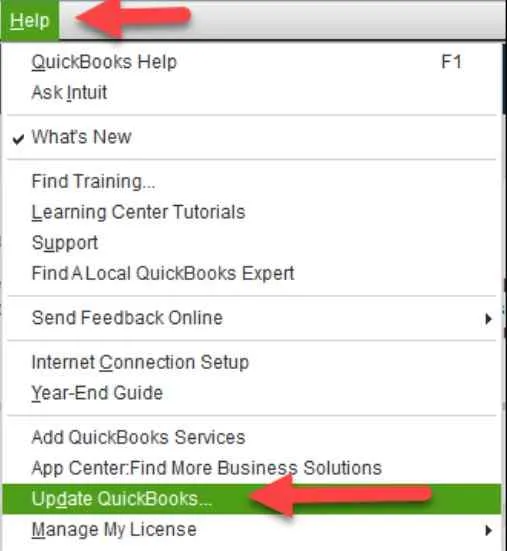
- Now, check the multi-user access in the company files.
Solution 8: QuickBooks Firewall Ports Information
Firewall limitations stop server connectivity and block QuickBooks from changing to multi-user mode. Here are the steps to configure the QuickBooks ports based on the version:
- QuickBooks 2016: 8019, 56726, 55368–55372
- QuickBooks 2017: 8019, 56727, 55373–55377
- QuickBooks 2018: 8019, 56728, 55378–55382
- QuickBooks 2019 and later: Ports refresh automatically through Database Server Manager
Once all the ports are added, reboot the firewall and check the multi-user mode once more.
Solution 9: Change QBGlobalAppConfig.ini on Fedora Linux Server
The wrong port format on the Linux database server restricts multi-user communication. Here are the steps to modify QBGlobalAppConfig.ini on Fedora Linux Server:
- On the server, access the Linux Terminal.
- Find and access the QBGlobalAppConfig.ini.
- Review the standard port range entries.
- Ensure no spaces appear before or after the = sign.
Port references by version:
- Enterprise 22.0: 55398=5
- Enterprise 21.0: 55393=5
- Enterprise 20.0: 55388=5
- Enterprise 19.0: 55383=5
- Enterprise 18.0: 55378=5
- Enterprise 17.0: 55373=5
- Save the file after editing.
- Reboot QBDBFILEMON and QBDBMGRN services.
Signs and Symptoms of QuickBooks Error Code H202
The following are the common symptoms of QuickBooks’ Multi-user switching Error H202:
- This error prevents you from switching to multiple-user mode in QuickBooks.
- Even after consistent attempts, you can’t open a company file located on another computer.
- The QuickBooks error code H202 message appears on your computer screen.
- During operation, QuickBooks freezes or stops working for a few seconds.
- The performance of your Windows is extremely slow.
Frequently Asked Questions
Does disabling host multi-user access resolve QuickBooks error H202?
Yes. Deactivating multi-user access on the system or host workstations can fix error H202. Make sure the server alone hosts the particular company file. Other systems that lack the company file should ensure the hosting is turned off to avoid further issues.
Can QuickBooks Tool Hub resolve the QuickBooks error H202?
Yes. By identifying configuration, network, and company file issues, the Tool Hub can fix error H202. First, users need to download the tool. Next, access the Company File Issues and Network Issues tools to fix multi-user connection issues.
How to identify the presence of QuickBooks error H202?
Error H202 often stops access to the multi-user environment or changes to single-user mode. QuickBooks fails to respond, the screen may freeze, tabs do not work, and displays become hazy. In some cases, Windows stops working suddenly to secure the workstation.
Can any third-party security software trigger the H202 error?
Yes. A security software or an antivirus program can prevent QuickBooks services, triggering H202. Deactivating the software temporarily or including authorizations for QuickBooks ports generally fixes connectivity errors. This, however, will not affect the system security.
Conclusion
This guide includes information on the causes and troubleshooting steps to fix the error H202. Still, if there is any query or doubt, feel free to reach out to our team of experts. Call our team of QuickBooks professionals to fix any technical issue at SMBAccountants.com.

