It seems that converting from QuickBooks Online to Desktop has been a common need of many business owners. There can be numerous reasons to convert. However, if you browse the internet you will hardly find any real-time solution. Thankfully, here you will find the genuine steps and other details of how to convert QuickBooks Online to the Desktop version.
Many businesses are thinking of converting QuickBooks Online to QuickBooks desktop. If you are one of them, you have a few steps and options that you can take into consideration to achieve the conversion successfully.
Table of Contents
- 1 Explaining Conversion From QuickBooks Online to Desktop
- 2 How to Convert QuickBooks Online to QuickBooks Desktop
- 3 Reasons Why You Need to Convert QuickBooks Online to QuickBooks Desktop
- 4 Benefits of converting QuickBooks Online to QuickBooks Desktop
- 5 Frequently Asked Questions
- 5.1 Q 1: Do I have to make Internet Explorer the default browser to convert QuickBooks Online to Desktop?
- 5.2 Q 2: Is it necessary to take a backup before converting QuickBooks Online to Desktop?
- 5.3 Q 3: If I make an error while converting QuickBooks Online to desktop, how do I fix it?
- 5.4 Q 4: How do I import QuickBooks Online into QuickBooks Desktop?
- 5.5 Q 5: What data does not convert from QuickBooks Online to QuickBooks Desktop?
- 6 Adams Williams
Explaining Conversion From QuickBooks Online to Desktop
The conversion refers to the export of all files from the Online version to the Desktop version. While exporting the files, the functionalities will vary. Thus, if you feel like changing, just change the subscription and move to the other version.
QuickBooks Online is a cloud-oriented software. Hence, you are allowed to sign up and access the files from any device. Contrarily, the Desktop version can have access from one device at a time which is connected to a specific network.
Struggling With Accounting or Bookkeeping?
Talk to our experts in minutes — No wait time!
- Free Consultation
- Fast Response
- Trusted Experts

Also read: How to Convert QuickBooks Enterprise to Pro (Desktop)
How to Convert QuickBooks Online to QuickBooks Desktop
Once you are ready after making the settings as per the requirements, the next step is to go for the QuickBooks conversion. Well, so far as the conversion is concerned, you have three options that you can adopt to achieve your objective.
The steps for both the options have been shared below:
Method 1: Download QuickBooks Desktop Latest Version
To download QuickBooks Desktop 2024, follow these steps after completing your purchase and logging into your Intuit account:
Step 1: Access the Products & Services Page from your Intuit account dashboard.
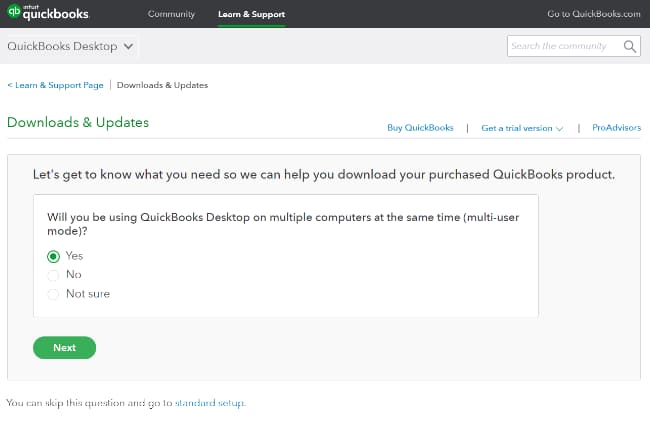
Step 2: Next, indicate whether you wish to use QuickBooks Desktop in multi-user mode by selecting Yes, No, or Not Sure.
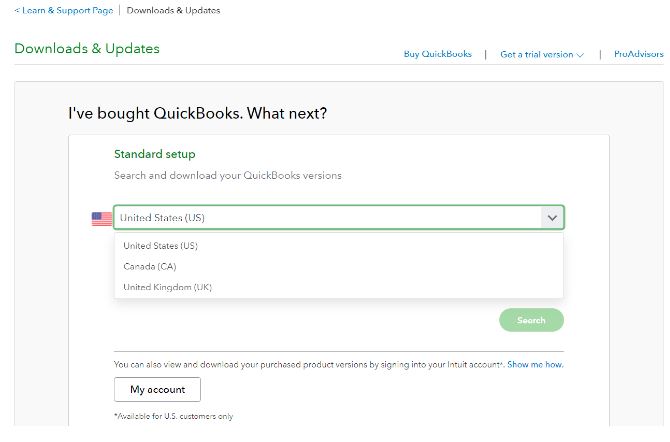
Step 3: Then, choose your preferred country.
Step 4: Based on your specific needs, select the edition of QuickBooks Desktop you require (Pro, Premier, or Enterprise).
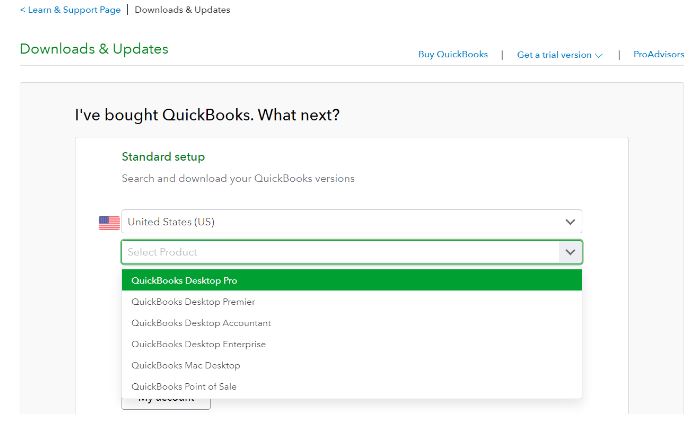
Step 5: Locate the latest QuickBooks Desktop 2024 release in the list of available products and click on it.
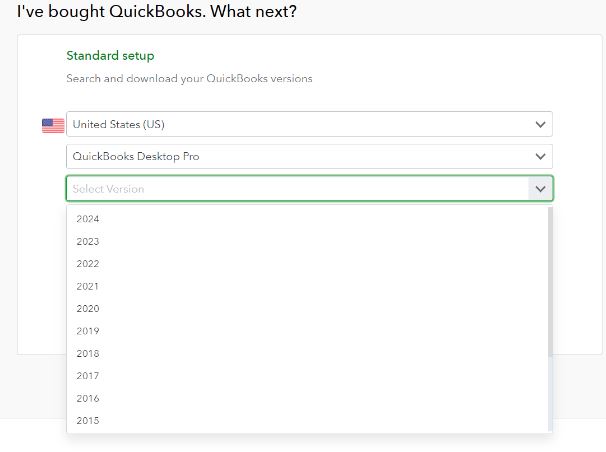
Step 6: You will be redirected to the download page for QuickBooks Desktop 2024.
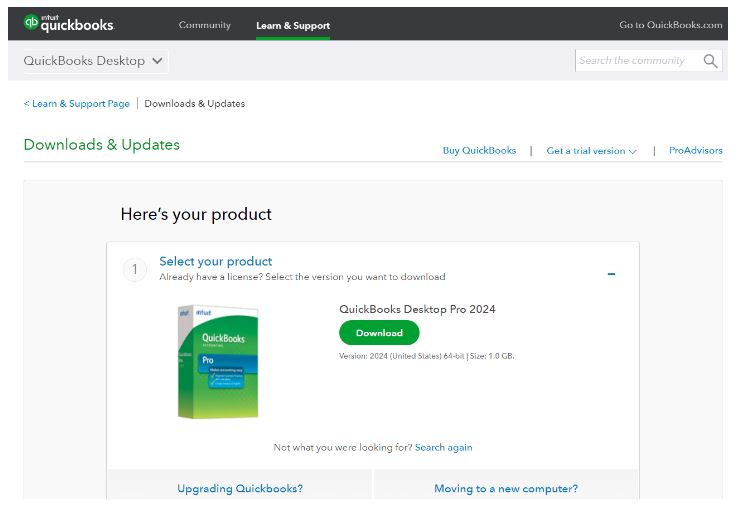
Step 7: Finally, initiate the download process by clicking the “Download” button on that page.
Method 2: Prepare the Data You Export from QuickBooks Online
- Open the QuickBooks version where you want to export the company file. You must proceed with the No Company option. Also do not open a company file.
- Log in to QuickBooks Online.
- Opt for the “Gear” icon. Go to “Export Data” under the Tools menu.
- From the pop-up, choose the reason and then tap to “Continue”.
- Access the “Learn More” options in QuickBooks Desktop.
- Access the “Learn More” under the menu of downloading the company data.
- Go through the overview of the “Export” and start the process.
- Choose and confirm the installation of ActiveX control.
- Continue after the installation is done.
- Select the data you will export and continue.
- Review the data you will be exporting and tap on “Continue” again.
- Enter the contact info and hit on “Continue”.
Note: You will be receiving an email with all the steps mentioned of the conversion and export. It also mentions the time depending on the amount of data present. The email indicates the completion of data compiling and moving to the last step.
Method 3: Download the Conversion Tool
- First of all, you have to download QuickBooks Conversion Tool.exe.
- Then you have to ensure here that you run it as an administrator.
- You have to search and right-click on the QuickBooks conversion tool icon.
- After that, you have to run it as an administrator.
- Note: Remember that whenever you use the QuickBooks conversion tool. So you have to walk as an Administrator every time.
Method 4: Run the QuickBooks Desktop Migration Tool
To begin in the Online version of QuickBooks, repeat the given steps and go to the export page.
- Click on “Settings” and go to “Export data”.
- Re-run the steps and prep up to export data from QuickBooks Online.
- Choose the “Continue” tab for downloading the exports from the Online page.
Switch to QuickBooks Desktop for the following:
- Make sure that the “No Company” screen is open. Visit file and opf for “Close Company”.
- Select the option as per your choice and tap on “Continue”.
- Tap on the download option.
- Save the screen of the company file. Choose the location where you want to save the file.
- From the pop-up screen, save the file in the desired location. Continue to the option stating “Convert Now”.
- Click on “Yes” every time it appears on the screen.
- Navigate the “Continue” option and tap on “Done”.
- Finish and start running the reports.
Reasons Why You Need to Convert QuickBooks Online to QuickBooks Desktop
The conversion from one version of QuickBooks to another has always been a fascinating process. As every person has their individual needs, the platform they use can also vary. Each version of QuickBooks has its distinguished features and functions. Thus, the conversion may be needed due to the following reasons:
Offline Access
QuickBooks Desktop can be accessed even without an internet connection. All you need to do is install it on your device. Thus, if you are in an area with no proper internet connectivity, the conversion proves to be beneficial for you.
Ownership of Data
As the data is saved locally in the case of QuickBooks Desktop, people who prefer to have sole control and access to their business finances can find it helpful.
Extra-Added Features
Surprisingly, the QuickBooks Desktop has more advanced features compared to the online version. Therefore, if you need to access any feature that is unavailable in the online version, it is better to switch to the Desktop.
Customization
The extreme customization features offer more flexibility when making reports, templates, and other financial documents. You can tailor and craft your business documents with the QuickBooks Desktop.
Cost Factor
The business size always determines what cost-effective accounting solution you need for smooth running. For example: If the business is large, its accounting requirements are intricate which in turn calls for the Desktop version.
Large Data
QuickBooks Desktop can access large files better as compared to QuickBooks Online. The businesses with huge transaction records always choose QuickBooks Desktop over the Online version.
Intricate Inventory Management
If your venture is inventory-centric and needs heavy inventory management, it is better to choose QuickBooks Desktop. The version also provides advanced tracking features related to the inventory.
Numerous Companies
After subscribing to QuickBooks Desktop, you can manage multiple companies with no extra charges. On the other hand, in the online version, you have to pay separate charges for each company.
Things to Remember Before Conversion
Before you begin the process of conversion of data from the Online version to the Desktop version, you should remember the below points:
- The Windows version you are using must be the latest one or the one launched after 2004.
- The desktop should be compatible with QuickBooks Desktop, and Internet Explorer must be 32-bit. Internet Explorer 64-bit will show an error while running the program.
- The Internet Explorer of your device should be either 10 or higher when exporting the data.
- You need to boost the conversion with the help of ActiveX when the process is no longer performed.
- If you are using the Desktop version of QuickBooks on Mac, direct export cannot happen. Moreover, the process will be different.
- People who are using the non-US edition of QuickBooks may have to restrict to a few items including customers, products, services, etc.
- You must have at least one invited accountant if you are an administrator of a company.
- You must clean all the unwanted or junk files from the QuickBooks desktop.
Read more: How to Convert QuickBooks Online to QuickBooks Enterprise?
Benefits of converting QuickBooks Online to QuickBooks Desktop
QuickBooks Desktop is a superior alternative for businesses and accounting services that need to keep up with different company books. It is additionally a superior choice for product-based organizations that need to monitor inventories, especially those that are operational in one of the business classes available in QuickBooks. The following is a synopsis of the significant benefits of QuickBooks Desktop over QuickBooks Online.
- Progressed stock administration: While QuickBooks Online provides just the earliest in, earliest out (First-In-First-Out) strategy for stock service, and that too just on select adaptations, there are two methods for following stock with QuickBooks Desktop. The option normal expense strategy is accessible with the Advanced Inventory add-on module.
- Industry-explicit customizations: QuickBooks Desktop remembers customizations for organizations for specific ventures like assembling and discounting, contracting retail, nonprofit, professional services, and general business.
- Group invoicing technique: It is feasible to give solicitations in groups with QuickBooks Desktop, which works on customer overhauling when there are numerous organizations involved.
- Deal with numerous accounts: A solitary QuickBooks Desktop installation supports various company files. This is, nonetheless, not valid for QuickBooks Online, which can deal with just one company file for each membership.
Need Professional Help?
In case you get stuck anywhere while conducting the conversion, you can connect with our experts on the smbaccountants.com option, as they are available to help 24/7.
Frequently Asked Questions
Q 1: Do I have to make Internet Explorer the default browser to convert QuickBooks Online to Desktop?
Ans: Yes, you have to make your Internet Explorer browser the default one. By making it the default browser, you won’t get any issues when converting QuickBooks Online to a desktop.
To do this, the steps are:-
- Open the Internet Explorer
- Go to the Gear icon
- Select Internet Options
- The window named Internet Options opens up
- Click on the Programs tab, under the Opening Internet Explorer heading
- You have to click on Make Internet Explorer by default browser.
Q 2: Is it necessary to take a backup before converting QuickBooks Online to Desktop?
Ans: The backup is as important as you have crucial data that you can’t lose. So for the safer side, You must take a backup and make copies to save it in different locations. It helps you restore your data in case of data corruption or data loss while converting QuickBooks Online to Desktop.
Q 3: If I make an error while converting QuickBooks Online to desktop, how do I fix it?
Ans: In this case, you have to resolve the error first. So, it won’t cause any harm to your data. After that, convert your data from QuickBooks online to desktop. You can also connect with the helpdesk team if you are facing more trouble in converting your data.
Q 4: How do I import QuickBooks Online into QuickBooks Desktop?
Ans: In the Banking menu, select Import Web Connect Files and Bank Feeds. Click Open on the QuickBooks Online file you saved. Select: Use an existing QuickBooks account if the account into which you’re importing transactions is already set up in QuickBooks.
Q 5: What data does not convert from QuickBooks Online to QuickBooks Desktop?
Ans: QuickBooks Desktop will not convert the following:
- Deposit’s billable status.
- Repeating transactions and online banking transactions awaiting approval.
- Attachments for transactions (such as invoices, expenses, and checks).
- Details like location data, custom field information, markups, and the To Be Sent status.

Adams Williams
Adams Williams is a seasoned accounting professional with over 4 years of experience in bookkeeping, financial reporting, and business accounting solutions. Specializing in QuickBooks software, Adams combines technical expertise with clear, accessible content writing to help businesses streamline their financial processes. His insightful guides and how-to articles are crafted to assist both beginners and seasoned users in navigating accounting software with confidence.


