

QuickBooks works on a subscription-based licensing model. Often, due to account or billing disruptions, this application shows a subscription lapse status. Even though the subscription remains active, users experience a lapse error while updating QuickBooks Desktop (QBD).
This subscription status error occurs when QBD is unable to validate the active license with Intuit’s billing servers, which restricts access to subscription-based features until verification is completed. Successful billing validation enables application update functionality.
QuickBooks subscription error is most commonly reported in QuickBooks Desktop products, including QuickBooks Pro, Premier, and Enterprise, which rely on local license validation.
In this article, you will find the steps to fix the QuickBooks Subscription Lapsed Error, along with its trigger reasons, impacts, and prerequisites.
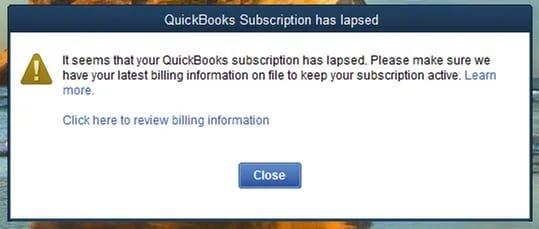
Table of Contents
- 1 What Factors Trigger the QuickBooks Subscription Has Lapsed Error?
- 2 Impact of the QuickBooks Subscription Has Lapsed Error
- 3 How to Fix the “Your QuickBooks Subscription Has Lapsed” Error?
- 3.1 Solution 1: Update Billing Details
- 3.2 Solution 2: Verify the System’s Date and Time settings
- 3.3 Solution 3: QuickBooks Desktop Update
- 3.4 Solution 4: Run the QuickBooks Install Diagnostic Tool
- 3.5 Solution 5: Review the Internet Network Settings
- 3.6 Solution 6: Product and License File Restoration
- 3.7 Solution 7: Digital Certificate Installation
- 3.8 Solution 8: Reboot the Internet Explorer settings
- 3.9 Solution 9: Manually Disabling the Firewall
- 4 Conclusion
- 5 Frequently Asked Questions
- 5.1 How to renew the subscription in the QuickBooks Desktop application?
- 5.2 What happens when subscription renewal is postponed?
- 5.3 Why does an error message appear when trying to get a subscription while installing QuickBooks?
- 5.4 Is it necessary to buy QuickBooks once more if the subscription has lapsed?
What Factors Trigger the QuickBooks Subscription Has Lapsed Error?
QuickBooks is not the only reason for the occurrence of the error. Here is the list of the common causes that trigger this subscription status error:
- Outdated billing details give rise to a subscription validation error.
- An outdated QuickBooks Desktop version triggers compatibility problems during subscription validation.
- Corrupted QuickBooks installation or faulty program files often trigger the error.
- A corrupted QBWUSER.ini file impacts product data and license recovery.
- Communication with Intuit servers is interrupted due to improper internet security settings.
- Accessing QuickBooks with non-admin credentials. This restricts the needed application permissions.
- An expired subscription after the allocated renewal date leads to subscription lapse status.
- QuickBooks Desktop processes are interrupted by outdated web browsers.
- Subscription renewal authentication is often prevented by Intuit’s server-side errors.
Impact of the QuickBooks Subscription Has Lapsed Error
The subscription error results in restrictions on operation and performance in the application. Here is the list of the after-effects of the error:
- Limited accounting operations result in inconsistent journal entries.
- Security patches and payroll updates are missing.
- Payroll tax tables do not update or open, restricting precise tax calculations.
- Improved and advanced QuickBooks capabilities are not accessible during subscription inactivity.
- Data accuracy is often compromised due to validation failure.
- PDF files are missing following a subscription lapse.
- Company files are available in read-only mode, restricting edits and transactions.
How to Fix the “Your QuickBooks Subscription Has Lapsed” Error?
Determining the reasons for the subscription error makes implementing the resolution simple.
Here is the list of the most effective solutions to remove this error:
Solution 1: Update Billing Details
Old or inaccurate payment details often gives rise to the subscription has lapsed error. Here are the steps to update the payment details efficiently:
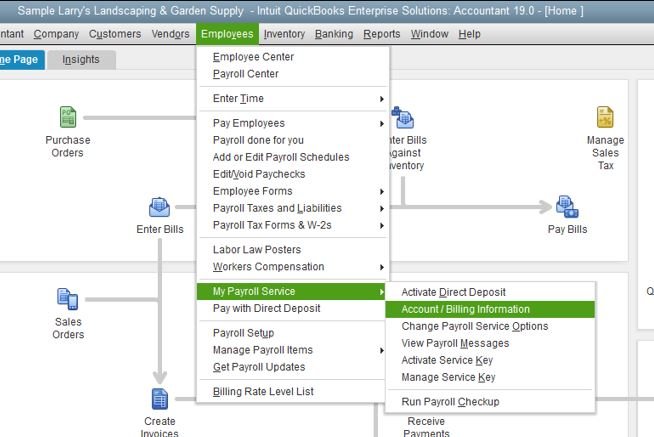
- Log in to the Customer Account Management Portal.
- From the products and services list, choose the “QuickBooks Desktop” option.
- Choose the details beside the QuickBooks Product.
- Choose the “Edit” option beside the “Payment Method”. Ensure to update the payment details, and when it is complete, click the “Save and Close” button.
- Start the QuickBooks Desktop application.
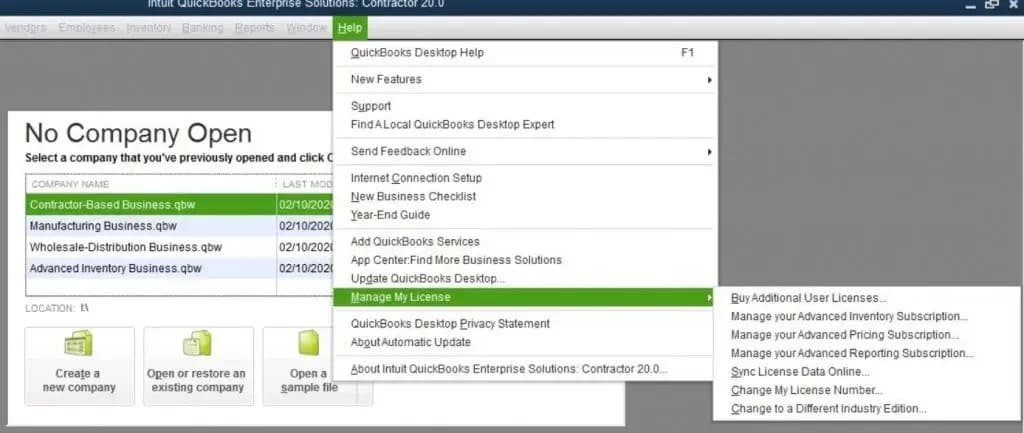
- Head to the “Help” menu and navigate to the “Manage My License” option.
- Now, choose the option “Sync License Data Online”.
Solution 2: Verify the System’s Date and Time settings
Inaccurate system time stops QuickBooks Desktop updates. This terminates the Internet Explorer processes. Here are the steps to check system time and date settings:

- On the “Clock” icon, right-click. Alternatively, right-click on the date and time on the bottom-right side of the desktop.
- Select the option “Adjust Date/Time”.
- Now, choose the option “Change Date/Time”.
- Add or choose the right time and date manually.
- Now, click the “OK” button twice to verify the changes made to the settings.
- Now start the QuickBooks program and check if the issue persists.
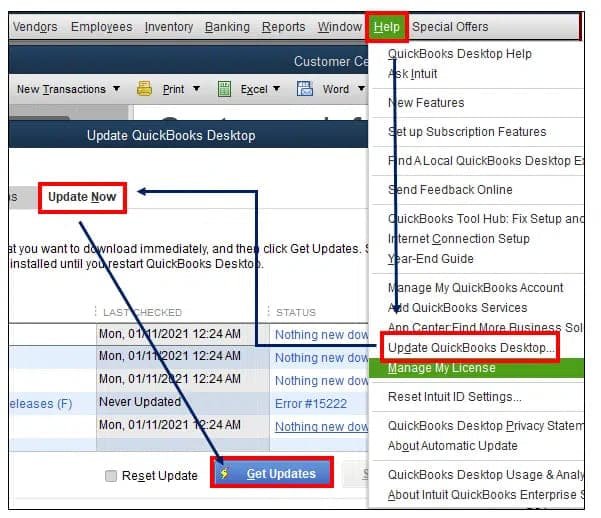
Solution 3: QuickBooks Desktop Update
Often, updating the QuickBooks Desktop application is the best way to resolve the subscription error. Here are the steps for the QuickBooks Desktop update:
- Sign in to the Company file and then close the QuickBooks application.
- On the QuickBooks icon, perform a right-click and then choose the option “Run as Administrator”.
- Head to the “Help” menu.
- Click the option “Update QuickBooks Desktop”.
- Choose the “Mark All” button from the “Options” tab.
- Now, click the “Save” button.
- Head to the “Update Now” tab and choose the button “Reset Update”.
- Now, click the “Get Updates” button.
- Once the updates are downloaded, exit the application.
- Reboot the application once more.
- Now, install the updates by clicking the “Yes” button.
- Reboot the system and allow the changes to apply.
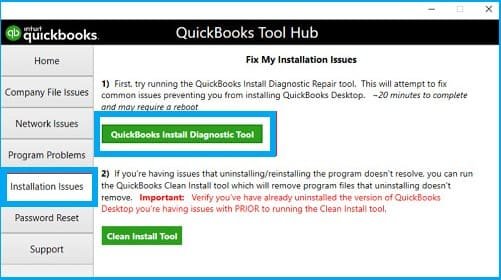
Solution 4: Run the QuickBooks Install Diagnostic Tool
Interruptions in the installations can result in corrupted QuickBooks Desktop files. Using the QuickBooks Install Diagnostic tool can fix the installation issues automatically.
Here are the steps to run the diagnostic tool:
- Download the QuickBooks Tool Hub on the system to start the installation repair.
- Select a place to keep the downloaded files to access them conveniently.
- Launch the InstallShied by clicking the exe file in the downloaded package.
- Agree to the license agreement of the software. Now, complete the QuickBooks Tool Hub installation with the on-screen guidelines.
- After the installation is done, access the Tool Hub and click the option “Installation Issues”.
- From the drop-down menu, select the option “QuickBooks Install Diagnostic Tool”.
- After the tool completes the scan, click the “OK” button.
- Use QuickBooks Desktop once the system is restarted. Now, complete the task that gave rise to the subscription issue previously.
Solution 5: Review the Internet Network Settings
Inaccurate internet settings restrict QuickBooks subscription renewal. Here are the steps to verify the internet connectivity settings:
- Select the “Help” menu.
- Now, click the option “Internet Connection Setup” in the drop-down list.
- Now, click the option “Use my computer’s internet connection settings to establish a connection when this QB application accesses the internet”.
- Now, click the “Next” button.
- Now, to restart the QuickBooks subscription, select the option “Advanced Connection Settings”.
- Now, click the “Advanced” tab.
- Choose the option “Restore Advanced Settings”.
- Next, select the “OK” button and then click the “Done” tab.
- Finally, try to renew the subscription and check if it has lapsed.
Solution 6: Product and License File Restoration
QuickBooks saves a file on the hard drive with product and license details. In the event of an issue, the file can be recovered easily using the steps shared below:

- Get the Product and License info. Search for it in case it is not available immediately.
- Now, exit QuickBooks Desktop.
- Now, click the Windows Start menu.
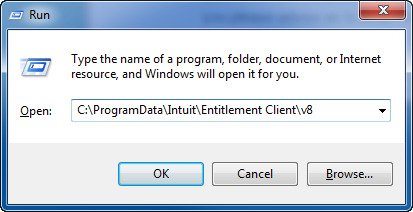
- Now, enter “Run” in the search box and then choose the “Run” tab.
- Next, type C:\ProgramData\Intuit\Entitlement Client\v8.
- Now, click the “Enter” button. In case the folder fails to open, type C:\ProgramData\Intuit\Entitlement Client\v6.
- Search for the “EntitlementDataStore.ecml” file.
- Right-click the file and select the “Delete” option.
- Now, select the “Yes” button to verify.
- Once the verification is done, start QuickBooks Desktop and open the company file.\
- Finally, complete the on-screen guidelines. Completing the instructions will help register QuickBooks once more with the license and product details.
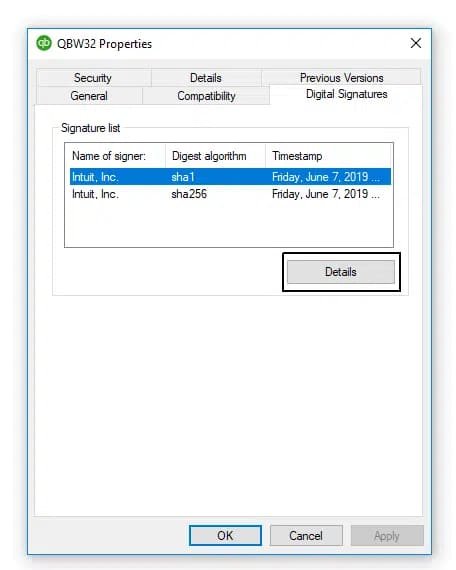
Solution 7: Digital Certificate Installation
Here are the steps to install a certificate with the help of the Google Chrome browser:
- Go to the website https://ratable.qbdt.intuit.com.
- Choose the padlock symbol from the address bar.
- Select the “View Certificates” option.
- Select the Symantec Class 3 secure server CA-G4 item in the certification path.
- Now, select the “View Certificate” option to get the certificate downloaded.
- The user needs to access the default option while importing.
- Now, a screen requesting a successful import will be displayed on the screen.
- The final step is to exit the certificate screen and retry updating and installation.
Solution 8: Reboot the Internet Explorer settings
Incorrect Internet Explorer settings often give rise to the QuickBooks subscription expired issue. Fix the issue by restarting the Internet Explorer settings:
- In this process, just open Internet Explorer.
- Now, go to the “Tools” menu and choose the “Internet “option.
- Click the “Alt” tab.
- Now, click the “Apply” and “OK” tabs to restore defaults.
- Lastly, just click on the “Apply and “OK” tab to finish.
Solution 9: Manually Disabling the Firewall
Resolve the issue by switching off the antivirus or firewall manually. Here are the steps to deactivate the firewall manually:
- Deactivate the firewall and switch off the antivirus software.
- Look for the third-party antivirus icon and right-click it.
- Now, click on the “Disable” button.
- Finally, check if the application is still displaying the error notification.
Conclusion
In this guide, complete information on how to resolve the “QuickBooks subscription has lapsed” error. From the causes and impacts to its troubleshooting methods, every detail has been shared. Still, if there is a query or doubt, feel free to reach out to us at SMBAccountants.com.
Struggling With Accounting or Bookkeeping?
Talk to our experts in minutes — No wait time!
- Free Consultation
- Fast Response
- Trusted Experts

Frequently Asked Questions
How to renew the subscription in the QuickBooks Desktop application?
QuickBooks Desktop subscription can be renewed via the “Help” menu in the software. Choose the Renew your subscription option, log in to the Intuit account, check billing information, and finish payment formalities. This will help to get complete access to features and services.
What happens when subscription renewal is postponed?
Users who delay renewal keep accessing QuickBooks Desktop in read-only mode for three years. Read-only permission allows checking reports, company data, and previous records without enabling editing or data entry.
Why does an error message appear when trying to get a subscription while installing QuickBooks?
It is quite likely to witness an error message while installing QuickBooks in the absence of an active subscription. The error message may read, “Sorry, it looks like you need a subscription to install QuickBooks Desktop.” Or “Sorry, we need to verify your subscription before installing QuickBooks Desktop”.
Is it necessary to buy QuickBooks once more if the subscription has lapsed?
No. It is not necessary to purchase a new product. The user can renew the previous QuickBooks subscription account. The subscription can be renewed by updating the billing information or payment process in the Intuit account.

