
QuickBooks Assign Class to Multiple Transactions
For multiple transactions in QuickBooks, a Class is defined where all the multiple transactions from an account of the customers are mentioned. This class keeps records of all the information related to the transactions in QuickBooks.
A class is assigned so that there is no confusion about the particular data or the number of transactions. Multiple transactions can be calculated only in the accountant version of QuickBooks not in the professional. In QuickBooks Pro and other versions, only one transaction at a time can take place.
So when there are transactions in bulk to reclassify them we need to assign a class to the multiple transactions in bulk. A class then keeps all the mass transactions to add on the transactions as soon as updated.
A tool by Client Data Review reclassifies your account register transactions to change them into multiple transactions. The tool helps you search for the transaction, change the account, or associate the class with matching transactions. Here, the tool can be used to reclassify income, expense & balance sheet accounts, and Cost of goods.
Before classifying transactions, access the Client Data Review Center. To access:
- Click on "Accountant," and click on "Client Data Review" in the drop-down menu.
- Now, use the left-hand pane to find the transaction and reclassify it.
- With this tool, you can easily select the account with the date and type of transaction.
- Once the account is selected, you will see the list of transactions in the right pane.
- You can also change transactions by clicking on the option and you can limit the transactions by transaction status, and name or you can show journal entries in QuickBooks.
Checkbox the transaction to reclassify multiple transactions. You can select between the options "De-Select All" and "Select All," this will speed up the process, according to your needs. For all the transactions, your basic data will remain intact when you reclassify.
Now, select the transaction, click on the "Class" or "Account" check box, and then select the option from the drop-down menu, this will help you move the item to the new class or account. Now, click on "Reclassify" to make certain appropriate changes.
Learn How to Assign the class to multiple transactions in the QuickBooks online edition
In QuickBooks Bookkeeping software, classes represent the significant segments in the company such as product lines. Before continuing forward, the client needs to ensure going to turn on class following. At the point when you set up the classes according to your concurring then you gain admittance to put together the vendor and client transaction by class. So, you can get a reasonable image of your productivity by business segment.
Assign a Class to Multiple Transactions
Here's how to assign a class to each column or thing in any transaction.
The first thing you have to know is the alternative to assigning one class to an entire invoice, receipt, or some other client transaction. This saves you time if you don't have to follow every item you sell by class.
If you need to follow your client transactions thusly, follow the means in the "Change how you label a class in client transactions" segment.
- In the first step, press the Select + New together
- Now, you have to choose the type of transaction that you want to save
- The last step is to add the subtleties of the transaction.
Assign a Class:
To assign one to the entire invoice or receipt, select the class drop-down at the top (in case you want to set one to an entire transaction). To assign one to everything, add the class in the Class section (in case you set one to each line in the transaction).
Point to be Noted: If you want to add another, then hit the Select + Add new at the highest point of the drop-down rundown to rapidly make another one. After this, Save your transaction, and you are all done.
If you want to download the bank transactions, then you will not need to add classes again when you match downloads to existing transactions in your books. In any case, if a downloaded bank transaction doesn't coordinate with any current transaction, you can assign a class to it and add it as another record.
To change how you assign a class in client transactions, the user required to perform the below guidelines
- Firstly, Open your Settings and click on the “Account and Settings” section
- Now, you have to choose the Advanced option
- Then select the Categories segment to Edit
- The next thing you have to do to choose the Track classes
- Select the Assign classes drop-down
- After this, you have to choose an entire transaction or One for each line in the transaction.
- Select the Save and Close button to end this program.
In another case, if you want to choose one for the entire transaction you don't have to enter a class for every item you offer to a client.
In QuickBooks, you can also reclassify the transaction
QuickBooks permits you to reclassify transactions starting with one account or class and then onto the next. This comes in particularly helpful when numerous transactions were presented on some unacceptable account, or when you need to clean up enormous, uncategorized business ledgers. Reclassify Transactions to assist you with being more efficient. Folding segments, more explicit channels, the capacity to choose different transactions, and an invigorating new plan (indeed, with lines that line up) make cleanup work simpler than at any other time.
Where do I discover it?
In QuickBooks Online Accountant, first click on the folder case symbol to open the Accountant Toolbox, which shows once you're in your client's books. Then implement the below-mentioned steps:
- ThRe-classify or move different transactions on the double
- The next thing is to figure out how to utilize the reclassified transactions to clump edit the transactions for your client.
In QuickBooks Online Accountant, you don't need to edit them each in turn. Utilize the reclassify to save time and roll out similar improvements to different transactions without a moment's delay.
Find out About the kinds of Transactions you can't move
You can utilize reclassify for most transactions. Nonetheless, there are a couple of you can't since they're attached to explicit accounts and highlights:
- You can't change the payment account for costs.
- You can't change the account or class for inventory adjustments since they're associated with your inventory shrinkage and resource accounts.
- You can change the class for invoices, cash updates, checks, or bills with things on them. Be that as it may, you can't change the accounts.
- You can change the business ledger for billable costs, yet not the paid account for the connected pay transactions.
How can I manage the bank Transactions in the Payroll menu?
Step 1: Find the transactions you need to reclassify
- If you understand what transactions you need to transform, you can skirt this progression.
- You can go into your client's QuickBooks Online company and run a reporting channel for explicit transactions and dates.
- Open your client's QuickBooks Online company.
- Select the Accountant and afterward Report choices.
- Set the dates for the report.
Step 2: Reclassify and move transactions
Utilize the reclassify to move transactions to comparable accounts or change their classes. You can likewise reclassify accounts, classes, and deal charge codes.
- Open your client's QuickBooks Online company.
- Select the Accountant and afterward Reclassify Transactions.
- From the Account types drop-down menu, select Profit and Loss to see pay and business ledgers. Or then again select the Balance Sheet to see your resource, obligation, and value accounts.
- From the Account list, select the account with the transactions you need to change.
- Utilize these sort, class, client, and change channels to channel the rundown.
Point to be Noted: You can likewise choose Accrual to see all paid and neglected transactions or Cash to see just paid transactions.
- Now, choose to Find Transactions.
- Then, select the checkbox for every transaction you need to change.
- Before you move transactions to Accounts Receivable or Accounts payable, ensure there's a client or provider. Try not to leave these fields clear.
- Choose the Reclassify option from the available preferences
- After this, choose another account to move the transactions from the Change account to the dropdown, or another class from the Change class to the dropdown.
- At the point when you're prepared, select Apply and the process is finished
Point to be Noted: You can likewise utilize the reclassify for your association's transactions in QuickBooks Online Accountant. At the point when you're on your company's page, select Accountant and Reclassify Transactions.
Reclassify by Location
Use can likewise reclassify transaction locations. To start with, ensure locations are turned on for your client.
- First of all, open your client's QuickBooks Online company.
- Then, open the Settings menu and choose Account and Settings.
- Click on the Advanced tab option.
- Go to the Categories segment and click on the Edit option.
- Now, you have to choose the Track locations.
- From the Location mark dropdown menu, choose the Location.
- Click on the Save button and you are all done with this program.
QuickBooks Change the Class on Multiple Transactions instead of plowing through each transaction
If you're talking about the downloaded transactions from your bank, it is indeed possible to modify the class assignment for multiple transactions simultaneously. However, please bear in mind that the Class field will only be accessible if you have configured classes in your Account Settings.
On the banking page, you can change it as follows:
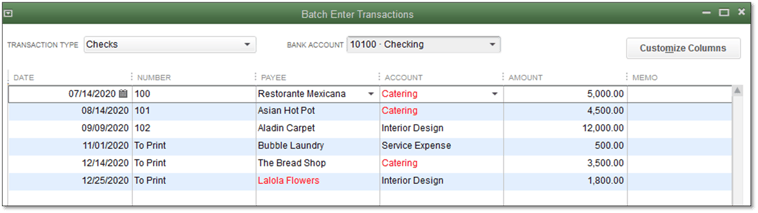
- From the Accountant menu > Batch Enter Transactions.
- Choose the appropriate transaction type and account.
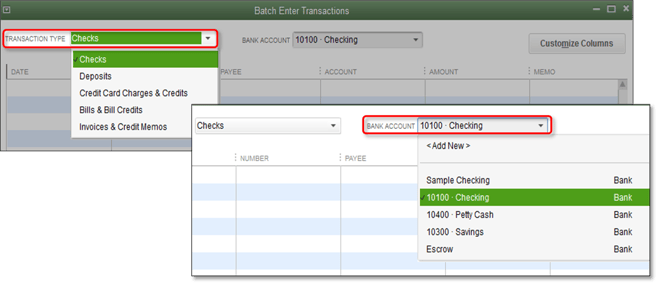
- Open the spreadsheet with the transactions you want to input into QuickBooks Desktop. Organize the columns in your spreadsheet to align with the column order in the Batch Enter Transactions window.
- Highlight the information, right-click on it, and then choose "Copy."
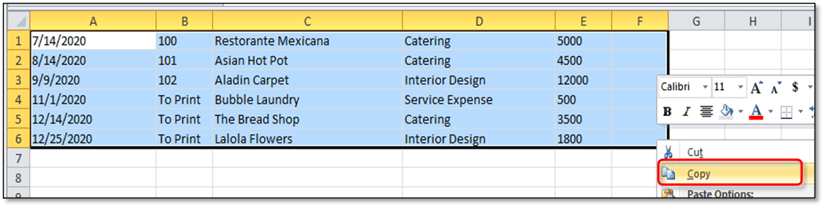
- Right-click the first date field in the Batch Enter Transactions window and select Paste.
Note: If a detail is not currently listed in the company file, it will turn red. Select the detail in red and select Quick Add or Set Up.
Add multiple split lines on my transaction
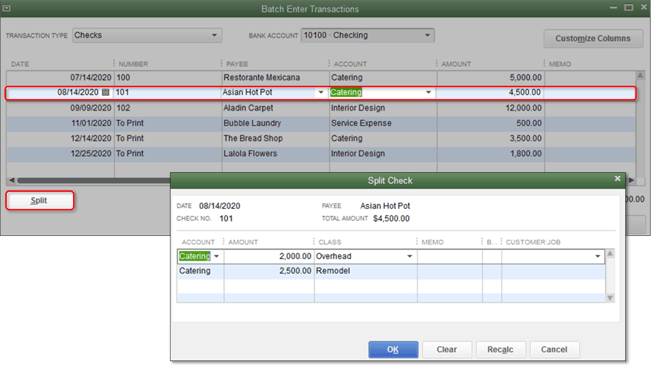
Split transactions enable you to add one or more additional split lines to a transaction.
- Highlight the transaction if you want to add split lines.
- Click on the "Split" button.
- Enter the necessary information for each split on separate lines.
- Click "OK" to go back to the Batch Enter Transactions window.
- Repeat steps one to four for each transaction requiring multiple split lines.
All transactions selected are affected by the specified information. You will need to change the class for each transaction if they are already matched or added or if they were manually created.
Still, find it difficult to understand?
If you still think it is difficult to understand, you can contact us on our Quickbooks Accounting Software number smbaccountants.com at any time and our team will answer your queries in no time. You can also have live chat with Expert professionals at your convenience.
Frequently Asked Questions
How to Classify numerous transactions in QuickBooks?
To classify numerous transactions in QuickBooks, you need to perform the below steps
- The first thing to do is to click on the “Expenses” option which is located at the left route bar.
- Then need to mark the cases of the costs you'd prefer to sort
- After that, hit your click on the Batch Actions drop-down rundown
- As per your business scheduling program, choose Categorize choose
- Pick the classification you need, and click on the APPLY option. You are enabling us to categorize all multiple transactions
How to categorize multiple transactions in QuickBooks at once?
Navigate to the Banking or Transactions section in the sidebar menu. Go to the Banking tab and select the relevant bank account. Choose the "For review" tab, then mark the checkboxes next to the transactions you want to categorize. Click the "Update" button, and then choose the appropriate category from the drop-down menu.
Can you bulk reclassify transactions in QuickBooks Online?
If you need to modify multiple transactions or transfer them to a different account, QuickBooks Online Accountant and QuickBooks Online Advanced offer a time-saving solution. Instead of editing each transaction individually, utilize the reclassify tool to apply the same change to multiple transactions simultaneously.
How would I appoint a class for various transactions in QuickBooks?
You can easily appoint a class to various transactions, just go with the below steps
- First of all, choose the specific section for the Review tab.
- Then need to check and verify the containers for every single transaction, you need to alter.
- From the Batch Activities drop-down menu, select the Modify option.
- Utilize the fields in the Modify Selected exchange to determine the Class as per your accordingly.
How would I erase transactions in bulk in QuickBooks?
To make the process faster and to avoid some error issues, make sure you delete all unnecessary records of transactions. QB users usually face many problems when they try to delete transactions in bulk.
To process this procedure, go to the Accountant menu first and select the Batch Delete/Void Transactions you want to delete. Select the transactions you need to erase or void from the Available Transactions list. Then choose the Review and Delete (or Review and Void). At last, Select Back Up and Delete or Back-Up and Void.
How would I solidify and expel quite a while of transactions?
To solidify and expel quite a while of transactions, follow the below instructions
- Hit your first click on the File menu
- Then choose the Utilities from the drop menu options
- And afterward, pick Condense Data
- You have to choose how would you like to consolidate your document/file
- Proceed forward with the NEXT click, at that point, a notification working on your record currently will show up.
How would I move transactions between accounts in the QuickBooks work area?
To move transactions, you have to choose the crate for every single transaction you want to change or move. After taking this approach, pick the “Reclassify” option. Then choose another record file where you want to move these transactions or you can choose any class from the available preferences. After taking these entire steps, check and verify carefully and click on the “APPLY” option.
How do I change the class of multiple transactions in QuickBooks?
Reclassify and move transactions
- Access your client's QuickBooks Online company.
- Navigate to Accountant Tools and choose Reclassify transactions.
- Utilize the Account types dropdown menu and opt for Profit and Loss to view income and expense accounts.
- Pick the account from the Account list that contains the transactions you wish to modify.