

QuickBooks Error C=224 is a technical data corruption issue that typically occurs when exporting reports to Excel or backing up your company file. This error signals a breach in data integrity, often triggered by an invalid split line in a transaction or an excessively large file size. When QuickBooks struggles to read a memorized transaction, this error warns of underlying database corruption.
To resolve this issue, ensure your software is up to date. You can fix the problem by running the Verify and Rebuild Data utility or using the QuickBooks File Doctor tool. These steps help repair the file and restore your accounting data.
Table of Contents
- 1 When does QuickBooks Error Code C=224 occur?
- 2 What are the Causes of QuickBooks Error C 224?
- 3 Solutions to Resolve the QuickBooks Error C=224
- 3.1 Solution 1: Review the QuickBooks Application Version and File
- 3.2 Solution 2: Update QuickBooks Desktop to Latest Version
- 3.3 Solution 3: Erase the ECML files
- 3.4 Solution 4: Run the QuickBooks Verify and Rebuild Data Utility
- 3.5 Solution 5: Rename the TLG File
- 3.6 Solution 6: Access the QuickBooks Repair Tool to Fix the QBW File
- 4 Conclusion
- 5 Frequently Asked Questions
When does QuickBooks Error Code C=224 occur?
QuickBooks Error C=224 arises while accessing data or processing operations. The issue restricts the file activities and disrupts regular bookkeeping tasks.
Here is the list of the instances when C 224 arises:
- The error arises while accessing the company file.
- The error arises while using the Rebuild Data under the “File” segment in the “Utilities” menu.
- The error arises while sending data to Excel.
- The error arises while taking a company file backup.
- The error arises while using the Verify Data under the “File” segment in the “Utilities” menu.
- The error arises while accessing reports connected to a damaged company file.
- The error displays while transaction or an invoice.
Struggling With Accounting or Bookkeeping?
Talk to our experts in minutes — No wait time!
- Free Consultation
- Fast Response
- Trusted Experts

What are the Causes of QuickBooks Error C 224?
Here is the list of the key reasons that trigger the error C 224:
- Outdated QuickBooks Desktop version.
- Damaged or corrupted transaction log files.
- Corrupted QBWUSER.INI file.
- Disrupted or unreliable network connectivity.
- The company file is corrupted or damaged.
- Corrupted Windows Registry files
- The system fails to address the basic requirements of QuickBooks Desktop.
- The file exported included damaged or irrelevant data.
Solutions to Resolve the QuickBooks Error C=224
Multiple solution steps can help fix the QuickBooks Error C 224. Every method resolves a certain cause like system errors or corrupted files. Ensure to implement the solutions one after another, depending on the root cause of the issue.
Here are the solutions to fix QuickBooks Error code C 224:
Solution 1: Review the QuickBooks Application Version and File
Users experience QuickBooks error C 224 while sending reports to Excel from QuickBooks. It generally arises while exporting from a recent version of QuickBooks to an older version of Excel. Hence, ensure to use an Excel version that aligns with the QuickBooks edition.
In addition, ensure there is no problem with the export file. Review the file name and format to detect the presence of any issues.
Solution 2: Update QuickBooks Desktop to Latest Version
Sometimes, a simple update can resolve the error. Hence, it is recommended to update QuickBooks to its current version using the steps shared below:
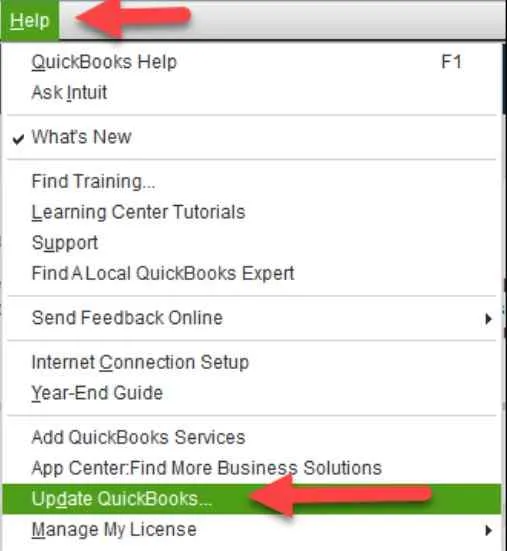
- First, start the QuickBooks software.
- Now, navigate to the “Help” tab.
- Head to the option “Update QuickBooks”.
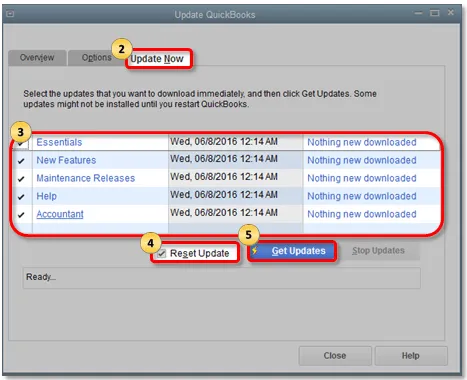
- Now, go to the “Update Now” tab.
- Now, choose the option “Reset Update” to remove all previous update downloads.
- Select the option “Get Updates”.
- Now, click the “New Update” tab.
- Allow the download procedure to complete and restart the software.
- Complete the onscreen guidelines and finish the procedure.
- Once the procedure is complete, the error C 224 will be fixed.
Solution 3: Erase the ECML files
Erase the entitlement client files to check if the issue C 224 persists or not. Perform the following steps to eliminate the ECML files:
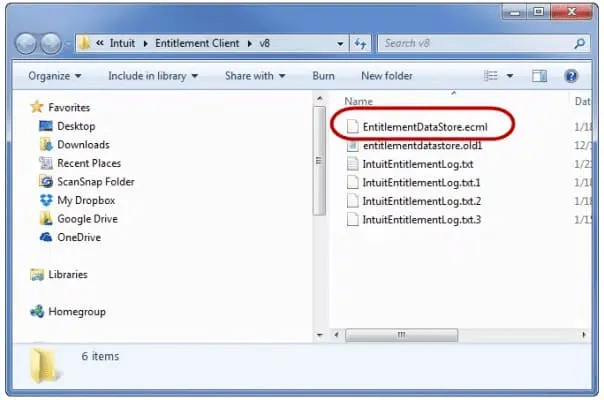
- First, click the keys “Windows + R”.
- In the Windows that appear, type “C:\Program Data\Intuit|Entitlment Client\v8”.
- Now, erase the ecml file by selecting the “Delete” option.
- Now, exit the window once it is complete.
- Exit QuickBooks and then click the “Continue” tab. This will re-register the product.
Solution 4: Run the QuickBooks Verify and Rebuild Data Utility
This solution includes a two-step process for reviewing and correcting the error code C 224. Here are the steps to run the Verify and Rebuild Data Utility tool:
Step 1: Access the Verify Data Tool to confirm any data damage
- Start by running the QuickBooks Desktop application together with the company file.
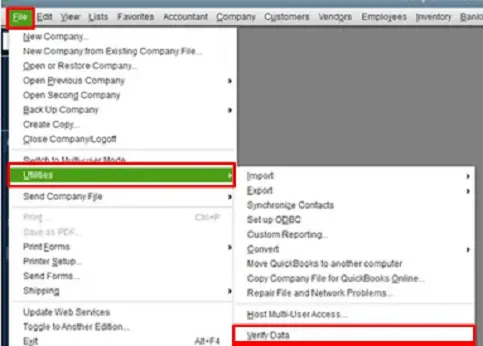
- Now, go to the “File’ menu and then click the “Utilities” tab.
- Now, search for the “Verify” data option. Click the option.
- Now, to start the verification procedure, click the “OK” button.
- Click the “OK” button after the process completes.
Step 2: Access the Rebuild Data Tool to correct any data corruption
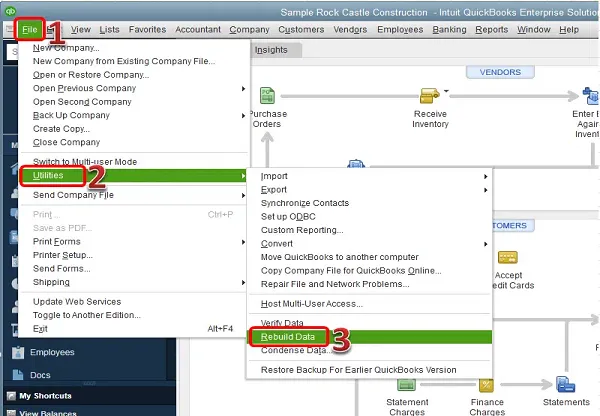
- Once the verification is over, access the Rebuild tool.
- Now, access the QuickBooks application and go to the “File” menu.
- Now, click the “Utilities” tab and then click the “Rebuild Data’ option.
- Now, take a backup of the company file.
- Click the “OK” button.
- Save the backup in a desired location.
- Click the “Next” tab.
- Now, select the “Browse” option to search for a location for the backup file.
- Allow the process to finish and then click the “OK” button to save the file.
- Finally, complete the on-screen guidelines to recreate the data properly.
Solution 5: Rename the TLG File
This file is needed to set up a connection with QuickBooks for multi-user access. When the .TLG is corrupted, and a C 224 error arises that can be resolved by renaming the file. Here are the steps to rename the .TLG file:
- Head to the folder where the QBW file is saved.
- Locate the .TLG file that matches the company file name.
- Select the file and right-click it.
- Now, choose the “Rename” button.
- At the end of every file name, include “old”.
Note: Renaming the file enables QuickBooks to create it automatically and fix the error.
Solution 6: Access the QuickBooks Repair Tool to Fix the QBW File
In case the Rebuild and Verify data utility tool fails to fix it, it signifies a serious issue with the company file. Using an improved QuickBooks repair tool like the File Doctor can help.
Here are the steps to use the QuickBooks File Doctor to resolve the error C 244:
Step 1: Download the QuickBooks Tool Hub and install it.

- Download the current version of QuickBooks Tool Hub.
- Now, save it in a preferred folder.
- Now, access the QuickBookstoolhub.exe file
- Give consent to the terms and conditions and complete the on-screen guidelines.
- Once the installation is complete, click on the QuickBooks Tool Hub twice to use it.
Step 2: Run the Quick Fix My Program File
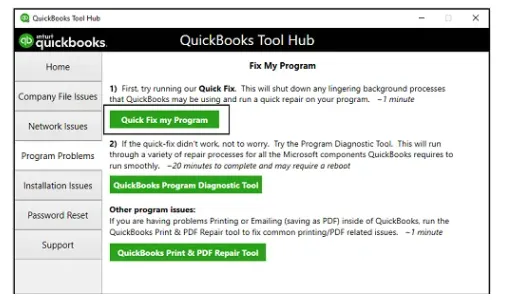
- Click the tool hub and then choose the company file issue.
- Select the “Quick Fix my File” option.
- To start the QuickBooks application, click the “OK” button.
Conclusion
In this guide, complete information on the QuickBooks error C 224 has been shared. This guide includes the causes and effective troubleshooting steps to fix the error with ease. Still, if there are any additional queries or questions, feel free to reach out to QuickBooks experts at SMBAccountants.com. You can get in touch with our team of certified QuickBooks professionals and experts. Our experts have adequate knowledge to deal with such issues.
Frequently Asked Questions
What are the symptoms of QuickBooks Error C 224?
Error C 224 arises when QuickBooks fails to open during startup, company file, or backup access. Users experience poor response, sudden freezing, unexpected error reminders, or unsuccessful exports.
Does QuickBooks error C 244 influence QuickBooks company data?
QuickBooks error C 224 influences company data when it is not fixed. It leads to unsuccessful backups, corrupted transactions, and partial records. With time, data accuracy becomes worse. However, daily backups and using the QuickBooks File Doctor safeguard financial reports and fix corrupted company files.
How to avoid QuickBooks data file corruption connected to error C 244?
Users avoid data damage by performing daily backups in different locations. Additionally, users limit third-party external tools, prevent malware experience, and frequently update QuickBooks. Such steps secure transaction accuracy and minimize risks connected to error C 224.
Can the Error C 224 impact all the QuickBooks Desktop versions
Error C 224 impacts several QuickBooks Desktop versions. Outdated versions witness the error frequently due to corrupted components, bugs, or unavailable updates. Installing the current QuickBooks release minimizes error incidence and enhances the reliability of the company file.

