

Importing data through CSV files allows you to move large volumes of financial information into QuickBooks without manual data entry. This process is essential for migrating bank transactions, customer lists, vendor details, and the Chart of Accounts from external spreadsheets or financial institutions.
To successfully import CSV into QuickBooks, you must format your file according to specific column requirements and map those fields to the corresponding attributes in your company file. Properly preparing your spreadsheet helps you import CSV into QuickBooks more accurately across different company files.
This guide covers the verified steps to import CSV into QuickBooks Online, QuickBooks Desktop, and QuickBooks Self-Employed. You will learn how to prepare your files, navigate the internal import utilities, and resolve common formatting errors across all three platforms.
Table of Contents
- 1 Understanding CSV in QuickBooks
- 2 How to Import CSV into QuickBooks Desktop and Online?
- 3 How to Import CSV Data into QuickBooks Self-Employed
- 4 Troubleshooting Common Issues While Importing Data into QuickBooks
- 5 Best Practices for Bulk Data Import
- 6 Conclusion
- 7 Frequently Asked Questions
- 7.1 What file types are supported for imports in QuickBooks Online and QuickBooks Self-Employed?
- 7.2 Can I undo a CSV import in QuickBooks Online?
- 7.3 Why are my column headers not appearing during mapping in QuickBooks Online?
- 7.4 Can I import transactions into a sub-account in QuickBooks Online?
- 7.5 What is the maximum limit for a bulk transaction upload in QuickBooks Online?
Understanding CSV in QuickBooks
A CSV (Comma-Separated Values) file stores data in a structured spreadsheet format that QuickBooks reads during the upload process. You can use these files for bulk data import tasks, including adding new customers, updating vendor details, or managing Products and Services lists. Although the menu paths differ across QuickBooks Online, Desktop, and Self-Employed versions, the general sequence remains the same: you upload the file, map the CSV headers to the corresponding QuickBooks fields, review the entries, and finalize the data transfer. The CSV import QuickBooks process becomes easier when the spreadsheet follows the correct formatting structure.
Prerequisites to Import CSV into QuickBooks
Before you begin, ensure your data meets these technical specifications to avoid errors:
- Save your data file strictly in the .csv format.
- Note that QuickBooks Online and Desktop also support .xls or .xlsx specifically for list imports.
- Organize banking files into a 3-column format containing Date, Description, and Amount.
- Use a 4-column format for banking files if your bank provides separate Debit and Credit columns.
- Remove all currency symbols and commas from numerical values to prevent import failures.
- Standardize all dates into a single format, such as MM/DD/YYYY, to match your QuickBooks company settings.
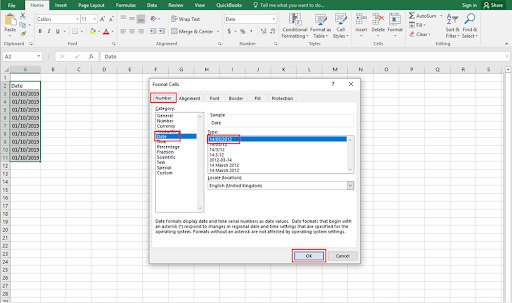
- Ensure the file contains a single header row at the top of the spreadsheet to enable field mapping.
How to Import CSV into QuickBooks Desktop and Online?
Below are the mentioned steps to import CSV into QuickBooks Desktop & Online:
Steps to Import CSV into QuickBooks Desktop (Data File)
To import CSV into QuickBooks Desktop, you must use the QuickBooks Import Excel and CSV Toolkit to process list data.
Using the Import Utility
- Open the File menu at the top of the screen.
- Select Utilities and then choose Import.
- Click CSV Files from the list of available import types.
- Download the QuickBooks Import Excel and CSV Toolkit if the system prompts you for installation.
- Open the CSV Examples folder within the toolkit to verify the required header names for your data.
- Select your CSV file within the QuickBooks import window.
- Choose the destination list for the data you are importing.
- Review and map the CSV columns to the correct QuickBooks fields.
- Select Local Backup to create a restoration point for your data before proceeding.
- Click Import to complete the data transfer.
Steps to Import CSV in QuickBooks Online (Data File)
QuickBooks Online provides tools within the Settings and Transactions menus to handle different data types. These tools help users import CSV into QuickBooks Online for customer lists, bank transactions, and vendor records.
Importing Lists (Customers, Vendors, Products)
- Click the Gear icon (Settings) in the upper right corner of the dashboard.
- Choose Import Data under the Tools column.
- Pick the data type you want to add, such as Customers, Vendors, Chart of Accounts, or Products and Services.
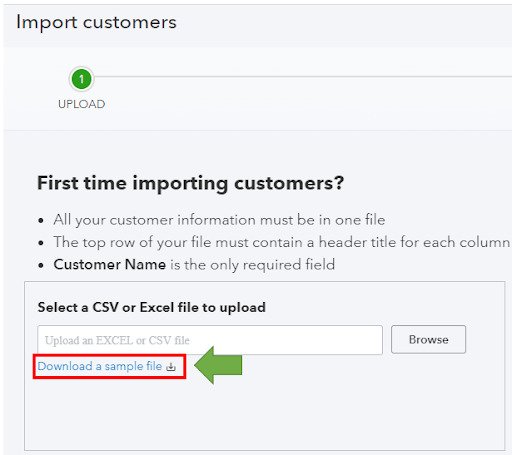
- Click Browse to find the CSV file on your computer and select Open.
- Select Next to move to the Map your fields screen.
- Match the QuickBooks Online Field labels to the corresponding headers in your CSV file using the dropdown menus.
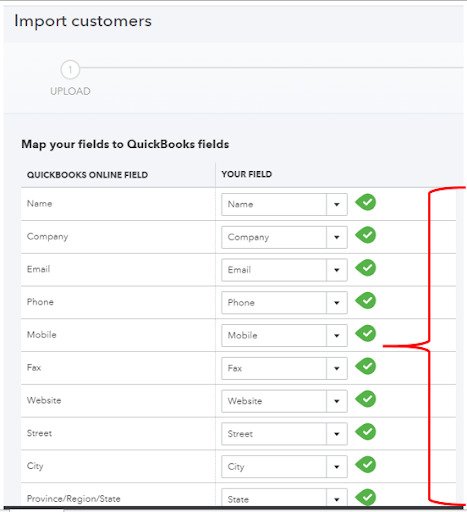
- Select Next to open the data preview window.
- Review all entries for accuracy and clear any highlighted errors.
- Click Import to add the list data to your company file.
Importing Bank Transactions
- Go to Transactions in the left navigation menu and select Bank transactions.
- Click the dropdown arrow next to the Link account button and choose Upload from file.
- Drag and drop your file into the upload box or choose select files.
- Choose the specific bank or credit card account from the QuickBooks account dropdown menu.
- Map the Date, Description, and Amount columns according to your file structure.
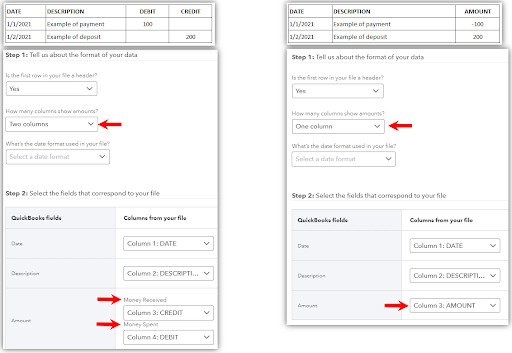
The following example shows how QuickBooks maps CSV files that use either a single Amount column or separate Debit and Credit columns during bank transaction imports.
- Check the boxes for the specific transactions you wish to include.
- Select Continue to move the transactions into the For Review tab.
- Click Done to finish.
How to Import CSV Data into QuickBooks Self-Employed
QuickBooks Self-Employed provides a simplified tool for importing bank data and historical transactions that are unavailable through direct bank feeds. This workflow helps users import CSV into QuickBooks Self-Employed when direct bank syncing is unavailable.
- Click the Settings (gear icon) on the main dashboard and choose Imports.
- Select Import transactions for the bank account you are updating.
- Select Browse to find your CSV file.
- Click Open and then select Continue.
- Map the columns in your file to the Date, Description, and Amount fields.
- Select Continue to review the list of transactions identified by the system.
- Select Import to add the transactions to your account ledger.
Troubleshooting Common Issues While Importing Data into QuickBooks
| Issue | Cause / Problem | Solution |
| Duplicate Entries | Transactions were already imported previously. | Delete duplicate transactions manually from the For Review tab to keep your balances accurate. |
| Invalid Date Errors | The date format in the CSV does not match the mapping. | Verify that the CSV date format matches the selection made during mapping (e.g., MM/DD/YYYY). |
| Empty Mapping Dropdowns | The CSV file does not contain a header row. | Add a single header row at the top so QuickBooks can identify and map the columns correctly. |
| Upload Failures | The CSV file is empty or contains zero-byte data. | Replace the file with a CSV containing valid transaction records. |
| Invalid File Errors | The file contains non-ASCII characters or extra commas. | Remove unsupported characters and unnecessary commas inside cells to ensure the file reads properly. |
Best Practices for Bulk Data Import
Following these practices helps you import CSV into QuickBooks with fewer formatting and mapping errors:
- Download the sample CSV templates from the Import Data screen to ensure your headers match QuickBooks requirements.
- Please remove any empty rows and extraneous text from your Excel spreadsheet before you upload.
- Consolidate all transaction amounts into a single column and ensure no currency symbols remain in the cells.
- Break large data sets into smaller batches if the upload process becomes slow or unstable.
- Always create a backup of your company file before performing a bulk data import to protect your financial records.
Conclusion
To successfully import CSV into QuickBooks, you need precise file preparation and accurate field mapping. By following these steps for Online, Desktop, or Self-Employed versions, you can maintain accurate financial records and save hours of manual data entry. Always perform a quick review of your data after the import to confirm everything is categorized correctly. With your bank transactions and lists organized, you can move directly to reconciliation and financial reporting with confidence. Following the correct CSV import QuickBooks workflow helps you maintain accurate accounting records across every version.
Struggling With Accounting or Bookkeeping?
Talk to our experts in minutes — No wait time!
- Free Consultation
- Fast Response
- Trusted Experts

Frequently Asked Questions
What file types are supported for imports in QuickBooks Online and QuickBooks Self-Employed?
QuickBooks Online and Self-Employed support .csv files for transactions. QuickBooks Online also accepts .xls and .xlsx for list data like Customers and Vendors.
Can I undo a CSV import in QuickBooks Online?
You can batch-delete transactions from the Banking menu if they are not yet reconciled. However, list items like Vendors or Products must be manually deleted or deactivated.
Why are my column headers not appearing during mapping in QuickBooks Online?
This happens if the file lacks a header row or contains multiple header rows. Ensure only one header row exists at the very top of the file.
Can I import transactions into a sub-account in QuickBooks Online?
Yes. Choose the specific sub-account from the QuickBooks account dropdown menu during the mapping stage to ensure data is categorized correctly.
What is the maximum limit for a bulk transaction upload in QuickBooks Online?
QuickBooks does not publicly specify a strict row limit for CSV imports. However, large files may slow down the upload process. Splitting large files into smaller batches can help reduce import issues during bulk data import tasks.

